background image

7. Installation menu

Image 7-7
Installation menu, Warp

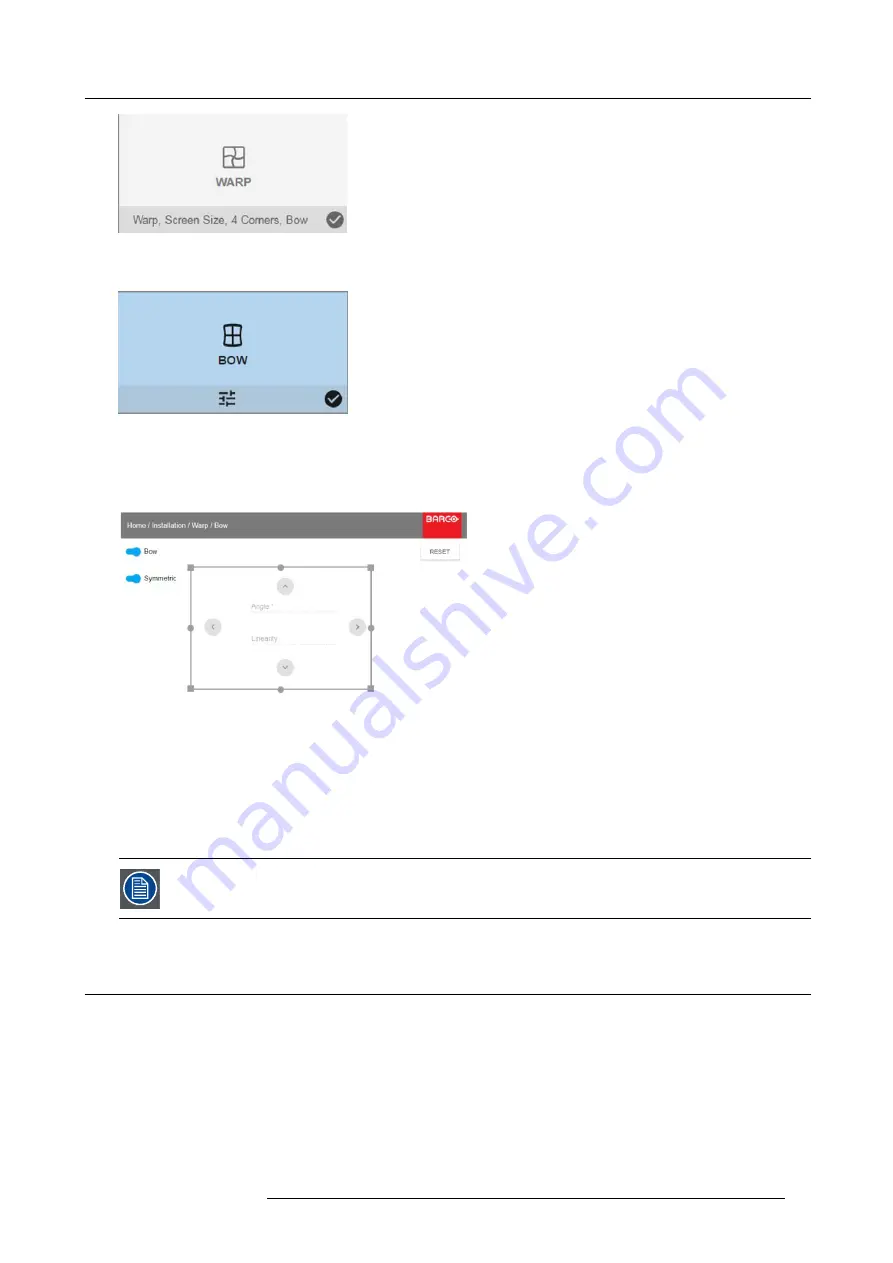
2. In the Warp menu, select

Bow

.

Image 7-8
Warp menu, Bow

A check symbol at the bottom right corner indicates that the bow function is activated.

3. To enable Bow correction, make sure the

Bow

slider is set to

On

.

The slider is enabled when set to the right and when it is colored blue.

Image 7-9
Bow adjustment

4. To enable a symmetric adjustment, make sure the

Symmetric

slider is set to

On

.

The slider is enabled when set to the right and when it is colored blue.

5. Select an adjustment point and use the arrow keys to adjust.

When selecting a mid point of an edge, the bow angle can be adjusted.

When selecting a corner point, the linearity can be adjusted.

To reset the bow adjustments, select

Reset

and press the OK button.

7.5

Basic Blend

About

When two projectors are used together to make one picture on the screen, the blend function must be activated. This blend function
ensures a seamless transition of the images between the two projectors.

The principle is that the light intensity in the blend zone from each projector will be adjusted individually, so that the rendering on the
screen are perceived as from one projector.

The blend function can be enabled for both pictures over/under, and pictures side by side.

601–0442 BALDER 13/09/2017

45

Summary of Contents for Balder

Page 1: ...Balder Installation Manual 601 0442 00 13 09 2017 ...

Page 2: ...Barco Fredrikstad AS Habornveien 53 N 1630 Gamle Fredrikstad Norway Phone 47 6930 4550 Fax 47 6930 4580 Support Support fre barco com Visit us at the web www barco com Printed in Norway ...

Page 3: ...names mentioned in this manual may be trademarks registered trademarks or copyrights of their respective holders All brand and product names mentioned in this manual serve as comments or examples and are not to be understood as advertising for the products or their manufacturers Turkey RoHS compliance Türkiye Cumhuriyeti AEEE Yönetmeliğine Uygundur Republic of Turkey In conformity with the WEEE Re...

Page 4: ...ed incorrectly or if after the transfer of risks the goods are subject to influences not agreed upon in the contract all guarantee claims of the purchaser will be rendered invalid Not included in the guarantee coverage are system failures which are attributed to programs or special electronic circuitry provided by the purchaser e g interfaces Normal wear as well as normal maintenance are not subje...

Page 5: ...rocedure 25 4 Getting started 29 4 1 Projector source and control connections 29 4 1 1 Making connections 29 4 1 2 Connector specifications 29 4 1 2 1 DVI I 29 4 1 2 2 Display Port 1 2 30 4 1 2 3 HDMI 2 0 30 4 1 2 4 3G SDI 31 4 1 2 5 HDBase T 31 4 1 3 Control interfaces 31 4 1 3 1 RS 232 32 4 1 3 2 LAN Ethernet 32 4 1 3 3 USB A port 32 4 2 Power up the projector 32 4 3 Power down the projector 32 ...

Page 6: ...Group 3 Safety 51 9 1 General considerations 51 9 2 Safety Training provided by the installer 51 9 3 High Brightness Precautions 51 9 4 Hazard Distance for fully closed projection system 53 9 5 HD in function of the lens Throw Ratio TR 54 2 601 0442 BALDER 13 09 2017 ...

Page 7: ...der products in general are all products within the Barco GP7 Platform Overview General considerations Important safety instructions Projector Hazard Distances Safety symbols RoHS compliance Contact adresses Product Info Statement 1 1 General considerations WARNING Be aware of suspended Loads WARNING Wear a hard hat to reduce the risk of personal injury WARNING Be careful while working with heavy ...

Page 8: ...pment please read this manual thoroughly and retain it for future reference Installation and preliminary adjustments should be performed by properly trained and qualified personnel All warnings on the projector and in the documentation manuals must be adhered to All instructions for operating and use of this equipment must be followed precisely All local installation codes should be adhered to Not...

Page 9: ...uld any liquid or solid object fall into the cabinet unplug the set and have it checked by qualified service personnel before resuming operations Do not disassemble this projector always take it to an authorized trained service person when service or repair work is required Do not use an accessory attachment which is not recommended by the manufacturer Lightning For added protection for this video...

Page 10: ...ers in place Always remove lens cap before switching on the projector If the lens cap is not removed it may melt due to the high energy light emitted through the lens Melting the lens cap may permanently damage the surface of the projection lens Only connect the projector to signal sources and voltages as described in the technical specification Connecting to unspecified signal sources or voltages...

Page 11: ...l Barco replace ment parts Unauthorized substitutions may result in degraded performance and reliability fire electric shock or other hazards Unauthorized substitutions may void warranty Safety check Upon completion of any service or repairs to this projector ask the service technician to perform safety checks to determine that the product is in proper operating condition 1 3 Projector Hazard Dist...

Page 12: ...IS PRODUCT IS IN CONFORMITY WITH PERFORMANCE STANDARDS FOR LASER PRODUCTS UNDER 21 CFR 1040 EXCEPT WITH RESPECT TO THOSE CHARACTERISTICS AUTHORIZED BY VARIANCE NUMBER 2016 V 0144 EFFECTIVE MARCH 6 2017 Location of Safety Label Image 1 1 Balder Projector Disposal Information Waste Electrical and Electronic Equipment This symbol on the product indicates that under the European Directive 2012 19 EU g...

Page 13: ... According to the Management Methods for the Restriction of the Use of Hazardous Substances in Electrical and Electronic Prod ucts Also called RoHS of Chinese Mainland the table below lists the names and contents of toxic and or hazardous substances that Barco s product may contain The RoHS of Chinese Mainland is included in the MCV standard of the Ministry of Information Industry of China in the ...

Page 14: ...re 外殼 O O O O O O Enclosure 電池 組 O O O O O O Batteries 文件茢明書 O O O O O O Paper Manuals 裝置配件 O O O O O O Installation kit 附電池遙控器 X O O O O O Remote control 本表格依據 SJ T 11364 的規定編制 This table is prepared in accordance with the provisions of SJ T 11364 O 表示該有毒有害物質在該部件所有均質材料中的含量均在 GB T 26572 標準規定的限量要求以下 O Indicates that this toxic or hazardous substance contained in all of the homogeneous materials for...

Page 15: ...aper Manuals O O O O O O 装置配件 Installation kit O O O O O O 附電池遙控器 Remote control X O O O O O 本表格依据SJ T 11364的规定编制 This table is prepared in accordance with the provisions of SJ T 11364 O 表示该有毒有害物质在该部件所有均质材料中的含量均在 GB T 26572 标准规定的限量要求以下 O Indicates that this toxic or hazardous substance contained in all of the homogeneous materials for this part is below the limit requirement in GB T 26572 X 表示该有毒有...

Page 16: ... Contact adresses For Taiwan Barco ltd 33F No 16 Xinzhan Rd Banqiao Dist New Taipei City 220 Taiwan Tel 886 2 7715 0099 Fax 886 2 7715 0097 E mail service taiwan barco com 1 7 Product Info Product info Image 1 3 product name 產品名稱 projector 投影機 model 型號 GP7 1 8 Statement EN55032 CISPR32 Class A MME MultiMedia Equipment Warning This equipment is compliant with Class A of CISPR 32 In a residential en...

Page 17: ...isk Group 3 RG3 when an interchangeable lens with throw ratio greater than 4 7 is installed For Northern America installation requirements according to Risk group 3 RG3 must be followed when interchangeable lens with throw ratio greater than 2 5 is installed Refer to the manual chapter 2 5 for the throw ratio versus hazard distance before operation 2 2 Lens range CAUTION Always remove the lens fro...

Page 18: ... 1 13 1 EN45 2 4 3 29 Yes 2 4 6 5 1 51 15 85 23 93 5 0 30 FLD Lens 0 75 1 13 1 EN46 2 4 3 29 Yes 2 4 6 5 1 51 15 98 23 99 0 7 7 FLD Lens 0 65 1 EN47 2 1 Yes 2 1 6 0 12 6 0 5 4 0 2 3 Replace a lens Lens lever The Balder lens mount and lens lever is designed to prevent damage to the lens board while providing an easy and stable lens change procedure The lens lever located at the bottom of the lens m...

Page 19: ... marking on the bayonet is facing upwards 5 Position the lens bayonet into the projector lens mount and support in place with one hand 6 Slide the lens lever to the far right 7 Verify that the lens is firmly in place before removing your hand from the lens Image 2 3 Remove a lens 1 Support the lens with one hand 2 Use the other hand to slide the lens release lever to the far left position 3 Pull t...

Page 20: ... lock is particularly important in moving platform applications in order to avoid that the lens comes out of position during operation See the procedure explained below to perform this WARNING This procedure must be performed ONLY by Barco trained service personnel Opening the unit may cause a risk of electrical shock and exposure to high intensity laser beam See also the Safety chapter in this ma...

Page 21: ...ighten the screws with a sufficient torque The green circles indicate the lock for the vertical shift and the red circles indicate the lock for the horizontal shift All four locking positions must be used to achieve a sufficient locking Image 2 7 7 Reinstall the front cover 8 Reinstall the Projector lens 2 6 Adjust zoom and focus General Zoom controls the size of the projected image 601 0442 BALDE...

Page 22: ...ens adjustments should be done in the following order zoom focus and then iris where applicable 2 7 Adjust Iris General Iris controls the contrast and focus depth of the image Decreasing the iris will increase contrast and image depth at the same time as it decreases brightness Iris control is as for the zoom and focus control motorized and is operated by the remote control or local keypad Iris is...

Page 23: ...chnical and environmental requirements See Installation conditions page 19 2 Decide where the projector will be mounted See Positioning the projector page 21 3 Unpack the projector and confirm that all equipment is present and in good working order See Initial inspection page 20 4 Mount the projector See Mounting the projector general considerations page 21 5 Install the projector lens See Replace...

Page 24: ...the air intake and exhaust are shown below 1000 mm 500 mm Image 3 1 3 3 Initial inspection General Each projector is inspected and rigorously tested at our production facility to ensure that it is free from any mechanical or electrical defects Upon receipt of the projector we recommend that customers inspect the projector for any signs of damage that may have occurred in transit If damage is found...

Page 25: ...al HDBaseT and 3G SDI are long haul interfaces and suitable for bespoke installations using relatively long cables DP HDMI and DVI are short haul interfaces using pre assembled cables with limited cable lengths Limit the use of power cable extensions wherever possible Where physical limitations necessitate their use make sure that the extension cord has adequate surge protection and meets all elec...

Page 26: ...5906768 Multifunctional Frame In stallation Manual Mounting on a flat surface 1 Position the projector at the desired location 2 Power up the projector 3 Go to Main Menu Test Patterns and select an internal hatch pattern to display on the screen 4 Adjust the projector legs until the projected hatch pattern is a level and perfect rectangle Adjustable feet Twisting the adjustable feet in either dire...

Page 27: ...d properly focused 3 6 Projector safe attachment points About Due to use of a Rigging Frame or other equipment the projector has some defines anchor points that shall be used See the illustration below Note that there is only this 4 selected attachment points that is approved as anchor points for the unit Anchorpoints For attaching to rigging frame or similar 1 Image 3 3 Item Thread Dimension Max ...

Page 28: ... D L e n s 0 8 1 E N 4 2 0 7 7 m FLD Lens 1 7 2 5 1 EN41 1 5 15m FLD Lens 2 5 4 6 1 EN44 2 5 25 m FLD Lens 1 2 1 7 1 EN43 1 5 15m FLD Lens 0 8 1 21 1 EN46 0 7 7m F L D L e n s 0 6 5 1 E N 4 7 0 5 4 m FLD Lens 0 8 1 21 1 EN45 5 30m 1 00 2 00 3 00 4 00 5 00 6 00 8 00 9 00 10 00 11 00 12 00 13 00 14 00 Image 3 4 3 8 Scheimpflug Boresight adjustment What is Scheimpflug The lens holder has to be adjust...

Page 29: ...image differs from the rectangle shaped image In other words distortion of the projected image occurs Masking will be required to solve the distortion The disadvantage of Masking is loss of content Therefore it is strongly recommended to place the projector in parallel with the projection screen and use the SHIFT functionality of the Lens Holder to match the projected image with the projection scr...

Page 30: ...flug adjustment screw reference 2 until the test image in the top left side of the screen is in focus Use a size 4 hex key to do this Note This process may cause the other areas of the image to slide out of focus This is totally normal 2 F Image 3 8 4 Adjust the top Scheimpflug adjustment screw reference 3 until the test image in the bottom half of the screen is in focus Use a size 4 hex key to do...

Page 31: ...then zooming in again Verify the image is still sharp If there are any deviations to sharpness repeat steps 2 to 6 until the image is correct 7 Tighten the three set screws in the following order left 1b right 2b and then top 3b Use a size 6 hex key to do this 601 0442 BALDER 13 09 2017 27 ...

Page 32: ...3 Physical Installation 28 601 0442 BALDER 13 09 2017 ...

Page 33: ...tions Control interfaces 4 1 1 Making connections The source switching time varies from 0 5 to 5 seconds Source signal connectivity The connector panel at the back of the projector is used for all source connections Source signal connectivity on the projector is 2x Dual Link DVI I DVI D functionality 2x DisplayPort 1 2 1x HDMI 2 0 1x HDBaseT 1x 3G SDI 4 1 2 Connector specifications Overview DVI I ...

Page 34: ...e length 15 m 24 AWG RBR 2 m 24 AWG HBR1 HBR2 Supported Link Rate RBR HBR1 HBR2 Scan format Progressive Max input data resolution 4096x2160 60Hz 4K Max Bit depth 8 10 12 bit EDID Supported HDCP Supported 4 1 2 3 HDMI 2 0 Specifications Regarding HDMI 2 0 The decryption protocol HDCP 2 2 are enabled and valid in this unit Parameter Value Connector Standard HDMI Signal characteristics Digital TMDS M...

Page 35: ...00 m Cat6a 7 Pixel Clock 225HHz Video Datarate 5 3Gbps Max TMDS Clock Frequency 270 MHz Max video resolution supported 1920x1200 60Hz WUXGA 60Hz HDCP Pass Through Yes from Source to Projector IR Extension Not Supported RS 232 Extension Not Supported 10 100Mbps Ethernet Pass Through Not Supported Fallback to 100BaseTx IEEE 802 3u Not Supported USB Over Centre Tap Not Supported Power Over Ethernet N...

Page 36: ...he projector using the keypad or remote 1 Connect the line cord to the projector 2 Plug the 3 pronged cord into a grounded AC outlet The projector will begin warming up and the backlight of the Standby power button are flashing white 3 When the backlight on the standby button are constant white the projector are in standby mode ready to be switched on 4 Press the standby button on the keypad or th...

Page 37: ...f button In order to show the OSD the OSD On Off button must be disabled White backlight on the button When the button have blue illumination the OSD will not appear and the display information are only visible on the LCD Display Only Critical warnings will be displayed User access levels The projector s software platform uses access levels to define what each user can do There are two user access...

Page 38: ...boxes barscale sliders and drop down lists To set a value Press OK to select or deselect a checkbox turn a function ON or OFF Use the arrow keys to move the barscale slider up or down on the value line For a barscale 0 9 each step will equal 10 of the total value To enter the value as a direct number press ENTER input the digit s and then Press ENTER again to execute and exit cursor mode e g ENTER...

Page 39: ...1 00 to 1 00 Default value 0 00 5 3 Saturation About Image Saturation Saturation levels impact on the white levels and the intensity of the color display the higher the value the more vivid the color display will be Available range 1 00 to 1 00 Default value 0 00 5 4 Advanced image adjustments About Image Advanced Advanced image adjustment settings that enable greater control particularly during c...

Page 40: ...Magenta and Yellow are moved according to the specified desired coordinates White White point only No changes to RGBCMY Default White Native Native Colors Color Correction Off Native values System Setting Service Color Measured values The current measured values WRGB used for RealColor processing These values must be accurate for RealColor to perform correctly Current values are presented in the c...

Page 41: ... your input format is not covered by these values the manual mode must be used When using the preset values the image is scaled to fill the frame vertically and at the same time keep the aspect ratio This means that there will be black bars at the side of the picture All cropping is done dynamically For best result Barco recommend that you pause the movie on the screen making sure that any subtitl...

Page 42: ...ber of black display lines that shall be removed Select the top value and enter a suitable numeric value If necessary do several iterations in order to match the correct value Select the bottom value and enter the same value as for the top Then the left and right sides must be adjusted The value entered here must be equal to the vertical lines removed multiplied with the aspect ratio in order to k...

Page 43: ...projector Must be used only in cases where the input format is 16 9 in combination with a Cinemascope screen 2 35 1 2 37 1 2 39 1 2 40 1 The 16 9 to center functionality explained When a 16 9 content is projected on a Cinemascope screen the lower and upper part of the picture will go outside the screen Overshoot When 16 9 to center function is enabled the picture will downsize to fit the height of...

Page 44: ...6 Advanced picture adjustments 40 601 0442 BALDER 13 09 2017 ...

Page 45: ...own to adjust zoom Use the navigational arrows left and right to adjust focus Shift Installation Lens Shift Use the left right up and down navigational arrows to adjust the lens shift in four directions 7 2 Orientation About Installation Orientation Rotate the image on the imaging device depending on the physical installatin of the unit There are four installationoptions as illustrated below front...

Page 46: ...and Projection positions and press OK button to activate 7 3 Warp About Image warping is the process of digitally manipulating an image to compensate for the distortion of the screen typically by non perpendicular alignment of the projector versus the screen The image will then typically occur as shown inimage 7 4 While an image can be transformed in various ways pure warping doesn t affect the co...

Page 47: ...ent mm inches yards or whatever but must be expressed in whole numbers without decimals This means that the accuracy are higher when given in mm than in inches The projector then calculate the aspect ratio All four corners can be adjusted and the image correction is calculated accordingly using perspective algorithm This can be used for keystone correction Use the navigational arrows to adjust the...

Page 48: ...n can be adjusted so that a normal image is displayed Positive adjustments introduce more outside bow distortion Negative adjustments introduce more inside bow distortion Image 7 6 Bow distortion How to adjust 1 In the main menu select Installation Warp 44 601 0442 BALDER 13 09 2017 ...

Page 49: ...e the arrow keys to adjust When selecting a mid point of an edge the bow angle can be adjusted When selecting a corner point the linearity can be adjusted To reset the bow adjustments select Reset and press the OK button 7 5 Basic Blend About When two projectors are used together to make one picture on the screen the blend function must be activated This blend function ensures a seamless transitio...

Page 50: ...jectors as accurate as possible in a mechanical way meaning without any optical correc tions At the same time establish an overlap in the pictures between the two screens Then adjust the remaining irregularities by using the shift and warp features in the projectors to obtain the last fine tuning of the alignment Setup the source to a blend which corresponds with the preset overlap on the screen T...

Page 51: ...number of pixels Confirm position by pressing enter Exit the menu by using the exit button on the remote control For the right picture repeat the procedure but adjust the Left Width instead of the right width When the projectors are correctly adjusted the cursor lines shall be above the outer frame of the opposite screen For Blend adjustments in over under configuration the procedure is the same b...

Page 52: ...7 Installation menu 48 601 0442 BALDER 13 09 2017 ...

Page 53: ...t information Article number Projector article part number Serial number Projector serial number Firmware Projector software package version Model name Projector model name This is a status menu only No changes can be made to settings from this menu 8 3 Illumination About Home Status Illumination Shows the current laser power and laser runtime This is a status menu only No changes can be made to s...

Page 54: ...8 Status menu Lists the projector IP address 50 601 0442 BALDER 13 09 2017 ...

Page 55: ...n zone based on the light beam Hazard Distance HD Dangerous energy sources inside the projector The user is not allowed to remove any cover from the projector The installation maintenance or service is for skilled persons only The requirements for a restricted access location and an exclusion zone Restricted access location To protect untrained persons and children the projector must be installed ...

Page 56: ...ined behavior is reasonably foreseeable the minimum separation height should be greater than or equal to 3 0 meter to prevent potential exposure for example by an individual sitting on another individual s shoulders within the HD For example a sufficiently large separation height may be achieved by mounting the image projector on the ceiling or through the use of physical barriers For applications...

Page 57: ...Based on the HD The projector is also suitable for rear projection applications projecting a beam onto a defuse coated projection screen As displayed in image 1 3 two areas should be considered the restricted enclosed projection area RA and the observation area TH RA TH sw PD HDDIFFUSE sw RZ sw sw PR HD REFLECTION RESTRICTED AREA RESTRICTED AREA Image 9 3 RA Restricted Access location Enclosed pro...

Page 58: ...l separation The HDreflection distance equals 25 of the difference between the determined HD distance and the projection distance to the rear projection screen To determine the HD distance for the used lens and projector model see graphs in chapter HD in function of the lens Throw Ratio TR page 8 HDreflection 25 HD PD The light emitted from the screen within the observation shall never exceed the ...

Reviews: