


VI. Thermal Laminating...
1. Be sure all laminator parts (i.e. safety shield, feed table, etc.) are in their proper positions and the laminating
film is loaded correctly (See page 3 for film loading instructions).
2. Select the CLOSE position using the Pressure Control handle located on the right side of your Finisher
2700.
3. Turn the HEATED ROLLERS switch and the TOP AND BOTTOM HEAT switches to the ON positions. The
heated rollers are necessary only during warm-up and may be turned off for most applications when operating
temperature is reached.
CAUTION: Heated Rollers are for warm-up only
and should be turned off when operating temp-
erature is reached to avoid damaging the rollers.
4. Set the temperatures according to the film manufacturer’s recommendations for the film you have chosen.
A low-melt film such as DIGIKote™is recommended for digital color prints. The temperatures indicated below
are approximate. The laminator will take approximately 15 minutes to reach operating temperature. The
temperatures will be indicated on the LCD displays on the control panel.
3 mil DIGIKote™
220°-230°F
5 mil DIGIKote™
210°-220°F
10 mil DIGIKote™
180°-190°F
5. Turn the fans ON. This allows for a clear lamination by cooling the film as it exits the rollers.
6. Perform a test lamination to ensure proper settings for successful lamination. If any adjustments are
necessary make them now and run another test. Repeat this step until you obtain desired results.
7. Feed the print to be laminated slowly and evenly into the laminator, smoothing it as the rollers pull it through.
8. You may laminate subsequent prints now, leaving ample space between prints for trimming.
9. Once your last print has completely exited the laminator, turn the MOTOR CONTROL AND FAN switches
OFF and use the trimmer on the rear of the laminator to remove the laminted prints.
VII. Pressure Sensitive Laminating...
Note:
You must have the Rewind Option for Pressure Sensitive Films in order to laminate with pressure sensi-
tive material.
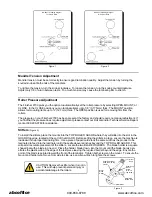
1. Load a roll of pressure sensitive film onto the upper mandrel so that it unwinds from the bottom.
2. Load an empty film core on the take-up mandrel and place it in its position in front of the upper mandrel.
3. Either place a roll of material on the lower mandrel that is at least as wide as the pressure sensitive film you
are using and thread as usual
or
use an additional piece of media under the print you will be cold laminating.
This will keep the adhesive from transfering to the heat shoes or rollers.
4. Thread the pressure sensitive film behind the upper idler roller rod and over the RollerShoes™ ensuring that
that the adhesive side is facing away from the RollerShoes™.
5. Peel back enough of the release liner to tape it to the empty film core on the take-up mandrel. Tape the liner
to the back of the core.
6. Set the pressure control handle on the right side of your laminator to the CLOSE position.
7
abcoffice
800-658-8788


