background image

33

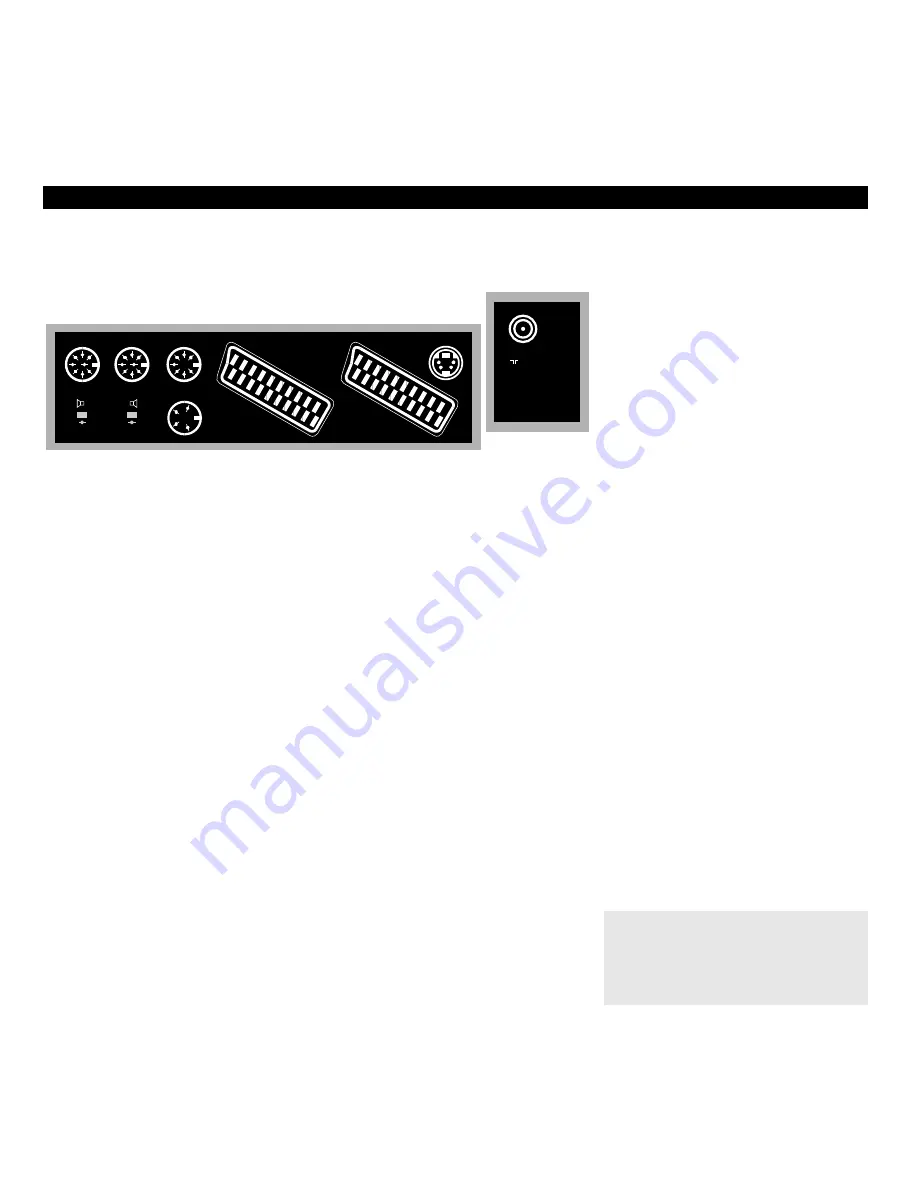
Sockets on the rear panel

POWER LINK 2

POWER LINK 1

B&O STAND

16V = / 300mA

R    8 OHM    L

AV

 2

AV

 1

S-VHS

UHF & VHF

      75 

AUDIO AUX LINK

… P L A C E M E N T   A N D   C O N N E C T I O N S  

Aerial

Connect the cable from your external aerial to 
the aerial socket marked UHF & VHF on the rear
panel of the TV.

Note: The socket marked TRANSPOSER is for a
special transposer required for the French 
SECAM L TV system.

Stand

The 4-pin DIN socket is for connection of a Bang &
Olufsen motorized stand or -base.

Active speakers

The 8-pin DIN sockets marked POWER LINK 1 and
POWER LINK 2 are for connection of active
speakers.

Note: See pages 34-35 for details of how to
programme  your speakers into the TV.

Passive speakers

(BeoVision MX 4000/6000 only)
You may connect external, passive speakers (8
ohm) to the speaker sockets marked R (right) 
and L (left).

Audio system

The 7-pin DIN socket marked AUDIO AUX LINK is
for connection of a compatible Bang & Olufsen
audio system. If your audio system is a Master 
Link product you must use the BeoLink 
Converter, please contact your Bang & Olufsen
dealer for further information.

Note: See pages 15 for details of how to include
your TV speakers in a timer sound programming
of your audio system.

AV connection

The socket marked AV1 is for connection of 
your primary video tape recorder, for example 
the Bang & Olufsen BeoCord VX 7000 or V 8000
video tape recorder.

The socket marked AV2 is for connection of all
other AV equipment, for example a second 
video tape recorder, a video camera, a DVD or
CDV player, a decoder or a socket expander.

Note: See pages 34-35 for details of how to
program your AV connections into the TV.

Super VHS connection

The S-VHS socket is for connection of a video tape
recorder or video camera using the S-VHS 
format.

Note: Remember also to connect your S-VHS
connection to the AV1 or AV2 socket for
reproduction of sound.

Note: See pages 34-35 for details of how to
program your S-VHS connection into the TV.

Please note…

Any equipment you connect should be
registered in the TV Sockets menu in order 
for you to operate them. Please refer to page
34-35  for further information.

Mains

Plug the mains lead attached to the TV into the
mains socket. 

Note: The attached mains lead and plug are
specially designed for this TV. If you change the
plug or in any way damage the mains lead, it 
will affect the TV picture adversely.

Once the TV is connected to the mains, the
standby indicator on the front of the TV lights 
up in red. The TV is now in standby mode, ready
to be operated with the Beo4 remote control.

Whenever the TV is switched on, the standby 
light turns green.*

*Note: When the BeoVision MX TV is switched 
on, the red standby light turns off and the two
green lights in the BeoVision speakers turn on
instead. (Only applies to MX 7000)

Summary of Contents for MX TV

Page 1: ...ure All operations can be carried out with ease using the Beo4 remote control From daily operations to setting picture and sound preferences you only need to press a few buttons in a straightforward s...

Page 2: ...Olufsen product on a firm and stable surface Products placed on soft heavy carpets must be duly protected against overturning TV sets placed on Bang Olufsen stands with castors must always be moved wi...

Page 3: ...tomatically 19 Page update Teletext function 20 Fastext or FLOF 21 Making Timer recordings via Teletext 22 25 PICTURE AND SOUND Adjusting the Picture 25 Adjusting the Sound 26 Switching sound 28 30 BE...

Page 4: ...ectangular buttons for source control numbers and dedicated functions Buttons within the star shaped button for stepping and winding and operation of on screen menus The circular GO button in the midd...

Page 5: ...ve various functions which include Troubleshooting describing specific circumstances which may occur during an operation Providing additional information such as detailed information about the content...

Page 6: ...required that you search for a station Switch on the TV Call up the main menu The main menu appears Press to move the red text cursor to the other items in the menu Make sure that the item function y...

Page 7: ...7...

Page 8: ...menu The Setup menu appears Press to call up Tuning The Tuning menu appears Freq is lit up already Press to let the system search for TV stations Or use the number keys to key in an exact frequency e...

Page 9: ...y the 10 dots in the menu including the letters from A to Z numbers and full stop The first of the 10 dots blinks indicating that you can start writing a name You must reveal the characters for the po...

Page 10: ...st You will always see the page where the station you are currently on is listed If you want to see one of the stations currently listed on the screen simply key in the appropriate number or press TV...

Page 11: ...133 140 147 154 161 168 231 238 245 252 S15 S16 S17 S18 S19 S20 S21 S22 S23 S24 S25 S26 S27 S28 S29 S30 S31 S32 S33 S34 S35 S36 S37 S38 S39 S40 S41 259 266 273 280 287 294 303 311 319 327 335 343 351...

Page 12: ...o set it again Menu TV program list Sound Picture Setup Time Text time 12 00 TV program 1 Setup Tuning Timer Clock Sockets Stand The main menu The Setup menu The Clock menu on the menu the time is now...

Page 13: ...xt time or not The first time you call up the clock menu the following displays are possible for this item TV program 1 appears if you choose to synchronise with Teletext and indicates the station e g...

Page 14: ...main menu The main menu appears Press until Setup is lit up Press to call up the Setup menu The Setup menu appears Press until Stand is lit up Press to call up the Stand menu The Stand menu appears P...

Page 15: ...ion about which audio systems can be connected to your TV Press to call up the main menu The main menu appears Press until Setup is lit up Press to call up the Setup menu The Setup menu appears Press...

Page 16: ...lect a TV station the program number and name appear briefly on the screen If you want to see the them again press TV You can adjust volume at all times For details of sound adjustment see pages 26 28...

Page 17: ...s MEM 1 2 3 and 4 are available in your MX TV for each station which transmits Teletext You can change this setup and preset the pages you use most often as your favourite Teletext pages then The Inde...

Page 18: ...superimpose the Teletext page on the TV picture so that you can see both simultaneously When you want to see just the Teletext page again press GO REVEAL If a Teletext page contains concealed text fo...

Page 19: ...etext page number 4 Note The Teletext page with the subtitles must be preset on your favourite Teletext page number 4 MEM 4 If you no longer want the Teletext subtitles to appear automatically on the...

Page 20: ...Teletext page up on the screen Note While you are watching a TV programme waiting for the page to be updated do not forget that the TV is in Teletext mode This means that if you key in a number the T...

Page 21: ...e page of your choice Red green yellow or blue Switch to Teletext and find a Fastext page A small bar made up of the colours red green yellow and blue indicates that the page is a Fastext page Press t...

Page 22: ...page are status lines Start is lit up in red A cursor appears and highlights the start time of the first programme on the page Making Timer recordings via Teletext If you have connected a Bang Olufse...

Page 23: ...he item Timer recording you will get the Video tape recorder s Timer index which lists the Timers you may have made already Now you must press GO to call up the Timer recording menu prompting you to f...

Page 24: ...24...

Page 25: ...level Tint Tint adjustment is only available if NTSC broadcast signals or NTSC sources are employed Tint adjusts colour nuance Press to call up the main menu The main menu appears Press until Picture...

Page 26: ...ng and and t t and s s as in the first menu Press GO to store your adjustments Press STOP to return to the previous menu without storing what you have entered Press EXIT to exit without storing your a...

Page 27: ...the voice of a person appearing on the TV screen can be made to seem to originate from the screen itself The balance between the sound of external speakers and the built in centre speakers can be adj...

Page 28: ...n you will hear the sound or specific language you selected for this program number This should be done via the tuning menu see page 8 9 Note If you have selected stereo as your preferred stored type...

Page 29: ...29...

Page 30: ...reen is blank you will record sound only but if the sound is accompanied by pictures the pictures will be recorded along with the sound produced by the audio system a simulcast recording Note A specia...

Page 31: ...m Using BeoVision MX in a link room With your BeoVision MX TV in a link room and BeoLink installed you can obtain the benefits of distributed sound and pictures Press to switch on your TV Then operate...

Page 32: ...d then 1 cf page 27 Note In order to display SPEAKER on Beo4 you must add the function to Beo4 Please refer to Beo4 s own User s guide for further instruction Buttons on the front When the TV is switc...

Page 33: ...ape recorder for example the Bang Olufsen BeoCord VX 7000 or V 8000 video tape recorder The socket marked AV2 is for connection of all other AV equipment for example a second video tape recorder a vid...

Page 34: ...nected a Bang Olufsen video tape recorder of a type other than the BeoCord VX 7000 or V 8000 You have connected any non Bang Olufsen equipment to your TV The equipment you have connected to your TV mu...

Page 35: ...usual way V Tape 2 B O will be selected automatically if your second video tape recorder is a Bang Olufsen video tape recorder If this does not happen automatically select the item V Tape 2 B O manua...

Page 36: ...you have connected e g BeoCord VX 7000 or V 8000 to your MX TV The item Timer recording calls up the Timer index and the Timer recording fill in menu Sound and Picture enables you to adjust sound and...

Page 37: ...37...

Page 38: ...AV1 AV2 S VHS Stand Turn TV to preferred position Setup Setup Tuning Timer Clock Sockets Stand Sound Balance Volume Speaker Centre Sound Sound Bass Treble Loudness Picture Brilliance Colour Contrast T...

Page 39: ...r packing we use the most conserving and recyclable materials known today and we constantly work to reduce any negative side effects our packing materials may have on the environment We observe any pr...

Page 40: ...ation during the design and development process and we strive to make our products easy and comfortable to operate We therefore hope that you will take time to drop us a line telling us about your exp...

Reviews: