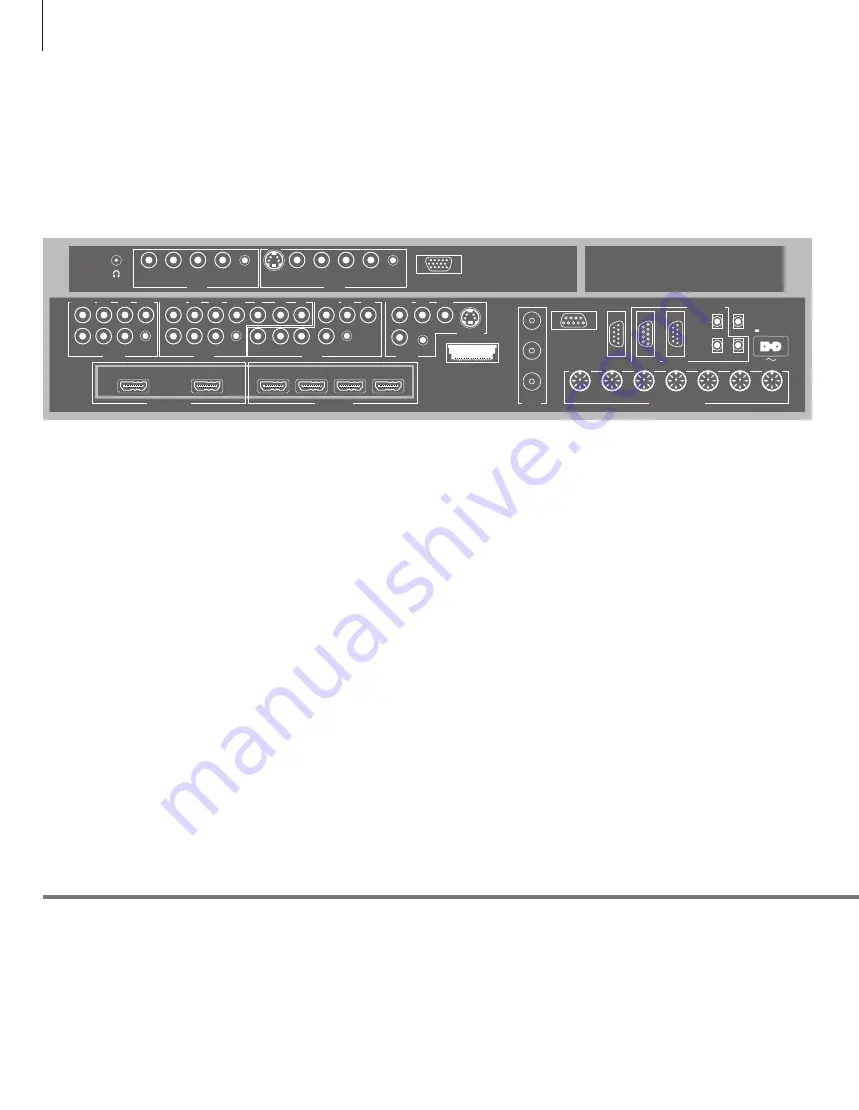
background image

Connection panels 

Any equipment you connect to the main connection panel must be registered in 
the CONNECTIONS menu. Equipment connected to the side connection panel can 

be registered in the CONNECTIONS menu. 

Useful hints 

Mains cord 

Connect the 

socket on the main connection panel of your TV to the wall outlet. The TV is in standby 

mode and ready to be used. 

AV1

Socket group for AV connection of a primary 

recorder or set-top box. You can also connect 
other types of extra video equipment. 

AV2

Socket group for AV connection of additional 

video equip ment. 

AV3

Socket group for AV connection of additional 

video equip ment. 

The TV keeps a signal path open between a 

recorder connected to the AV1 socket and a 
recordable source connected to the AV3 socket. 

This allows you to set the source on AV3 to switch 

on automatically, as well as set a recorder on AV1 
for timed recording of the source on AV3, 
provided your connected equipment supports 
these functions. 

AV4 

Socket group for AV connection of additional 

video equip ment. 

AV5

Socket group for AV connection of additional 

video equip ment. You can also connect a 
BeoMaster, a camera or a camcorder. 

AV6 

Socket group for AV connection of additional 

video equip ment. You can also connect a camera 
or a camcorder. 

CTRL

 (AV1 – AV6) 

For IR control signals to external equipment 
connected to an AV socket. 

L-IN, R-IN

 (AV1 – AV6) 

Right and left line input. AV5 and AV6 is for audio 
connection of, e.g., a camera or camcorder. 

L–R OUT

 (AV1 – AV2) 

Right and left line output. 

VIDEO IN

 (AV1 – AV6) 

For video signal. On AV5 and AV6 you can 
connect a camera or a camcorder. 

VIDEO OUT

 (AV1 – AV2) 

For a video recorder. 

Y – Pb – Pr 

(AV2 – AV3) 

For video signals from an external source, e.g. 
HDTV source. You can use the socket in 
conjunction with an AV socket or a digital audio 
socket. 

SPDIF

 (AV1 – AV6) 

Digital audio input socket, e.g. DVD player. 

S VIDEO

 (AV4, AV6) 

For the connection of equipment with Y/C output, 
e.g., a game console. 

POWER LINK 

CONTROL 

CENTRE 1 

CINEMA 

MONITOR 

IR IN 

DTV DATA 

MASTER LINK 

1(SUB) 

TTL 

ANT 

HDMI  IN 

HDMI  OUT

AV 4 

AV 3 

RS232 

IR IN 

CTRL 

SPDIF 

VIDEO IN  L IN 

R IN 

IR 1+2 

S VIDEO 

VIDEO IN  L IN 

R IN 

Pb 

Pr 

AV 2 

AV 5 

AV 1 

L IN 

VIDEO IN 

DISPLAY 1 

R IN 

SPDIF 

L OUT 

VIDEO 

OUT 

R OUT  CTRL 

R  IN 

L  IN 

VIDEO 

IN 

SPDIF 

CTRL 

DISPLAY 2 

AV 6 

R  IN 

L  IN 

VIDEO 

IN 

SPDIF 

CTRL 

VGA 

S VIDEO 

Pr 

Pb 

SPDIF  CTRL 

L IN 

VIDEO IN 

R IN 

SPDIF 

L OUT  R OUT 

VIDEO 

OUT 

CTRL 

1

ANALOGUE

ATSC

LINK TV

2

3

22

Summary of Contents for BeoSystem 3

Page 1: ...BeoSystem 3...

Page 2: ......

Page 3: ...described in more detail in the product s Guide The Guides are found on www bang olufsen com guides The Guides are also kept up to date if new software introduces new or modified features and function...

Page 4: ...e safety purpose of the polarized or grounding type plug A polarized plug has two blades with one wider than the other A grounding type plug has two blades and a third grounding prong The wide blade o...

Page 5: ...he television in direct sunlight or direct artificial light such as a spotlight as this may reduce the sensitivity of the remote control receiver Also if the screen is overheated black spots may appea...

Page 6: ...uous step Navigation button left right up and down move in menus by pressing the button in the direction you need Standby Rewind or wind search backwards or forwards Pause and stop playback or recordi...

Page 7: ...or recording Switch on the TV 3 Select channels and enter information in on screen menus Step through channels Hold for continuous step Move backwards through menus and the Beo4 list Long press to ex...

Page 8: ...n the display on the remote control On screen menus allow you to adjust settings Display and menus Introduction Select TV s zone 1 Switch on TV Important 1 Zone Zones are named in the Beo6 configurati...

Page 9: ...e describe operation with the REMOTE CONTROL menu set to NAVIGATION BUTTON In the OPTIONS menu you can bring up the REMOTE CONTROL menu and set up your television to be operated with or without a navi...

Page 10: ...calibration has started Automatic Colour Management automatically compensates for colour changes on the screen for every 100 hours of use approximately Do not switch off the television or disconnect i...

Page 11: ...ack Press Select Activate numbers Select previous channel Hold for channel list Select channel Adjust volume To mute turn quickly counter clockwise Turn either way to bring back the sound or Press Pre...

Page 12: ...ng up programme information Switch on the ATSC tuner Switch off the ATSC tuner Change Closed Captioning for the current channel 1 Change Closed Captioning Bring up a channel list While you watch TV yo...

Page 13: ...ress and hold BACK Press Press Press Press Press Press Press Press Press Show channel list Select channel Select page Accept or Hold to activate Select page or channel and accept Press Press Press Pre...

Page 14: ...perience such symptoms stop watching 3D TV remove the 3D glasses and rest Watching 3D TV for an extended period of time may cause eye strain If you feel eye strain stop watching 3D TV remove the 3D gl...

Page 15: ...een 3D representation by scaling two pictures vertically SIDE BY SIDE 3D TOP BOTTOM 3D Converts side by side 3D signal into full screen 2D representation by scaling one picture horizontally Converts t...

Page 16: ...e format While you watch TV through the television tuner you can switch between available sound types and adjust the picture format Change sound type or language Switch between available sound types a...

Page 17: ...oy the advantages of this setup several speakers and a Beo6 remote control are necessary If you have only a few speakers or a Beo4 remote control this setup is not recommended and you should choose th...

Page 18: ...18...

Page 19: ...Installation and setting up 20 Set up your television 21 Cleaning 22 Connection panels 24 First time setup of your television Contents Installation and setting up 19...

Page 20: ...the cable cover down over the cable brackets The tabs A should fit the gaps in the cable cover 4 Press the cable cover down lightly until it clicks into place To remove the cable cover press the tabs...

Page 21: ...nd a projector and the projector screen covers the IR receiver when in use you must mount a second IR receiver The IR receiver receives signals from your remote control and sends them to the system wh...

Page 22: ...connect a BeoMaster a camera or a camcorder AV6 Socket group for AV connection of additional video equip ment You can also connect a camera or a camcorder CTRL AV1 AV6 For IR control signals to exter...

Page 23: ...tailer IR IN 9 pin For the screen s IR receiver enabling remote control operation MONITOR For a plasma screen CINEMA For a Home Automation system TTL RS232 Only for use in Hotel setups IR IN mini jack...

Page 24: ...date you can access the same menus and update your settings Switch on the TV Select settings You are led through the following settings only when you switch on the TV for the first time 1 However the...

Page 25: ...g See the Guide for further information Adjust volume bass treble and loudness and preset two default speaker combinations Calibrate the speakers Set up the speakers to optimise sound from your listen...

Page 26: ...ent WEEE Environmental protection All Bang Olufsen products comply with applicable environmental legislation throughout the world For the US market only NOTE This equipment has been tested and found t...

Page 27: ...27...

Page 28: ......

Reviews: