background image


NanoRam

®

 Series

 Handheld Raman


19 Shea Way, Newark, DE 19713, USA 

 Tel: +1 (302) 368-7824 

 Fax: +1 (302) 368-7830 

 Web: www.bwtek.com


290020255-J (2017/07/28)   


Page 17 of 38  


Copyright 2017 B&W Tek 


Never remove the lensed shaft when the instrument is on.


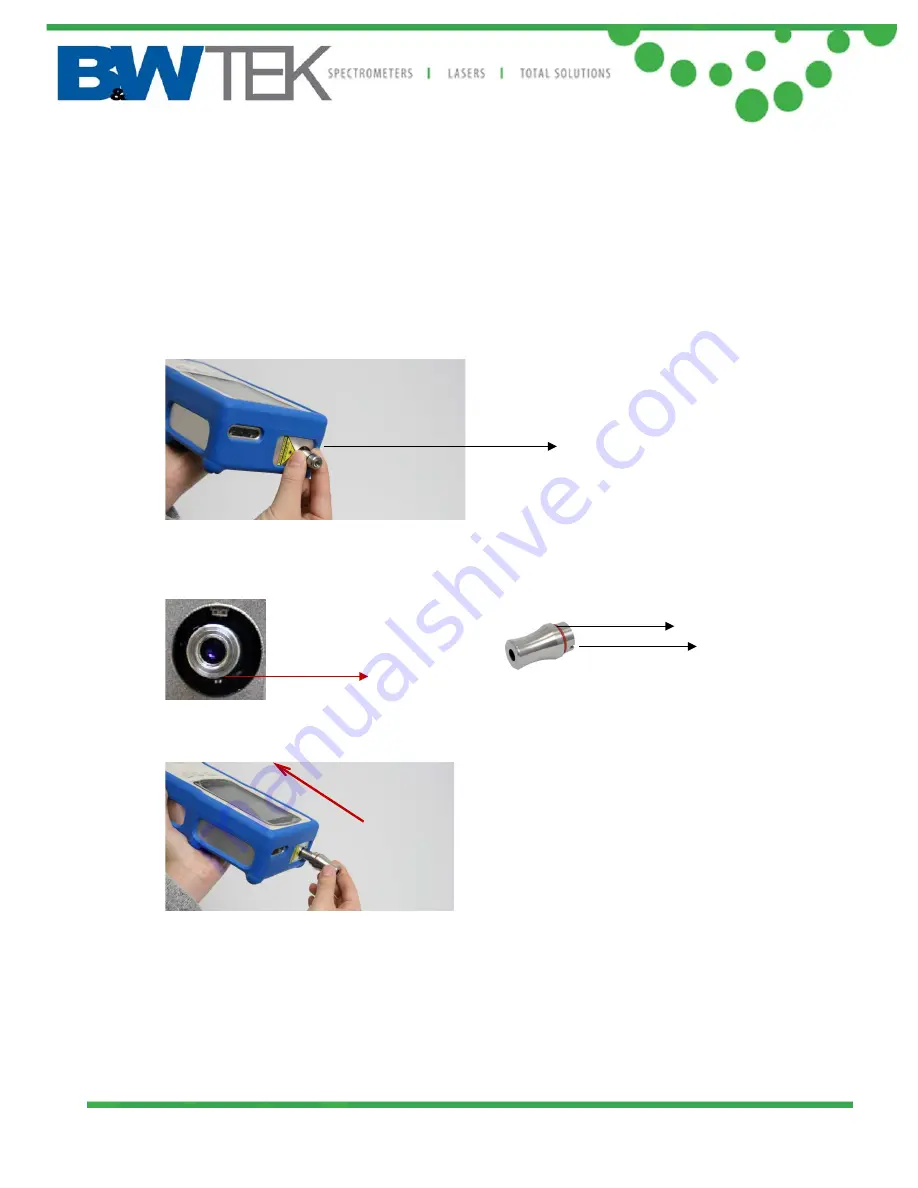
The following steps will guide the user to successful installation of the sampling 
accessory: 


Make sure the correct shaft is installed onto the laser emission aperture.   


Locate the alignment key on the adaptor and the set pin position at the laser emission 
aperture. 


Push the adaptor onto the shaft until the O-ring just reaches the instrument surface.   


Gently turn the adaptor clockwise until a click is felt or the sound of a click is heard, which 
indicates that the key on the adaptor is set to the set pin at the laser emission aperture. 
Once the alignment is reached, stop turning the adaptor.     

Standard Lensed Shaft 


Key


Set pin


Push in


O-ring


Summary of Contents for NanoRam

Page 1: ...19 Shea Way Newark DE 19713 USA Tel 1 302 368 7824 Fax 1 302 368 7830 Web www bwtek com 290020255 J 2017 07 28 Copyright 2017 B W Tek NanoRam Series Handheld Raman System Quick Start Manual...

Page 2: ...NANORAM 8 1 2 NANORAM MINI 9 1 3 Warranty Seal Label 10 1 4 Manufacturer s Identification Label 10 2 KNOWING YOUR INSTRUMENT 11 2 1 Power Supply 11 2 2 Battery Installation and Charging 11 2 3 Power O...

Page 3: ...Web www bwtek com 290020255 J 2017 07 28 Copyright 2017 B W Tek 3 3 Perform Material Investigation 27 3 4 Performance Validation 30 3 5 Enable Data Transfer 31 3 6 History Review 32 4 NID SOFTWARE 33...

Page 4: ...y synchronizing the instrument data with the data library user report management software NID loaded onto a PC Library and method transfer are supported between same type of units NanoRam to NanoRam N...

Page 5: ...cated at the bottom of the unit next to the Ethernet port The remote interlock facilitates the laser on and off remote control function When the laser stop key is inserted into the slot the interlock...

Page 6: ...ommunication Education and Radiation Programs Never point the unit directly at a person Never look directly into the laser beam path or scattered laser light from any reflective surface Never look dir...

Page 7: ...t 2017 B W Tek Center for Devices and Radiological Health Food and Drug Administration 10903 New Hampshire Avenue W066 4613 Silver Spring MD 20993 USA Tel 1 800 638 2041 Fax 1 301 847 8149 dsmica fda...

Page 8: ...0255 J 2017 07 28 Page 8 of 38 Copyright 2017 B W Tek 1 Diagrams of the Instruments 1 1 NanoRam Laser emission indicator 12V DC Power connector Ethernet Port Remote Interlock Battery compartment Barco...

Page 9: ...b www bwtek com 290020255 J 2017 07 28 Page 9 of 38 Copyright 2017 B W Tek 1 2 NanoRam Mini 2D Barcode scanner Laser emission aperture Sampling port Shaft 2D Barcode Scanner Barcode Scan Key Home Key...

Page 10: ...al Label The warranty seal labels are positioned on both sides of the system under the blue jacket Any attempt to open the panel s of this device will break these seals and void the warranty 1 4 Manuf...

Page 11: ...can be found on the top right corner of the screen in operation displays or the center of the screen when in charging only mode The NanoRam battery can be charged with the 12VDC power adaptor or opti...

Page 12: ...ide Insert the provided NanoRam Lithium Ion battery pack into the battery compartment as shown Battery contacts should be facing down towards the back of the unit and to the right The strap attached t...

Page 13: ...W Tek Turn the ring clockwise 1 8th turn till the ring is in a vertical position The cover is now locked Version B Hold the ring Turn it clockwise 1 8th turn to unlock Turn it counterclockwise 1 8th t...

Page 14: ...S Operating System screen indicating that the system initialization is in process with a count up in percentage of completion After the initialization of the system is completed the user login screen...

Page 15: ...ed user name and password the Home Screen will be displayed The Home screen for the NanoRam is displayed here for an Administrator The same home screen is displayed for an Operator level user 2 5 Home...

Page 16: ...tyrene Right angle adaptor optional Tablet holder adaptor optional Immersion probe adaptor for use with NanoRam only The user needs to ensure that the sampling adaptor is installed properly before usi...

Page 17: ...the correct shaft is installed onto the laser emission aperture Locate the alignment key on the adaptor and the set pin position at the laser emission aperture Push the adaptor onto the shaft until t...

Page 18: ...r The Point and shoot adaptor can be used for powder solid or liquid sample measurements through a thin and transparent container With the Point and shoot adaptor in place hold the NanoRam unit so tha...

Page 19: ...sparent containers of less than 5 mm in thickness such as liquid samples inside bottles or containers The bottle or container can be placed directly against this adaptor The measurement beam will then...

Page 20: ...r turned off to ensure safety No operations are permitted without the lensed shaft in full installed position with standard accessories Using the Point and Shoot Adaptor The point and shoot adaptor ca...

Page 21: ...tion and secured by the rubber jacket ribs Using the Rubber Jacket s Ribs as Bottle Adaptor The rubber jacket s rib is designed in such a shape that it can be used as a bottle adaptor for the measurem...

Page 22: ...oning During measurement operations place the NanoRam Mini so that its right angle adapter port is in contact with the sample surface 2 7 Barcode Scanner Key The barcode scanner functions only in the...

Page 23: ...s already been set up by the Administrator At the user login screen enter the user name and password and then press Login The home screen for basic user will be displayed The user information includin...

Page 24: ...reless and Ethernet functions in the Set Up The rest of the Set Up functions are deactivated for the Operator user type but are accessible for Developer and Administrator user types For example in Gen...

Page 25: ...ification test is performed in the following order i Load the Method ii Enter product information iii Acquire a Raman spectrum of the material to be identified iv A p value will be calculated by compa...

Page 26: ...whether to run another sample If user chooses Yes a note must be entered user can either select the default notes or press Add to type in the note and saved before repeating the test If user chooses...

Page 27: ...ress Operation Preset The list for the existing Operation Preset will be displayed Select the desired Operation Preset by tapping on the name The selected Preset will be marked by a check mark Press o...

Page 28: ...egration time will be automatically optimized A dark scan will follow accompanied with acoustic signals of a slightly shorter interval Note While the dark scan is being collected the sample needs to r...

Page 29: ...e library HQI 0 indicates a 0 correlation score between the sample spectrum and the particular spectrum in the library While the default setting for minimal HQI is 80 the criteria for Match can be set...

Page 30: ...yrene Standard is provided for the validation The frequency on how often the validation test needs to be run should be determined by the user s SOP depending on the requirement of the applications and...

Page 31: ...st establish the connection between NanoRam and the PC Press the Set Up icon on the home screen then WLAN Networks Press Ethernet for connection via Ethernet or press Wi Fi for connection via wireless...

Page 32: ...etails on synchronization from NID 3 6 History Review To view history scans before syncing to NID simply swipe down on the NOS display a Scan History List will appear with Identification or Investigat...

Page 33: ...udit trail data etc is synchronized onto server using NID Client the data is stored on the NID Server 4 2 Device Connection on NID The device connection on NID is done by connecting the NanoRam unit w...

Page 34: ...utes A warning message will appear on the screen Data could be lost if data is being synchronized at the moment The user needs to login again and re enable Ethernet or Wi Fi in Data Transfer 4 3 Login...

Page 35: ...2017 07 28 Page 35 of 38 Copyright 2017 B W Tek Click on in the upper right corner Six languages are available in display English Simplified Chinese Traditional Chinese Japanese Korean and Spanish Onc...

Page 36: ...the available NanoRam devices that have established connection The serial number of the system is displayed under the device icon Note NanoRam Mini will appear as a different icon on the login page Cl...

Page 37: ...server s time Meanwhile message Successfully logged in will appear At this stage the NanoRam device login is completed 4 4 Data Synchronization Data synchronization is to transfer data from the NanoRa...

Page 38: ...NanoRam Series Handheld Raman 19 Shea Way Newark DE 19713 USA Tel 1 302 368 7824 Fax 1 302 368 7830 Web www bwtek com 290020255 J 2017 07 28 Page 38 of 38 Copyright 2017 B W Tek...

Reviews: