background image

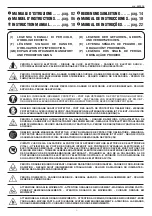
limited side room installation for Roll-A-Door Neo 

(front mount)

mark 

lock bolt flush with 

inside of guide

side view

front view

lock bolt 

engages without 

interference


11

side view

X

mark 

X

2

8

1

a. After limits are set on the opener, 

measure the position 

X

  of each 

lock striker from the ground to 

the middle of the lock striker. (as 

shown). 

b. Once both lock strikers are 

installed, test manual operation 

of the door to ensure no sticking 

or scraping within the guide.

c. Open the door, place some 

tape inside each guide and 

transfer measure 

X

  to middle 

of guide. 

d. Using an 18mm stepped drill, 

drill a hole through the guide 

and remove any burs from hole.

e. Assemble both AutoLocks 

1

 to the 

wall brackets 

8

 using 2 x button 

head screws 

2

, ensuring the flat 

side of the lock bolt is facing the 

door.

f.  Remove the old head stop and 

replace with longer head stop 

11

.

g. Unscrew the bottom rail stop on 

each side of the door and move 

into the inner hole and refit screw 

as shown.

h. Place bracket on wall up against 

the guide and ensure the body of 

the lock bolt is flush with the inside 

of the guide.

i.  Mark the position of the bracket 

holes on the wall. Predrill holes and 

affix to wall with 2 x coach screws 

and washers. (not supplied)

j.  With the door closed, test the 

operation of each AutoLock by 

pressing the lock/unlock button to 

ensure the lock bolt fully engages 

through the guide and into the 

striker without interference. 

PROCEED TO CONNECTING WIRELESS 
BASE STATION TO THE OPENER.

4

Auto-Lock Kit - 

R1N Installation instructions

Summary of Contents for Roll-A-Door R1N

Page 1: ...D SEPARATELY 13 BRACING BAR 1 Important Safety Instructions WARNING DO NOT attempt to disassemble repair or modify the product This will invalidate the warranty DO NOT allow children to play with the Auto Lock DO NOT install in garages that have only one exit DO NOT cover paint or lubricate the product CAUTION Burns DO NOT handle damaged or leaking batteries The Auto Lock Kit contains sealed lead ...

Page 2: ...ock striker 7 into the second bottom curtain corrugation pushing striker towards the door edge whilst sliding the legs under the Nylofelt and hooking them over the curtain edge before snapping into position as per diagram b Repeat for second lock striker at other side of door c Continue with door installation before proceeding install striker corrugated plate 7 W Install Corrugated plate a Unscrew...

Page 3: ... button head screws 2 ensuring the flat side of the lock bolt is facing the door 2 8 1 mark X e Place bracket on wall up against the guide and ensure the body of the lock bolt is flush with the inside of the guide f Mark the position of the bracket holes on the wall Predrill holes and affix to wall with 2 x coach screws and washers not supplied lock bolt engages without interference g With the doo...

Page 4: ... both AutoLocks 1 to the wall brackets 8 using 2 x button head screws 2 ensuring the flat side of the lock bolt is facing the door f Remove the old head stop and replace with longer head stop 11 g Unscrew the bottom rail stop on each side of the door and move into the inner hole and refit screw as shown h Place bracket on wall up against the guide and ensure the body of the lock bolt is flush with...

Page 5: ...y lock unlock button on this product is not to be used as a primary means of locking the door under normal circumstances The emergency lock unlock button is to be used only in case of power outage or emergency If a PE Beam is installed ensure that the channels on the basestation on each device are different The channel on the basestation can be changed by sliding the switch in either direction 5 A...

Page 6: ...it does not move call 13 62 63 red and green lights both on solid on the lock error with lock press the unlock button on the lock to test operation switch off power to opener then switch back on after 30 secs If a battery backup is installed press hold STOP SET button on the opener until power ceases Press the lock unlock button on the lock to test operation If it does not move call 13 62 63 one l...

Reviews: