background image

27

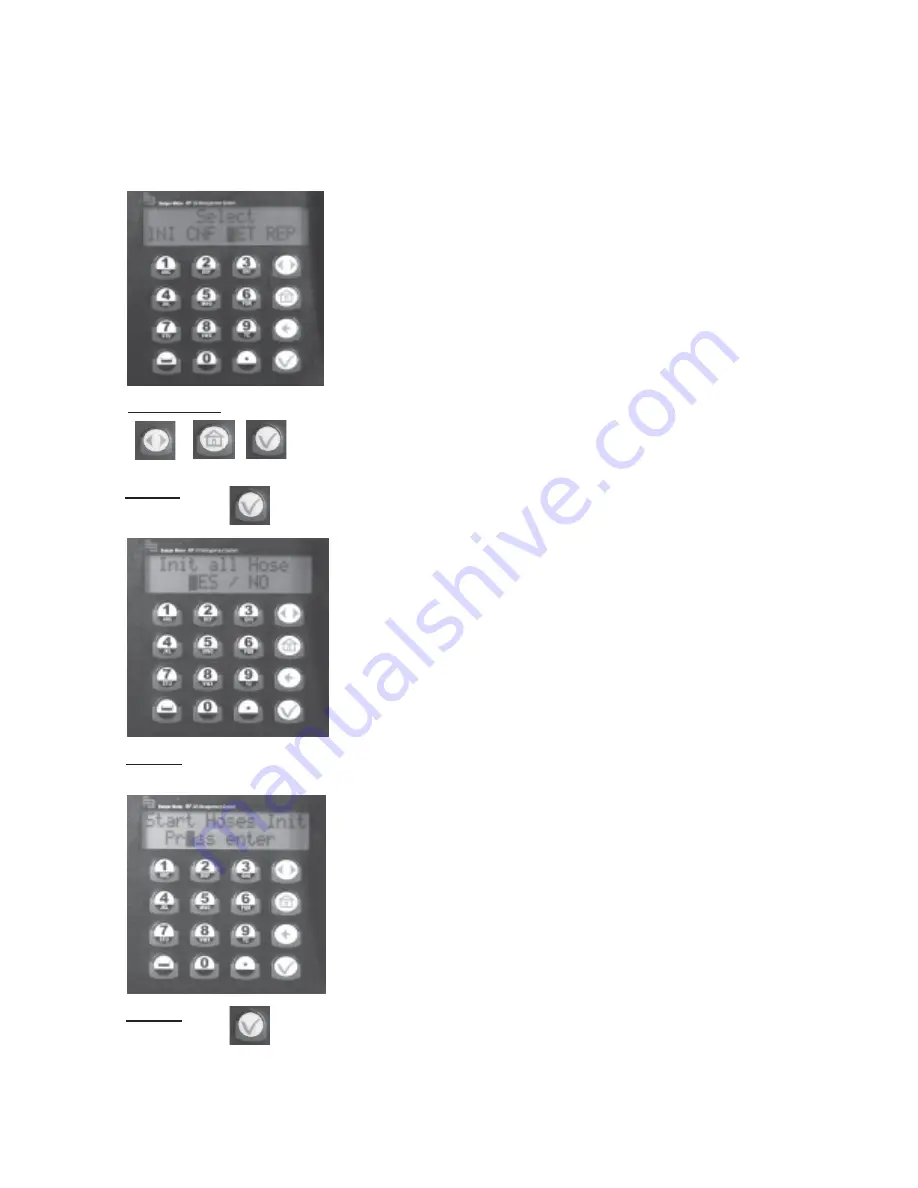
Meter Reset Menu (MET)

    • Only the supervisor has access to MET.

    • The supervisor may delete a dispense order in the keypad que for a single hose or all  

       hoses in the system.

    • If the supervisor selects all RF Meters, all dispense orders in the que are deleted.

    Active Keys:

              ,           ,


    Action:

    Press Enter           to go to Init All Hose

    Action:

    If YES - start (Start Hoses Init) displays

    Action:

    Press Enter           to Start Hoses Initiation

Summary of Contents for 3110-012

Page 1: ... Rev B 12 08 Thoroughly read and understand this manual before installing operating or servicing this equipment OPERATION INSTALLATION MAINTENANCE AND REPAIR GUIDE FUSION CENTRAL CONTROL FLUID MANAGEMENT SYSTEM Model 3110 012 ...

Page 2: ...application and use of the equipment described Should the equipment be used in a manner not specified by Balcrank Products Inc the protection provided by the equipment may be impaired Questions or Service Assistance If you have questions regarding the product or this document contact Balcrank Products Inc 115 Reems Creek Rd Weaverville NC 28787 Telephone 828 645 4261 800 747 5300 Fax 828 658 0840 ...

Page 3: ...nterDate 9 TankInitialization 10 SelectTankUnitNumber 10 SelectFluidQuantityorRemoveaTank 11 SelectaTankStockLevel 11 FluidInitialization 12 Tank FluidRelationshipScreens 12 CreateorRemoveanRFMeter 13 Tank HoseScreen 14 HoseAddressAlreadyUsed 14 DeleteaHose 15 AddingandDeletingOperators 15 AddinganOperator 15 DeletinganOperator 16 Configuration Menu CNF 17 ConfigurationMenuFlowchart 17 ClearingTra...

Page 4: ...eport 30 ConfigurationReport 31 CommunicationReport 32 WorkOrderReport 33 UseReport USR 33 ProductReport PRO 34 Hose MeterReport HOS 34 TankReport TNK 34 Report Menu Flowchart 35 Keypad Test Program 36 Fluid Type Definitions 37 Tank Definitions 38 Hose Meter Definitions 39 Appendix A 41 EpsonLX 300 IIPrinter or Compatible 41 LX 300 II Printer Settings 41 ToChangeLX 300 IISettings 44 ...

Page 5: ...s or metal chain link fences that may block the RF communi cation signals Specifications Power Requirements 120VAC 50 60Hz RF Communications 2 way 902 928MHz Frequency Hopping Spread Spectrum per FCC Part 15 247 Part 15 109 Operating Temperature 14 F to 140 F 10 C to 60 C FCC ID GIF RF KEYPAD FCC CERTIFIED PART 15 SUB PART C This device complies with Part 15 of the FCC Rules Operation is subject t...

Page 6: ...6 Pictoral Diagram of Set up UP TO 8 FLUID TYPES KEYPAD UP TO 48 METERS PER KEYPAD UP TO 8 TANKS ...

Page 7: ...t screen display Backspace Key Used to backspace when entering data Enter Key Used to enter data and move to the next screen Space Key Used to enter a space character when entering data Alphanumeric Keys Used to enter numbers and alpha characters Press and release the desired key to enter a number To enter a letter press and hold the key with the desired letter When the desired letter displays rel...

Page 8: ...ur 4 digits To access management screens enter the supervisor PIN number The default is 0000 at initial power up Management Screens The management Select screen displays after entering the supervisor PIN number Use the Scroll key to select which menu option is wanted Then press the Enter key Screens in Initialization INI can be accessed only when the Dispense Order list is empty The supervisor mus...

Page 9: ...4 hour military time of day Press Enter when finished to move to the next Initialization screen Enter Date This screen is used to set or change the system date Active keys Numeric keys Action Enter Date by first entering the two digit day The cursor automatically moves to the month Use the Scroll key to select a month Then enter a four digit year After date is set press Enter to move to the next I...

Page 10: ...t The tank stock level setting is updated after each dispense from the associated tank The tank stock level quantity setting format is 5 3 digits 99999 999 The remaining tank stock level quantity is printed to the nearest whole number after each dispense on a ticket The Supervisor updates the tank level quantity setting at any time by entering these screens to change stock levels To Install a Tank...

Page 11: ... REMOVE The REMOVE option deletes a tank from the system Press Enter to move to the next screen Select a Tank Stock Level Active keys Numeric keys Action Use the numeric keys to enter a stock level from 00000 000 to 99999 999 Press Enter to move to the next screen When all tanks have been added press Enter to move to the next screen ...

Page 12: ... fluid type name is blank Tank Fluid Relationship Screens The relationship between tank ID and fluid type ID is 1 1 one tank assigned to one fluid type For example a supervisor may associate tank 1 with fluid 3 or tank 5 with fluid 5 Each tank must be associated with one and only one fluid type The user must enter a valid number for the fluid and then enter a name for the fluid Active keys Numeric...

Page 13: ...XX XXX XXX Leading zeros must be entered RF Meters can be added and deleted Maximum of 48 RF Meters in the system Initially the RF Meter address list is empty A given keypad can exchange data only with RF Meters whose identification number has been entered All RF Meter addresses and IDs are unique The relationship between tank and RF Meter is 1 n one tank is assigned to n RF Meters Since there is ...

Page 14: ...next screen to show is Hose ID This screen identifies which hose is assigned to the tank and fluid Active keys None NOTE Hose ID is the number used to create dispense orders for a meter by an operator Hose Address Already Used This screen displays if another RF Meter already uses the last three numbers of an RF Meter If this screen displays check the RF Meters in the system to make sure duplicate ...

Page 15: ... Active keys Numeric keys Action When a RF Meter is deleted the Delete Hose screen displays Pressing the Enter key with no entry displays the Create Operator screen Adding and Deleting Operators Only an operator with a valid PIN can dispense fluid A Maximum of 50 operators may be active in the system at one time The operator ID PIN number format is 4 numeric digits The operator name format is 16 a...

Page 16: ...ame and press Enter to add it to the list When finished adding Operators press Enter Deleting an Operator Active keys Numeric keys Action The Delete Operator screen above displays if the Enter key is pressed with no entry To delete an operator enter his four digit ID number and press Enter When finished deleting operators press Enter while Delete Operator is blank ...

Page 17: ... YES NO Confirm Clear YES NO System Reset YES NO Confirm Reset YES NO Milage Type KM Miles Milage Info YES NO Regist Info YES NO Keypad Timeout 10 Top Off Timer 300 Internal Printer YES NO External Printer YES NO Super New Pass Super Confirm Buzzer YES NO YES YES Configuration Menu Flowchart Press the scroll bar until CNF is highlighted Next press Enter WO Validantion YES NO Display Fluid YES NO ...

Page 18: ... WO results data Data is cleared confirmation Active keys Use the Scroll key to select between YES or NO Action If YES the keypad asks for a confirm If NO the menu advances to System Reset System Reset System Reset allows a supervisor to reset all configuration parameters to default values Active keys Use the scroll key to select Yes or No ...

Page 19: ...e keypad displays Mileage Type screen Mileage Type Allows a supervisor to select how vehicle mileage is stored in the keypad KM MILES KM is the Default mileage Active keys Action Press the scroll key to select KM or Miles Press the Enter key to move to Mileage Info screen ...

Page 20: ...e keys Action Use the Scroll key to select YES or NO Press ENTER key to move to the Registration Information screen Registration Information Option Selects the option to collect registration information for each dispense order YES or NO for the option Default registration is NO Active keys Action Use the Scroll key to select YES or NO Press ENTER key to move to the Keypad Timeout screen ...

Page 21: ...eys Numeric key Action Press Enter to move to the Hose Inactive Timeout option Topoff Timer Option This is the time a user has to top off a dispense after the complete preset batch has been dispensed If a user has not pressed reset on a RF Meter within the timeout period the RF Meter transmits a dispense order quantity to the keypad and locks out the RF Meter The topoff time is equal to one 1 seco...

Page 22: ...l Printer of Yes or No Press ENTER key to select the Internal Printer setting and move to External Printer option External Printer Option The External Printer EPSON LX 300 is used to print the report information This must be set to Yes to print reports Active keys Action Use the Scroll key to select the External Printer setting of Yes or No Press ENTER key to select the External Printer setting an...

Page 23: ...ys to enter a new password Then press Enter Reenter new Password to confirm When changing a password first delete the active password Pressing Enter with no entry brings no change to Password and Buzzer option displays Buzzer Option This screen provides a user with the option to have a beep on every key entry The default is YES Active keys Action Select YES or NO by using the Scroll key Then press...

Page 24: ...ys Use the Scroll key to select YES or NO Press ENTER key to move to the display fluid screen Display Fluid Option Selects the option to display the fluid selected YES or NO for the option Default option is yes Active keys Use the Scroll key to select YES or NO Press ENTER key to move back to the Select screen The Keypad displays the Select menu ...

Page 25: ...tings from the keypad and put them in a safe place To use the internal keypad printer Press the Scroll key to move the cursor to Rep Press Scroll one more time to bring up screen 190 Press Enter to bring up the FLU HOS TNK and USE screen Press Enter to print Fluid FLU Press Scroll to move cursor to Hose HOS Press Enter to print HOS 25 ...

Page 26: ...ove the cursor to User USE Press Enter to print USE Scroll until screen WO PEN PAR and MEM appears Scroll to PAR Press Enter to print Tear the ticket off of the keypad Put it in a safe place in case it should be necessary to reprogram the keypad Press Home to go back to the Default Screens ...

Page 27: ...e order in the keypad que for a single hose or all hoses in the system If the supervisor selects all RF Meters all dispense orders in the que are deleted Active Keys Action Press Enter to go to Init All Hose Action If YES start Start Hoses Init displays Action Press Enter to Start Hoses Initiation ...

Page 28: ...s Enter to reset the hose screen Do this until all the hoses that need to be initiated are initiated Press the Home key to return to the Select screen Select All YES NO Start Hoses Init Press Enter Select INI CNF MET REP Hose init Hose no YES NO Meter Reset Menu Flowchart MET MENU NOTE To exit this routine hit the Home Key ...

Page 29: ...ected for a keypad configuration MET Prints the status of all hoses meters REP Prints the dispense order history To print reports the External Printer option must be set to YES see the Configuration Menu CNF section of this manual From the Select screen scroll to Rep Press Enter to go to the Select First Report screen Active keys Action Use the Scroll key to select the desired report Press Enter t...

Page 30: ...2 ID PIN NAME 1 1234 John SMITH 2 1235 Paul GREEN 3 1236 Mike BROWN ID PRODUCT 1 Fluid 1 name 2 Fluid 2 name 7 Fluid 7 name 8 Fluid 8 name DD MMM YYYY Date of the printout HH MI Time of the printout TNK Tank No PRODUCT Fluid type name QTY Quantity dispensed UNT Unit ADDR Meter RF address ID RF Meter Id Last 3 address characters TNK Tank No PIN User pin number NAME User name Active keys Action Use ...

Page 31: ...Registration Info NO Mileage Info NO Internal printer Yes External printer Yes Address printer Buzzer Yes Approved PTB NO Supervisor pass 1234 Hose Inactive 600 Keypad Timeout 10 Display Timeout 2 On Off sequence 999999 Active keys Action Use Scroll to move to COM and press Enter ...

Page 32: ...inactive 0 000 000 127 5 inactive 0 000 000 109 6 inactive 0 000 000 100 7 inactive 0 000 000 135 8 inactive DD MMM YYYY Date of printout HH MI Time of printout ADDR Meter RF address ID RF Meter Id Last 3 address characters STA Status of RF link OK RF link established KO RF link not established RF link doubtful Active keys Action Use Scroll to move to WO Press Enter ...

Page 33: ...se Meter TNK Print dispense orders by Tank After printing the Work Order List Reports the Work Order list memory is erased automatically Active keys Use Report USR DD MMM YYYY STATISTICAL REPORT BY USER HH MI USER PRODUCT QTY JOHN SMITH FLUID TYPE 1 99999 FLUID TYPE 2 99999 FLUID TYPE 3 99999 FLUID TYPE 4 99999 PAUL GREEN FLUID TYPE 5 99999 FLUID TYPE 6 99999 FLUID TYPE 7 99999 FLUID TYPE 8 99999 ...

Page 34: ... Report HOS DD MMM YYYY STATISTICAL REPORT BY RF METER HH MI ADDR ID USER QTY 123456 456 JOHN SMITH 99999 PAUL GREEN 99999 234561 561 JOHN SMITH 99999 PAUL GREEN 99999 Tank Report TNK DD MMM YYYY STATISTICAL REPORT TANK LEVEL HH MI TNK PRODUCT LEVEL UNT 1 5W30 OIL 123 LITERS 2 GEAR OIL 1111 LITERS 3 ATF 111 11111 GALLONS 4 HYDRAULIC FLUID232 QUARTS 5 10W40 OIL 3466 PINTS 6 WASHER FLUID 1 LITERS 7 ...

Page 35: ...t Report INI CNF COM WO Start INI Report Start CNF Report Start COM Report Select REP USR PRO HOS TNK Start User Start PRO Start HOS Start TNK NOTE It is recommended that the Supervisor print all internal reports and store hard copies a fter setting up the system 35 ...

Page 36: ...ress check mark 10 LX 300 test validate Press check mark 11 RF card test please wait Wait 12 Turn off the mains 10s Unplug the keypad for 10 seconds 13 Plug the keypad in after 10 seconds 14 Date Hour validate Press check mark 15 End Test Passed Unplug the keypad for 10 seconds When the keypad is plugged back in the message Switch on for the first time appears on screen for about five 5 seconds Th...

Page 37: ...37 FLUID TYPE DEFINITIONS Fluid Identification Name 1 2 3 4 5 6 7 8 Maximum Fluid types is 8 The Fluid name can be 16 characters in length ...

Page 38: ...38 TANK DEFINITIONS Tank Identification Fluid Identification or Name Tank Level Tank Capacity 1 2 3 4 5 6 7 8 Maximum of 8 Tanks The Tank capacity value is formatted xxxxx xxx ...

Page 39: ...se Meter Identification Address Number x xxx xxx xxx Tank Number 1 2 3 4 5 6 7 8 9 10 11 12 13 14 15 16 17 18 19 20 21 22 23 24 Maximum of 48 Hose Meters Hose Meter address is a 10 digit number Address Data Format is x xxx xxx xxx ...

Page 40: ... Identification Address Number x xxx xxx xxx Tank Number 25 26 27 28 29 30 31 32 33 34 35 36 37 38 39 40 41 42 43 44 45 46 47 48 Maximum of 48 Hose Meters Hose Meter address is a 10 digit number Address Data Format is x xxx xxx xxx 40 ...

Page 41: ...pson LX 300 II Printer or Compatible An Epson LX 300 II printer or compatible must be used Badger Meter takes no responsibility for and does not support any printer except an Epson LX 300 II LX 300 II printer settings ...

Page 42: ...42 ...

Page 43: ...43 ...

Page 44: ...erview Technical Support Epson America Inc 4 On the screen LX 300II Impact Printer click on Documents Manuals 5 On the next screen click on Product information Guide 6 Go to page 14 Default Settings 7 On the right side of the page is a segment titled Changing Default Settings Follow the instructions to change settings ...

Page 45: ...ipment Accessories User Price List Refer to the Balcrank web site www balcrank com for a copy Any equipment returned to Balcrank must have the Warranty Service Claim number WSC clearly marked on the outside of the carton Balcrank s sole responsibility is for defects in material and workmanship and Buyer s sole and exclusive remedy hereunder shall be limited to repair or replacement of the defectiv...

Reviews: