OPERATION
1. Plug the unit into a 120V AC outlet. The
power supply cord is UL listed and meets
OSHA standards.
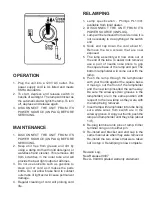
2. To start, depress and release switch in
handle of worklight. The lamp will flicker as
the automatic starter lights the lamp. To turn
off, depress and release again.
3. DISCONNECT THE UNIT FROM ITS
POWER SOURCE (UNPLUG) BEFORE
SERVICING.
MAINTENANCE
1. DISCONNECT THE UNIT FROM ITS
POWER SOURCE (UNPLUG) BEFORE
SERVICING.
2. Keep unit free from grease and dirt by
using a damp cloth with mild detergent, or
waterless hand cleaner. This removes dirt
from scratches in the outer tube and will
provide the best light output at all times.
3. Do not use solvents such as gasoline to
clean unit or cord as it makes the parts
brittle. Do not allow brake fluid to contact
outer tube of light as it will cause permanent
damage.
4. Regular cleaning of cord will prolong cord
life.
RELAMPING
1. Lamp specification - Phillips PL13/41
available from local dealer.
2. DISCONNECT THE UNIT FROM ITS
POWER SOURCE (UNPLUG).
3. Lamp will be removed from cord end so it is
not necessary to do anything at the switch
end.
4. Slide end cap down the cord about 6”.
Remove the two screws that are now
exposed.
5. The lamp assembly will now slide out of
the end of the tube. To assist in its removal,
use a pair of needle nose pliers to grip
the square base of the lamp and pull. The
bottom lampholder will come out with the
lamp.
6. Push the lamp through the lampholder
with your thumb against the square base.
It must go out the front of the lampholder
and the new lamp inserted the same way.
Be sure the wireways (two grooves in the
lampholder) are in the same position with
respect to the new lamp as they were with
the lamp being removed.
7. Insert lamp with lampholder into tube being
sure white wires from switch are in the
wireway groove. Using your thumb, push the
lamp and lampholder until they stop (about
1/4”).
8. Re-plug terminal onto pins of lamp. Either
terminal can go onto either pin.
9. Re-install end bracket and end cap in the
same manner as when they were removed.
Re-install the two screws that were taken
out in step 4. Relamping is now complete.
Revision Log:
New Release 09/07
Rev A - 04/09 Updated warranty statement


