background image

Page 4

54775_97_C

Persistent Memory and Powering Up

Any time you change DIP Switches or Software Configuration Settings that 
affect parameters the user can change (any filter settings, set temperature 
default, Celsius vs Fahrenheit, 12-hour vs 24-hour time, reminders 
suppression, etc), you must reset Persistent Memory for your DIP Switch or 
Software Configuration Settings changes to take effect. You should also reset 
Persistent Memory after loading a new file into a board (using the ESM, 
purchased seperately).

To reset Persistent Memory:

s

 Power 

down.

s

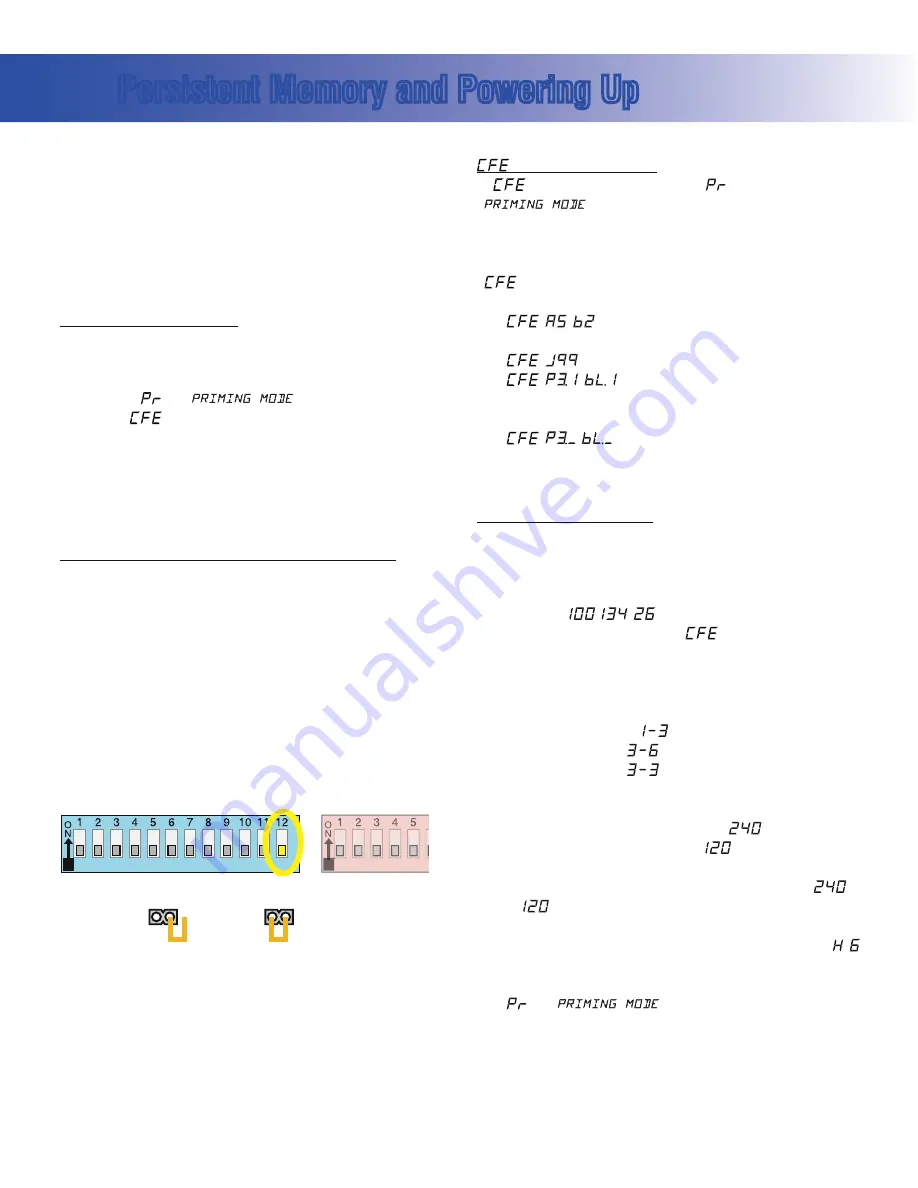
  Set A12 ON (See illustration below).

s

 Power 

up.

s

  Wait until “

” or “

” is displayed on your panel. 

Note: If “

” appears see section below.

s

  Set A12 OFF.  (This can be done safely with power on if you use a non-

conductive tool such as a pencil to push the switch back to the OFF 
position.  Otherwise, power down before setting A12 OFF)

s

  Power up again (if you powered down in the previous step).

s

  For all other power ups, leave A12 OFF.

About Persistent Memory and Time of Day Retention:

This system uses memory that doesn’t require a battery to store a variety 
of settings.  What we refer to as Persistent Memory stores all the User 
Preferences, as well as all the filter settings, the set temperature, and the 
heat mode.

Persistent Memory is not used for Time of Day.  Time of Day needs to be 
“kept running” (not just stored) while the power is off, so a separate Real 
Time Clock feature (on all models except the EL1000) keeps track of 
Time of Day while the unit is off.  Time of Day Retention, and Time of Day 
Retention alone, is controlled by the J91 jumper.  J91 must be set according 
to main system panel used.

 message on power up:

If “

” appears before (and instead of) “

” or 

”, you have not configured DIP Switches and/or 

Software Configuration Settings in a valid manner.  This must be corrected 
before you can reset Persistent Memory.
The switch numbers, jumpers, or configuration settings displayed after

” are ones with which the system has found a configuration problem.  

For example:

s

  “


” would mean that the combination of how you’ve set 

A5 and how you’ve set B2 is not supported on this system.

s

  “


” would mean that there is a problem with jumper J99

s

  “


” would mean that the combination of how 

you’ve set pump 3 for 1-speed and blower for 1-speed is not supported 
on this system.

s

  “


” would mean that the combination of how you’ve 

set DIP switches which have been assigned to pump 3 and blower is not 
supported on this system.

Power Up Display Sequence

Upon power up, you should see the following on the display:

s

  Three numbers in a row, which are the SSID (the System Software 

ID).  The third display of these numbers is the Software Version, which 
should match the version of your system.  For example, if these three 
numbers are 


, that is a Mach 3 EL8000 at version 26.

s

  If there is a Configuration Error, the 

 message (see above) will 

appear at this point (and none of the messages below will display).  
Otherwise what comes next is:

s

  An indication of either the input voltage detected (EL1000/EL2000), or 

the heater wattage range supported (EL8000/GL2000/GL8000).


s


Heater wattage display: “

” means the system supports a heater 

from 1 kW to 3 kW. “

” means the system supports a heater 

from 3 kW to 6 kW. “

” means the system supports a 3 kW 

heater only. (These ranges may be modified slightly in the case of 
special heaters, which the next bullet covers.)


s


Input voltage display:  A system showing “

” supports 3 kW 

to 6 kW heaters.  A system showing “

” supports the very same 

heaters, although at 120V those heaters will function at only 1/4 of 
their 240V rated wattage.  (The system shows only either “

” or 

” as a general indication of input voltage; it does not show the 

actual input voltage.)

s

  If your system is using a special type of heater, a display such as “    ” 

may appear next.  If your system is using the generic Balboa heater, no 
heater type display will appear.

s

  “

” or “

” will appear to signal the start of 

Priming Mode.

At this point, the power up sequence is complete.  Refer to the User Guide 
for the ML Series panel on your system for information about how the spa 
operates from this point on.

Switchbank A 

Switchbank B

J91

J91

RTC

Disabled

(Jumpered)

RTC

Enabled

(Not Jumpered)

Summary of Contents for EL8-EL84P-YCAH

Page 1: ...756 Base PCBA PN 55889 PCB EL8000 PN 22041 Rev A HEX File 10013432_EL84P_02 hex Configuration Signature 513BFF57 Base Panels ML900 PN 54589 Aux Panels AX10A3 PN 52765 Optional Base Panel MLM990S PN 54...

Page 2: ...54775 2756 02 11 2008 Balboa New system at v31 54775 2756 04 24 2008 Balboa Update to v32 54775 2756 06 04 2008 Balboa Pages 1 19 AX40 panel PN 55487 54775 2756 09 10 2008 Balboa New Con g le Change...

Page 3: ...O ADCM J69 J20 J38 1 2 3 LK A 12VAC B J77 MAIN PANELS AUX PANELS J16 J40 J34 J31 J73 J72 J71 J70 Power Requirements s 6 Z LASS PROTECTED SERVICE IRCUIT REAKER RATING MAX s WIRES HOT HOT NEUTRAL GROUND...

Page 4: ...ration problem For example s would mean that the combination of how you ve set A5 and how you ve set B2 is not supported on this system s would mean that there is a problem with jumper J99 s would mea...

Page 5: ...em Wiring Configuration and DIP Settings Setup 1 As Manufactured Switchbank A Switchbank B B2 Assignable B3 Assignable B4 Assignable B5 Assignable B6 Assignable A5 Assignable A6 Assignable B1 Assignab...

Page 6: ...J75 J53 J95 J46 J55 J44 J52 J28 J27 J35 J43 J23 J32 TB1 FUSE 30A CLASS G FUSE 30A CLASS G F6 F7 K7 HTR2 HTR1 K6 K8 FUSE 1 2A 250V F2 K4 K3 K2 J37 K16 J7 J8 K11 K9 K10 G N G N G N J9 J11 G N J1 G N G N...

Page 7: ...ump or blower is turned on Note A2 A3 A4 all off No heat with any high speed pump or blower CFE errors are illegal configurations such as a pump and a blower set to run on the same output The configur...

Page 8: ...0 240 Volts AC Jumper on Pins 2 and 3 will power J8 pin 2 Fiber Optic Light at 12 Volts AC Note J47 and J49 must be set for the same voltage W5 controls voltage on return line of J8 pin 3 and must be...

Page 9: ...bove 1 4 number of hours 3 DIP Switch Light Timeout d 1 2 3 4 d Use Timeouts value above 1 4 number of hours Scrunch Panel n Y n Normal panel layout Y Alternate panel layout ML900 scrunching enabled M...

Page 10: ...ght and EitherLight buttons spa light enabled on SpaLight buttons only Spa Light On Off n Y n Dimmable H M L Light Y On Off Light 1 DIP Switch Fiber Optics n Y n Disabled Y Light and Wheel Enabled 2 D...

Page 11: ...tton 3 Bank B 1 2 3 4 5 6 b g F E o t d P n A U r O H 9 L 8 7 Aux Button 4 Bank B 1 2 3 4 5 6 b g F E o t d P n A U r O H 9 L 8 7 1 6 Assigns Pump Number Pump 1 Pump 2 etc b Blower g Spa Light F Fiber...

Page 12: ...A b C d E F g H J L n o P r Filter 2 Start Hour Set 1 0 1 2 3 4 5 6 7 8 9 A b C d E F g H J L n o P r Filter 2 Duration Set 1 0 1 2 3 4 5 6 7 8 9 A b C d E F g H J L n o P r Standard Defaults 0 0 12 a...

Page 13: ...ycle runs If 4d is set to 0 only the Day cycle runs If neither 3d nor 4d is set to 0 both the Day and Night cycles run Sets default for user preferences only applies when persistent memory is reset A1...

Page 14: ...1 2 5 4 4 5 2 3 6 7 8 DOLPHIN REMOTE ROUND REMOTE Remote Button 1 Bank B 1 2 3 4 5 6 b g F E o t d P n A U r O H 9 L 8 7 Remote Button 2 Bank B 1 2 3 4 5 6 b g F E o t d P n A U r O H 9 L 8 7 Remote B...

Page 15: ...4 8 7 6 5 Time Warm Warm Mode e Cool ML90x Custom Buttons Enable n Y n Disabled Y Enabled 1 DIP Switch ML75x MX75x Custom Button 1 1 2 3 4 5 6 b g F E o t d P n A U r O H 9 L 8 7 ML75x MX75x Custom Bu...

Page 16: ...L55x Custom Button 1 1 2 3 4 5 6 b g F E o t d P n A U r O H 9 L 8 7 ML55x Custom Button 2 1 2 3 4 5 6 b g F E o t d P n A U r O H 9 L 8 7 ML55x Custom Button 3 1 2 3 4 5 6 b g F E o t d P n A U r O H...

Page 17: ...Blower off when 2nd high speed pump on Note DIP A11 must be ON to use Special Amperage Rule Heat Cool Feature n Y n Disabled Y Enabled 1 DIP Switch Color Kinetics n Y n Disabled Y Enabled ACD n Y n D...

Page 18: ...The EL circuit board is factory configured to deliver a preset voltage 120V or 240V to the on board ozone connector J4 See the ratings table on the wiring diagram attached to the cover of the enclosur...

Page 19: ...ts 1 Jets 4 Jets 3 Jets 1 Jets 2 Jets 4 AX10A3 Optional on Se Jets 1 Jets 1 Blower Blower Jets 3 Jets 1 Invert Fiber Jets 3 Time Warm Jets 1 Jets 2 Jets 3 Cool Mode Prog Invert Fiber Light F2 TL F1 PL...

Reviews: