background image


15 

15 

  Improper connection of the equipment-grounding conductor can result in risk of electric 

shock. The conductor with insulation having an outer surface that is green with or without 
yellow stripes is the equipment-grounding conductor. If repair or replacement of the electric 
cord or plug is necessary, do not connect the equipment-grounding conductor to a live 
terminal. 

  Check with a qualified electrician or service personnel if the grounding instructions are not 

completely understood, or if in doubt as to whether the machine is properly grounded. 

  Repair or replace damaged or worn cord immediately. 


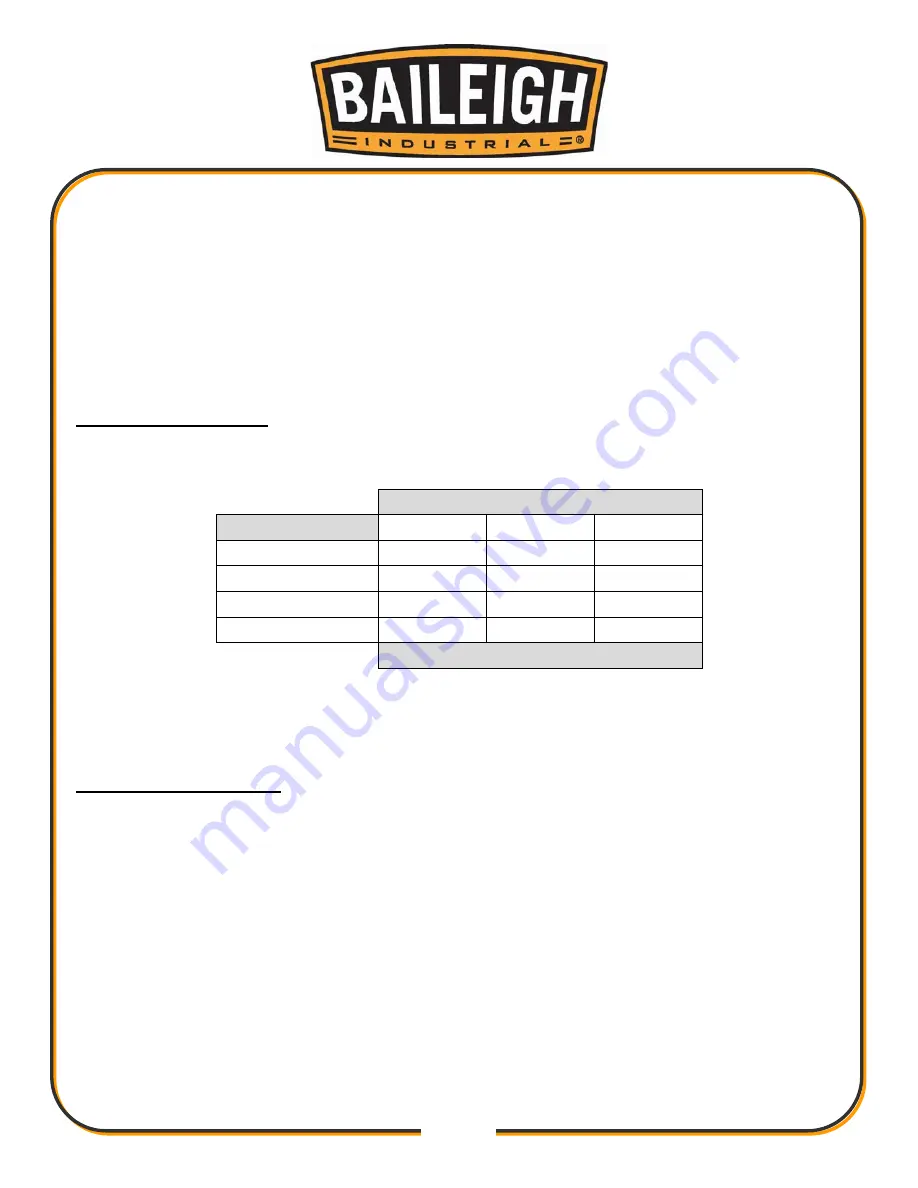
Extension Cord Safety 

Extension cord should be in good condition and meet the minimum wire gauge requirements 
listed below: 


LENGTH 

AMP RATING 

25ft 

50ft 

100ft 

1-12 

16 

16 

14 

13-16 

14 

12 

12 

17-20 

12 

12 

10 

21-30 

10 

10 

No 


WIRE GAUGE 

 
An  undersized cord decreases line voltage, causing loss of power and overheating. All cords 
should use a ground wire and plug pin. Replace any damaged cords immediately. 


Power cord connection: 

1.  Turn the main disconnect switch on the control panel to the OFF position. 

2.  Unwrap the power cord and route the cord away from the machine toward the power supply. 

a.  Route the power cord so that it will NOT become entangled in the machine in any 

way. 

b.  Route the cord to the power supply in a way that does NOT create a trip hazard. 

3.  Connect the power cord to the power supply and check that the power cord has not been 

damaged during installation. 

4.  When the machine is clear of any obstruction. The main power switch may be turn ON to test 

the operation. Turn the switch OFF when the machine is not in operation. 


Summary of Contents for DG-500

Page 1: ...AL INC IS PROHIBITED Baileigh Industrial Inc does not assume and hereby disclaims any liability for any damage or loss caused by an omission or error in this Operator s Manual resulting from accident...

Page 2: ...ATIONS 9 TECHNICAL SUPPORT 9 UNPACKING AND CHECKING CONTENTS 10 Cleaning 10 TRANSPORTING AND LIFTING 11 INSTALLATION 11 Anchoring the Machine 12 GETTING TO KNOW YOUR MACHINE 13 ELECTRICAL 14 MACHINE A...

Page 3: ...e to Seller of any suspected defect in the Goods prior to the expiration of the warranty period The original end user must also obtain a RGA from Seller prior to returning any Goods to Seller for warr...

Page 4: ...or further remedies provided under this Agreement or at law or equity Attorney s Fees In the event legal action is necessary to recover monies due from Buyer or to enforce any provision of this Agree...

Page 5: ...Description of the functional parts of the machine Capacity charts Setup and start up instructions Machine operation Scheduled maintenance Parts lists GENERAL NOTES After receiving your equipment remo...

Page 6: ...zardous situation which if not avoided will result in death or serious injury WARNING Indicates a hazardous situation which if not avoided could result in death or serious injury CAUTION Indicates a h...

Page 7: ...against objectionable or uncomfortable loud noises DUST HAZARD Wear appropriate dust mask Dust created while using machinery can cause cancer birth defects and long term respiratory damage Be aware of...

Page 8: ...educe your potential for injury But even the best guard will not make up for poor judgment carelessness or inattention Always use common sense and exercise caution in the workshop If a procedure feels...

Page 9: ...recommended when using machinery Wear a restrictive hair covering to contain long hair 11 Do not overreach Maintain proper footing and balance at all times DO NOT reach over or across a running machin...

Page 10: ...icals known to cause cancer birth defects and other reproductive harm Some examples of these chemicals are Lead from lead based paint Crystalline silica from bricks cement and other masonry products A...

Page 11: ...Dimensions L x W x H 30 5 x 28 x 54 5 775mm x 711mm x 1384mm Shipping Weight 438lbs 200kg TECHNICAL SUPPORT Our technical support department can be reached at 920 684 4990 and asking for the support d...

Page 12: ...age painted surfaces Follow manufacturer s label instructions when using any type of cleaning product After cleaning wipe unpainted metal surfaces with a light coating of quality oil or grease for pro...

Page 13: ...er gently to the floor Level the machine so that all the supporting feet are taking the weight of the machine and no rocking is taking place INSTALLATION IMPORTANT Consider the following when looking...

Page 14: ...be a level surface If the unit wobbles or rocks once in place be sure to eliminate by using shims WORKING CLEARANCES Take into consideration the size of the material to be processed Make sure that yo...

Page 15: ...o raise or lower table on column F Guard Helps to control sparks and dust G Start Stop Switch w Lockout Lift button to start Press button to stop Remove yellow insert to lockout H Motor Turns the disc...

Page 16: ...indicated on the machine All line connections should make good contact Running on low voltage will damage the motor In the event of a malfunction or breakdown grounding provides a path of least resist...

Page 17: ...sted below LENGTH AMP RATING 25ft 50ft 100ft 1 12 16 16 14 13 16 14 12 12 17 20 12 12 10 21 30 10 10 No WIRE GAUGE An undersized cord decreases line voltage causing loss of power and overheating All c...

Page 18: ...el C 2 After the table is adjusted retighten the knob B The working table A can also be raised or lowered on the column 3 Loosen the knob D and adjust the table height with the hand wheel E 4 When the...

Page 19: ...e new grinding disc against the drive disc and center the grinding disc carefully onto the drive disc Press to hold that section against the drive disc 7 Rotate the drive disc 180 The part of the grin...

Page 20: ...safety keeping the piece part in this area greatly increases the effectiveness of the dust control chute and any vacuum dust control system you might be using 5 The speed and aggressiveness of the ma...

Page 21: ...TERIAL SELECTION When selecting materials keep these instructions in mind Material must be clean and dry without oil Material should have a smooth surface so it processes easily Dimensional properties...

Page 22: ...stiff brush to remove excessive dust and grit from the tilt mechanism and table raising gear rack Check daily for any unsafe conditions and fix immediately Check that all nuts and bolts are properly t...

Page 23: ...21 21 PARTS IDENTIFICATION DRAWING...

Page 24: ...Nut 2 10 Hex Bolt 1 11 Gear Worm 1 12 Bearing 2 13 Washer Flat 1 14 Handle Lock Assembly 1 15 Hex Bolt 4 16 Worm Table Lifting 1 17 Pin 1 18 Shaft 1 19 Bracket Shaft Support 1 20 Washer 2 21 Screw 2 2...

Page 25: ...50 Arm Disc Guard L 1 51 Guard Disc 1 52 Segment Solid 1 53 Screw 1 54 Pilot Right 1 55 Screw 1 56 Screw 1 57 Pilot Left 1 58 Segment Gear 2 59 Pointer 4 60 Screw Round Head 1 61 Trunnion 1 62 Screw 1...

Page 26: ...24 24 Item Description Qty 75 Plate Switch 1 76 Switch 1 77 Screw 2 78 Connector 2 79 Cord Power 1 80 Sanding Disc 1 81 Bolt 2 82 Nut 2 83 Wire Motor 1 86 Chute Dust 1...

Page 27: ...25 25 NOTES...

Page 28: ...4 www baileigh com BAILEIGH INDUSTRIAL INC 1455 S CAMPUS AVENUE ONTARIO CA 91761 PHONE 920 684 4990 FAX 920 684 3944 BAILEIGH INDUSTRIAL LTD UNIT D SWIFT POINT SWIFT VALLEY INDUSTRIAL ESTATE RUGBY WES...

Reviews: