background image

CLEANING & MAINTENANCE

For easy cleaning, the blades on your BaByliss For Men clipper are
removable. Regular cleaning will maintain their high performance level.
To clean proceed as follows:
• Switch the appliance off and unplug at the mains supply.
•  Remove any comb guides. Rinse the comb guide under running 

water and dry thoroughly before storage or use.

•  Remove the blades carefully noting which way round they are fitted. 

This will help with re-assembling.

•  Remove the two screws from the large fixed blade and detach this 

blade.

•  Now brush away the hair and other debris from the interior of the 

cutting head and blades.

•  Re-assembly is simply the reverse of the above instructions.
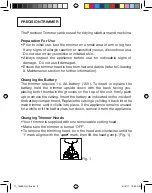
•  Finally, before fully tightening the two screws in the large blade, to 

avoid injury ensure that the blades are correctly aligned. With the 
taper control lever fully forward, the tips of the small blade must be 
parallel with and 1mm below the tips of the large blade. Also check 
that the extreme left hand tooth of the small blade is inside the large 
blade. (Failure to do so could cause injury).

•  Carefully tighten the two screws in the big blade, taking care not to 

disturb the above correct position of the blades.

NOTE:

 Do not attempt to repair or replace the blades. In the event that

the blades become blunt or damaged, contact the Conair Customer
Care Line (refer to UK «After Sales Service» section for further 
information).

17_7448DGU_IB.indd   8

4/10/17   10:25 AM

Summary of Contents for 7448DGU

Page 1: ...Model 7448DGU COPPER GIFT SET 17_7448DGU_IB indd 1 4 10 17 10 25 AM...

Page 2: ...a variety of lengths and different styles and a separates battery operated trimmer for shaping and edging the sideburns and hair line A travel bag completes the set for convenient storage and easy tr...

Page 3: ...e Do not use if damaged or if the appliance has been dropped In the event of damage contact the Conair Customer Care Centre refer to UK Guarantee section for further information Only use the attachmen...

Page 4: ...re that they do not play with this product Always switch off and unplug the appliance when changing cutting guides when cleaning or when not in use Allow appliance to cool before storing away After us...

Page 5: ...or a further few seconds to allow the oil to thoroughly spread the length of the blades Switch off the unit and remove any excess oil by gently dabbing with a cloth Comb Guides This appliance is suppl...

Page 6: ...th the teeth of the clipper pointing upwards ensuring that the comb guide is resting flat against the head Slowly move the clipper upwards and outwards through the hair towards your crown against the...

Page 7: ...the neck with the comb guide flat against the head move the clipper upwards and outwards over the area you want to take shorter Repeat on the sides of the hair starting with the teeth of the clipper p...

Page 8: ...e assembly is simply the reverse of the above instructions Finally before fully tightening the two screws in the large blade to avoid injury ensure that the blades are correctly aligned With the taper...

Page 9: ...x AA battery 1 5V To insert or replace the battery hold the trimmer upside down with the back facing you placing both thumbs in the grooves on the top of the unit firmly push up to remove the casing I...

Page 10: ...d outward through the hair against the direction of hair growth The trimmer will work most efficiently when cutting through hair at its own speed Never force the trimmer Never switch the appliance off...

Page 11: ...anteed for consumer use for 3 years This guarantee covers defects under normal use from date of purchase and ceases to be valid in the event of alteration or repair by unauthorised persons If the appl...

Page 12: ...r plug proceed as follows The wire which is coloured BLUE must be connected to the terminal which is marked with the letter N The wire which is coloured BROWN must be connected to the terminal which i...

Reviews: