background image

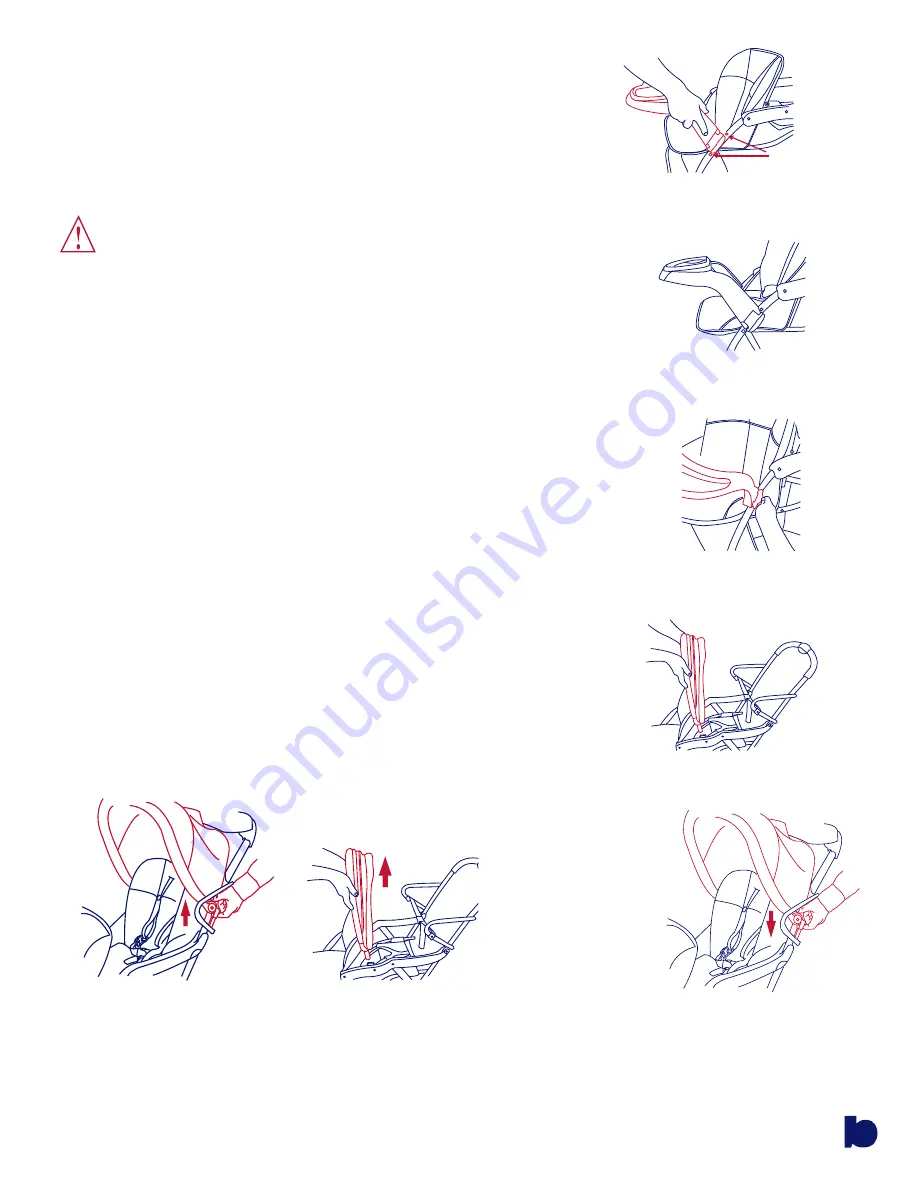
6.  To attach the front child tray, push the tray onto the front frame tube, 

lining up the tray between the protruding rivets. Push backward on the 

latch until snapped into place.  The protruding rivets on the outside of 

the frame tube should be between the tray latch.  Check that the tray is 

securely latched in place.  Please see figure 5 and 6.  

7.   To remove front child tray, pull outward on the latches and pull outward 

on the tray.  Please see figure 7.  Please note that you may attach or 

remove one end at a time.  

    WARNING:

 The child’s tray is not a 

restraint device: always secure your child with 

the  seat  belt.  DO  NOT  lift  the  stroller  by  the 

child’s tray.  Use care when attaching the child’s 

tray on the stroller with a child in the stroller. 

8.   To attach the front canopy, line up the male fittings on the canopy with 

the female fittings on the armrest and push both fittings downward until 

snapped into place.  Please see figure 8.   Push forward on the front edge 

of the canopy to open. 

Fig. 5.

Fig. 6.

Fig. 7.

Fig. 8.

Rivet

9.  To attach the rear canopy line up the female fittings of the canopy with   

     the male fittings on the handle frame tube and push downward.  Please    

     see figure 9. 

10. To remove rear canopy reverse installation steps and pull up to remove.  

      Please see figure 9A.

11. To remove front canopy depress the plastic attachment and pull upward  

      to remove. Please see figure 9B.

Fig. 9.

4

Fig. 9A.

Fig. 9B.

Summary of Contents for Sit N Stand Plus 7581

Page 1: ...enience through innovation and thoughtful design Sit N Stand Plus with Car Seat Snap N Go Attachment System Model 7581 Read all instructions BEFORE assembly and USE of product KEEP INSTRUCTIONS FOR FU...

Page 2: ...0 inches tall Use of the stroller with two 2 children weighing more than 40 pounds each or children totaling more than 80 pounds will cause excessive wear and stress on the stroller and may cause a ha...

Page 3: ...h the rear wheels position the rear axle and wheel assembly such that the brake levers are facing to the rear of the stroller Press the rear wheel assembly onto the rear frame tubes being careful that...

Page 4: ...seat belt DO NOT lift the stroller by the child s tray Use care when attaching the child s tray on the stroller with a child in the stroller 8 To attach the front canopy line up the male fittings on...

Page 5: ...lance and coordination and is not over 40 inches tall Position the child on the platform on the back of the stroller Be sure child is facing forward and hands are holding frame Secure the safety belt...

Page 6: ...Locate the rear seat attachment positions Please see figure 15 Unhook the fabric from the tabs on the stroller handle frame Repeat for opposite side Also un snap the footrest fabric as shown in figur...

Page 7: ...ack TO REMOVE FRONT CHILD TRAY 1 To remove front child tray pull forward on the locking lever on the tray arms to unlock Please see figure 7 Please note that you may attach or remove one end at a time...

Page 8: ...move the child tray 2 Slide snap n go attachment bar into the female slots located on the frame tube Make sure the snap n go attachment bar locks in place before attaching the car seat See figure 23 3...

Reviews: