background image

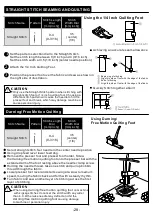
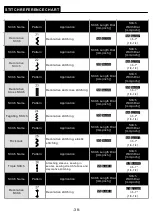
SCALLOP STITCH

Stitch Name


Pattern

Stitch Length 

Dial

[mm(inch)]

Stitch 

Width Dial

[mm(inch)]

Open Toe 

Foot

All Purpose 

Foot

Scallop Stitch

0-1

(0-1/16)


3.5-7*

(1/8-1/4)

These stitches are used to sew a decorative edge on garments
and table cloths using the Opening Toe Foot or the All Purpose Foot.

1

SCALLOP HEM

(1)


Fold the fabric with right sides together and sew near the edge.

(2) Cut the fabric along the seam leaving an allowance of 3 mm (1/8")
      for seaming. Notch the allowance.
(3) Turn fabric with right sides out and gently push out the curved 
      seam then press. 
       

2

DECORATIVE SCALLOP EDGE

(1)


Place the fabric with wrong sides together and stitch near the edge.

(2) Trim along the outside edge of the stitching;being careful not to 
      cut the stitching. 
(3) Use seam sealant or fabric glue to secure edges of the scallop 
      stitching. 
       

-30-

10

Summary of Contents for Jazz BLMJZ

Page 1: ......

Page 2: ......

Page 3: ...product is intended for household use 1 The sewing machine s rating is 100V 120Vac 20 If one of the LED lamps is damaged or broken it must be replaced by the manufacture or its service agent in order...

Page 4: ...2...

Page 5: ...achine directly into the wall Do not use extension cords To give your machine a longer life 1 Do not store this machine in direct sunlight or in high humidity conditions Do not use or store the machin...

Page 6: ...EAD TENSION FABRIC THREAD AND NEEDLE COMBINATIONS STRAIGHT STITCH SEWING ZIGZAG STITCH SEWING BLIND HEM STITCH SEWING OVERCASTING OVERLOCKING MULTI STITCH ZIGZAG STRETCH STITCH SEWING SEWING BUTTONHOL...

Page 7: ...isc 10 Bobbin Winder Shaft 22 Thumb Screw Holes 12 Knee Lifter Mounting Slot 13 Flat Bed Attachment With Accessory Compartments 14 Pattern Indicator 15 Stitch Length Dial 16 Stitch Width Dial 17 Press...

Page 8: ...Controller 27 Lower Thread Guide 28 Needle Threader 29 Buttonhole Lever 30 Presser Foot Holder Screw 31 Needle Plate 26 32 Bobbin Cover 33 Presser Foot Lever 34 Presser Foot Holder 35 Needle Clamp Sc...

Page 9: ...nvenient for sewing tubular and hard to reach areas To change your machine to the free arm style remove the flat bed attachment 1 Slide the flat bed attachment to the left to release it 7 17 17 Knee L...

Page 10: ...ain power first Always grasp the plug to remove it from the outlet Pulling on the cord may damage the cord or lead to fire or electric shock Do not allow the power cord to be cut damaged modified forc...

Page 11: ...wrong presser foot the needle may strike the presser foot and bend or break and may cause injury Only use presser feet that have been designed to be used with this machine Using any other presser foot...

Page 12: ...e end of thread and start the machine WINDING THE BOBBIN If the spool of thread is not correctly placed the thread may tangle on the spool Make sure you follow the instructions carefully If you do not...

Page 13: ...your right hand guide the thread through the slot pull the thread toward you to cut it with cutter as shown and then replace the bobbin cover and close cut Slot This machine uses Class 15 bobbins To p...

Page 14: ...orward and down the right channel then to the left and up the left channel 6 Pull the thread through and into the take up lever from right to left 7 Pass the thread down the left channel and into the...

Page 15: ...needle goes down into the needle plate and back up to the highest position 3 Lightly pull the top thread upward until a loop of bobbin thread comes up 4 Grasp the bobbin thread and pull both top and b...

Page 16: ...millimeters mm 1 25 inch THE HIGHER THE NUMBER THE LONGER THE STITCH With the 0 setting material will not feed This is used when sewing a button The range is for making a satin stitch which is used f...

Page 17: ...Sewing Lever 1 Drop Feed Dog Lever The feed dog should be up for all general sewing Lower the feed dog for free motion darning embroidery monogramming and stipple quilting When the feed dog is lowere...

Page 18: ...ar as far as possible If the knee lifter bar is not pushed into the mounting slot as far as possible it may come out during use 3 Use your knee to move the knee lifter to the right in order to raise t...

Page 19: ...e upper thread tension should be set to a slightly weaker tension than when sewing straight stitches Turn the tension dial to a lower number to decrease the upper thread tension Turn the tension dial...

Page 20: ...er thread is not threaded correctly or thread tension regulator may not be set correctly Refer to page 12 for correct upper threading Lightweight Fabric thin georgette organdy viole taffeta silk etc M...

Page 21: ...sition the needle 1cm 3 8 inch from the edge of the fabric Guide the upper and bobbin threads under the presser foot and toward the back of the machine 5 Lower the presser foot 6 To back tack push dow...

Page 22: ...nd pull the fabric out gently to the left side of the machine 3 Cut both threads with the thread cutter on the left hand side of the machine 3 Sewing Heavy Fabric When sewing heavy fabrics the front o...

Page 23: ...an be used for making buttonholes and a few decorative stitches Set the pattern selection dial to the zigzag stitch set the stitch length dial in the range and set the stitch width dial between 0 and...

Page 24: ...ompleted sewing The Blind Hem Stitch is useful for stretch fabric If too much of the stitching shows on the right side of the fabric change to a narrower stitch width or move the guide on the foot to...

Page 25: ...tterns and stitch width CAUTION Use a narrow zigzag width for lightweight fabrics Adjust the width and length for various weights of knit and stretch fabrics When using overcasting foot do not change...

Page 26: ...on right side is at the edge on the fabric see page 22 STRETCH STITCH SEWING Stitch Name Pattern Stitch Length Dial mm inch Stitch Width Dial mm inch All Purpose Foot Triple Stitch 3 5 7 1 8 1 4 Rick...

Page 27: ...t so that the center line mark is in the center of the needle opening in the buttonhole foot With the main part of the foot pushed to the back lower the presser foot lever 5 Pull the buttonhole lever...

Page 28: ...rew with included large screwdriver If the stitch density on the buttonhole s right side is less than the left side use the large screwdriver to turn the fine tuning screw slightly toward the right cl...

Page 29: ...instructions on how to prepare zipper placket and place zipper To sew close to the zipper on the right side snap the zipper foot onto the presser foot holder on the left side so the needle passes thro...

Page 30: ...r Screw the darning free motion quilting foot onto the presser bar with the extended arm of the foot resting above the needle clamp screw Holding the needle thread take one stitch and pull up bobbin t...

Page 31: ...ch Width Dial mm inch Decorative Overcasting 3 5 7 1 8 1 4 Decorative Applique 3 5 7 1 8 1 4 Using Open Toe Foot 1 Position the applique on fabric with fabric glue fusible iron on stabilizer or bastin...

Page 32: ...old the fabric with right sides together and sew near the edge 2 Cut the fabric along the seam leaving an allowance of 3 mm 1 8 for seaming Notch the allowance 3 Turn fabric with right sides out and g...

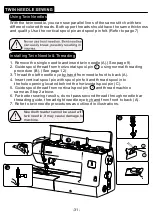
Page 33: ...g procedure B See page 12 3 Thread the left needle eye by hand from needle front to back A 4 Insert vertical spool pin with spool pin felt and thread spool into the hole opening located behind the hor...

Page 34: ...be sure to attach All Purpose foot and always check that the needles do not touch needle plate and presser foot otherwise the needle may break or damage the machine When using the twin needle be sure...

Page 35: ...ioned against the spring 4 Replace the needle plate Put a drop of good quality sewing machine oil on the hook race as indicated by arrow A Never use a bobbin case that is scratched otherwise the upper...

Page 36: ...12 11 17 11 12 17 12 32 18 18 18 32 8 8 10 15 Needle is not raised to highest position Eye of needle too small Hook pin on threader bent Insert needle size 11 or higher See authorized Baby Lock retai...

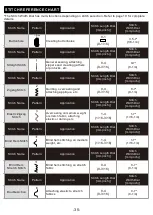
Page 37: ...3 16 1 7 1 16 1 4 Stitch Name Pattern Application Stitch Length Dial mm inch Stitch Width Dial mm inch Blind Hem Stitch Blind hem stitching on medium weight etc 1 4 1 16 3 16 1 7 1 16 1 4 Stitch Name...

Page 38: ...tin scallop stitching 0 4 0 3 16 3 5 7 1 8 1 4 Stitch Name Pattern Application Stitch Length Dial mm inch Stitch Width Dial mm inch Decorative Satin Stitch Decorative and satin stitching 0 4 0 3 16 3...

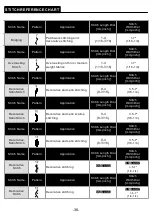
Page 39: ...ch Width Dial mm inch Decorative Stitch Decorative stitching 3 5 7 1 8 1 4 Stitch Name Pattern Application Stitch Length Dial mm inch Stitch Width Dial mm inch Double Overlock Stitch Decorative hemmin...

Page 40: ...m inch Stitch Width Dial mm inch Rick rack Decorative stitching elastic stitching 3 5 7 1 8 1 4 Stitch Name Pattern Application Stitch Length Dial mm inch Stitch Width Dial mm inch Triple Stitch Attac...

Page 41: ......

Page 42: ...IBBLMJZ English Printed in Taiwan...

Reviews: