background image

24

BEFORE YOU CALL FOR SERVICE

Your new serger was carefully inspected and tested at the factory and was in perfect working order when
shipped.
Under normal conditions, if you carefully follow instructions for threading, operating and maintenance, your
machine will give you years of trouble-free service.
Occasional difficulties are usually caused by a condition that can be easily remedied with a minor adjustment.
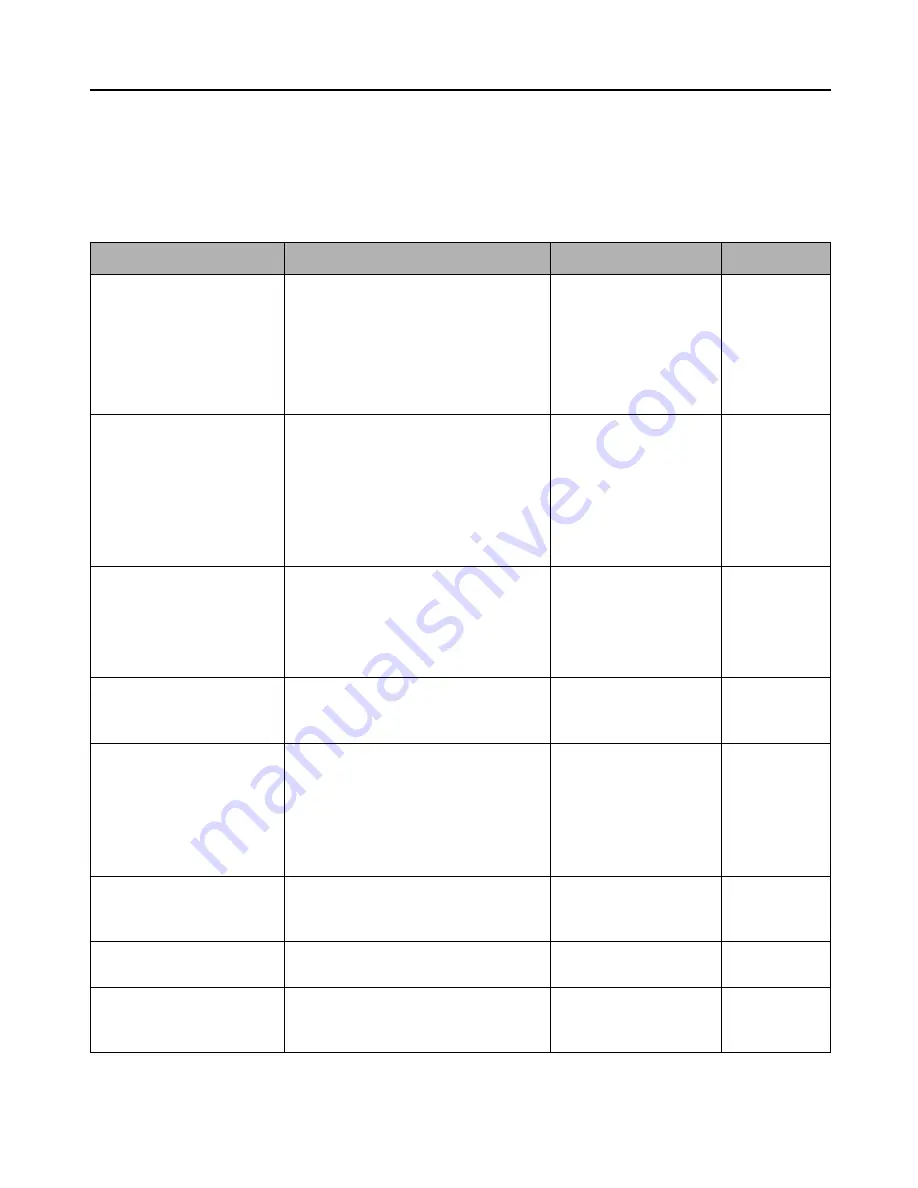
Some possible problems, their causes and corrections are given here.

REF. PAGE

5

11, 13, 15, 17

5

6-9

6-9

5

5

13

5

6-9

11, 13, 15, 17

10

5

5

13

23

12

12

11, 13, 15, 17

12

11, 13, 15, 17

23

4

4

CORRECTION

Reset needle

Loosen thread tensions

Insert new needle

Rethread machine

Rethread machine

Insert new needle

Reset needle

Increase pressure

Insert correct needle

Rethread machine

Loosen thread tensions

Do not pull fabric

Choose correct needle

and thread

Reset needle

Increase pressure

Change lower blade

Readjust stitch length

Readjust differential feed

Loosen thread tensions

Readjust seam width

Check thread tensions

Clean the machine

Check plug

Turn on the switch

CAUSE

• Needle inserted incorrectly

• Thread tensions are too tight

• Bent or blunt needle

• Machine not properly threaded

• Threads are caught in incorrect guide

• Bent or blunt needle

• Needle inserted incorrectly

• Pressure on foot insufficient

• Incorrect needle size or type

• Machine incorrectly threaded

• Tensions set too high

• Pulling fabric while sewing

• Incorrect size needle or thread for

fabric being sewn

• Needle inserted incorrectly

• Pressure on presser foot insufficient

• Lower blade is dull

• Stitch length not suitable for fabric

• Differential feed not suitable

• Thread tensions are too tight

• Seam width not suitable for fabric

• Tensions not adjusted properly

• Dirt or lint in stitching mechanism

• Cord not plugged into electrical outlet

• Light and power switch not on

PROBLEM

THREAD BREAKS

MACHINE SKIPS

STITCHES

NEEDLE BREAKS

MACHINE DOES NOT

FEED PROPERLY

FABRIC PUCKERS

LOOSE STITCHES OR

LOOPS FORMED

MACHINE RUNS HEAVILY

MACHINE WILL NOT SEW

Summary of Contents for A-LINE Lauren BL450A

Page 1: ......

Page 2: ...tailer or service center for examination repair electrical or mechanical adjustment 4 Never operate the sewing machine with any air openings blocked Keep ventilation openings of the sewing machine and...

Page 3: ...THREAD TENSION 11 SETTING STITCH LENGTH 12 ADJUSTING THE DIFFERENTIAL FEED 12 SETTING THE SEAM WIDTH 12 ADJUSTING THE PRESSURE ON FABRIC 13 OVERLOCK SEWING 1 needle 3 thread 13 three thread tension 1...

Page 4: ...Looper Thread Tension Dial Blue 4 Upper Looper Thread Tension Dial Green 5 Thread Guide and Pretension Disc 6 Right Needle Thread Tension Dial Yellow 7 Left Needle Thread Tension Dial Red 8 Pressure...

Page 5: ...2 Upper Blade Holder 3 Upper Blade 4 Needle Plate 5 Seam Width Knob 6 Upper Looper 7 Lower Looper 8 Lower Blade 1 To unlock side cover turn lever located on left side of Extension Table towards front...

Page 6: ...ont of the terminal box To turn power on push the front side of the switch Turning on the power lights up the stitching area The machine will not operate unless the switch is on FOOT CONTROL Model YC...

Page 7: ...means the fineness of both needle and thread FABRICS LIGHTWEIGHT organdy voile taffeta lawn crepe MEDIUM WEIGHT gingham satin seersucker linen velveteen gabardine broadcloth HEAVY WEIGHT denim tweed c...

Page 8: ...ar up as far as it will go 2 Rotate the Thread Guide Hanger so that the Thread Guides are right above the spool pins Stopper pegs will snap into position 3 Place the spools or thread cones on spool pi...

Page 9: ...Bring thread straight down through the slot so that it passes between the tension discs 4 Hook thread from the left side 5 Hook thread from the right side 6 Hook thread from the bottom side and pull...

Page 10: ...left E Hook thread from the bottom side F Hook thread from the bottom side and pull thread towards left G Turn handwheel toward you until the lower looper is in extreme left side position Pass thread...

Page 11: ...des with red color marking on machine A C Thread same sequence as threading upper and lower looper thread D Hook thread into front opening of guide and pull thread up E Hook into guide by sliding thre...

Page 12: ...d you until the upper looper is in the lowest position Pass thread through the looper hole Lower Looper Thread cut the needle threads near needle hole rethread the lower looper rethread the needle nee...

Page 13: ...en sewing with 80 to 90 polyester spun threads Turning thread tension dial Increase Decrease Medium Weight Correct 4 thread tension Upper Looper Thread Left Needle Thread Right Needle Thread Bottom si...

Page 14: ...the rear feed dog motion The front feed dog will hold back the fabric enabling the rear feed dog to take it up behind the needle without any puckering fig 12 C When sewing stretch or knit fabrics tur...

Page 15: ...side of fabric Bottom side of fabric Lower Looper Thread 6 2 mm The pressure on the foot can be adjusted for different weight fabrics The fabric should move along smoothly and evenly without slipping...

Page 16: ...late off and replace with Rolled Hemming Plate Be sure that thread is not caught under plate 8 Retighten the screw and replace Free Arm Cover 1 Turn power switch off 2 Turn handwheel toward you until...

Page 17: ...s table is a guide for thread tensions when sewing with 80 to 90 polyester spun threads Needle thread is too loose Upper looper thread is too loose Lower looper thread is too loose Light Medium Fabric...

Page 18: ...al seam known as the flatlock seam You can flatlock garments ranging from lingerie to fake fur coats When sewing with two threads you can achieve a flat bulk free seam Using it to seam fake fur fabric...

Page 19: ...per to its lowest position 2 With your finger push back on the subsidiary looper and rotate clockwise up to disengage from the eye of the upper looper 3 Remove subsidiary looper from the upper looper...

Page 20: ...de is adjusted by turning the screw 3 Raise the presser foot 1 Fold hem up as desired fold it back toward right side of the fabric Leave 1 to 2 cm seam allowance to the right sewing First sew a test s...

Page 21: ...nd hem presser foot to insure even seam width NOTE When using the blind hem foot always remove the left needle 1 Unplug the machine 2 Open the front cover 3 Turn handwheel toward you until the upper b...

Page 22: ...Sample Lower Looper Thread Upper Looper Thread Needle Thread 1 First sew test sample for adjusting the thread tensions 2 Fold fabric with wrong sides together 3 Adjust the plastic guide on blind hem f...

Page 23: ...overlock stitching Try using various types of thread to create attractive combinations experiment with different tension adjustments to produce a variety of decorative effects examples Upper Looper Th...

Page 24: ...ng line 2 Sew to the end of fabric and stop machine 3 Raise needle and presser foot 4 Pull fabric slightly towards the back and pull out tangled thread from Needle plate 5 Turn fabric and position the...

Page 25: ...en it becomes dull An extra blade is provided with the accessories 1 Unplug the machine 2 Open the front cover 3 Disengage the upper blade See page 19 4 Loosen the Lower Blade Screw and take out the b...

Page 26: ...ade Readjust stitch length Readjust differential feed Loosen thread tensions Readjust seam width Check thread tensions Clean the machine Check plug Turn on the switch CAUSE Needle inserted incorrectly...

Page 27: ...Refer to Page 13 for Tension Adjustment Refer to Page 15 for Tension Adjustment Refer to Page 15 for Tension Adjustment Refer to Page 17 for Tension Adjustment 1 4 mm 1 4 mm 1 4 mm 1 2 mm 1 2 mm 1 4...

Page 28: ...62180 BL450A B8...

Reviews: