


40429 Brickyard Drive • Madera, CA 93636 • USA
559.438.5800 • FAX 559.438.5900
www.bklighting.com • [email protected]
B-K LIGHTING
IMPORTANT SAFETY INFORMATION LISTED ON REVERSE
READ, FOLLOW, AND SAVE ALL SAFETY AND INSTALLATION INSTRUCTIONS
RELEASED
10-30-18
REFERENCE
NUMBER
INS-2783-00
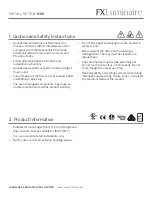
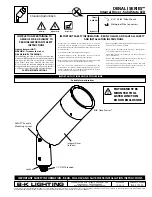
DENALI SERIES™
Integral Driver - Solid State LED
Standard Installation
Integral Driver Replacement
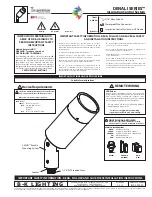
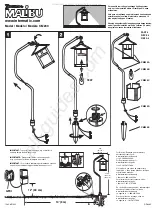
3. Loosen two (2) #4-40 hex nuts on heatsink
assembly. Gently pull heatsink and driver from
fixture body.
2. Twist and pull away optic.
1. Loosen three (3) #8-32 set screws with 5/64”
Allen wrench on cap, then remove cap.
5. Connect new driver assembly to fixture leads
Place connections inside body cavity, then slide
down fixture body along guides.
4. Disconnect driver assembly from fixture body.
Separate heatsink from driver assembly via quick
disconnect.
10. Install cap by tightening three (3) #8-32 set
screws with 5/64” Allen wrench. Do not over
tighten.
9. Twist to reinstall optic onto optic holder.
6. Remove protective plastic from the double-sided
tape square on clean top of driver assembly.
7. Reconnect heatsink assembly to driver assembly
via quick disconnect. Quick disconnect tucks into
space underneath heatsink. Press heatsink down
along guides until flush and even with tape on
driver.
8. Tighten two (2) #4-40 hex nuts onto guides to
secure heatsink assembly in fixture.