


150-CF24-
101
8 of 19
1) Choose the desired Sub-Function.
The currently selected Sub-Function will be distinguished by the white font
color displayed on the Selection Button.
Example:
After the desired Sub-Function is highlighted, press the “MENU” key to
activate the highlighted Sub-Function
Press the “
√
” key one time to resume navigation in the Menu Selection
List
2) Adjust the desired Level.
Example:
After the desired selection is activated, press the [
▼
] or [
▲
] keys to set
the desired level.
Press the “
√
” key one time to activate the desired level and resume
navigation in the MAIN Menu Selection List
Press the “
√
” key one additional time to resume navigation in the Top- Level OSD
menu.
Pressing “
√
” while in the Top-Level of the OSD menu will deactivate the OSD.
4.4.
OSD MENU NAVIGATION – IMAGE MENU (MAIN VGA MODE)
If the OSD is not visible, press the “MENU” key, once, to activate the OSD.
Navigate to the MAIN menu and set the Source to “VGA”, before proceeding.
Press the [
▼
] or [
▲
] keys to navigate to the IMAGE menu
Observe the following choices in the IMAGE Menu Selection List:
•
Auto Adjust
- (Single Sub-Function Selection Button)
•
Auto Gain
- (Single Sub-Function Selection Button)
•
Phase
- (Level Adjust Function)
•
Clock
- (Level Adjust Function)
•
Horizontal
Position
- (Level Adjust Function)
•
Vertical
Position
- (Level Adjust Function)
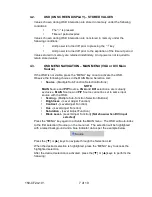
Brightness
Adjustment Indicator
Bar
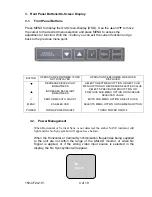
VGA
DVI
Source


