background image

150-CF24-

101


11 of 19 


2)  Adjust the desired Level. 

Example: 


After the desired selection is activated, press the 

[

]

 or 

[

]

 keys to set 

the desired level. 
 Press the “

” key one time to accept the desired level and resume 

navigation in the PIP Menu Selection List. 

Press the “

” key one additional time to resume navigation in the Top Level OSD 

menu. 

Pressing “

” while in the Top-Level of the OSD menu will deactivate the OSD. 


4.6. 

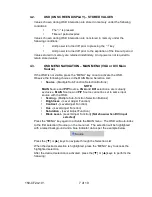
OSD MENU NAVIGATION – COLOR MENU 


If the OSD is not visible, press the “MENU” key once to activate the OSD.  Press 
the [

] or [

] keys to navigate to the COLOR menu. 

Observe the following choices in the COLOR Menu Selection List: 


sRGB

 - (Multiple Sub-Function Selection Buttons) 


Color Temperature

 - (Multiple Sub-Function Selection Buttons) 


Red

 - (Level Adjust Function) 


Green

 - (Level Adjust Function) 


Blue

 - (Level Adjust Function) 

Press the “

MENU

” key again to activate the 

COLOR

 menu.  The OSD will auto-

index to the first selection (

sRBG

) on the menu list.  The selection will be 

highlighted with a raised background and a blue indicator dot as per the example 
below: 


Press the 

[

]

 or 

[

]

 keys to navigate through the Selection List. 

When the desired selection is highlighted, press the “

MENU”

 key to access the 

highlighted selection. 

After the desired selection is activated, press the 

[

]

 or 

[

]

 keys to perform the 

following: 

Brightness 

Adjustment Indicator 

Bar 

sRGB 

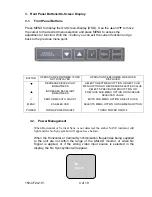
Summary of Contents for CFP24W2 Series

Page 1: ...Riga Lane Birdsboro PA 19508 USA Telephone 610 404 7400 Fax 610 404 8190 www aydindisplays com USER S MANUAL for the Model CFP24W2 24 INCH AMLCD FLAT PANEL COLOR MONITOR Document 150 CF24 101 Nov 200...

Page 2: ...Activation 6 4 1 3 OSD Menu 6 4 2 OSD ON SCREEN DISPLAY STORED VALUES 7 4 3 OSD MENU NAVIGATION MAIN MENU VGA or DVI Main Source 7 4 4 OSD MENU NAVIGATION IMAGE MENU MAIN VGA MODE 8 4 5 OSD MENU NAVIG...

Page 3: ...76Hz Input Signal Video Sync Analog 0 7V p p 75 Separate sync TTL level Horizontal Sync Positive Negative Vertical Sync Positive Negative Composite Sync Positive Negative Sync on Green Video 0 7Vp p...

Page 4: ...CREASE SELECTED VALUE INCREASES BACKLIGHT BRIGHTNESS SELECTS PREVIOUS MENU OPTION OR PREVIOUS SUB MENU OPTION OR INCREASE SELECTED VALUE PERFORMS AUTO ADJUST EXITS SUB MENU OPTION OR EXITS OSD MENU EN...

Page 5: ...ing Supply a format with Horizontal or Vertical Synchronization frequencies that are compatible with the display Connect a video source to the selected video input on the display Enable the correct vi...

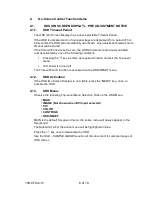
Page 6: ...Pressing the key as often as required to reach and exit the Top Level menu Unit power is turned off The Timeout Period function is accessed via the OSD RESET menu 4 1 2 OSD Activation If the OSD On S...

Page 7: ...iple Sub Function Selection Buttons NOTE MAIN Source and PIP Source VGA and DVI selections are mutually exclusive MAIN Source and PIP Source cannot be set to same input source with the OSD Scaling Mul...

Page 8: ...N Menu Selection List Press the key one additional time to resume navigation in the Top Level OSD menu Pressing while in the Top Level of the OSD menu will deactivate the OSD 4 4 OSD MENU NAVIGATION I...

Page 9: ...ist See examples below When the desired selection is highlighted press the MENU key to activate the highlighted selection The remaining items in the IMAGE Menu Selection List are associated with Level...

Page 10: ...Adjust Function Press the MENU key again to activate the PIP menu The OSD will auto index to the first selection Source on the menu list The selection will be highlighted with a raised background and...

Page 11: ...serve the following choices in the COLOR Menu Selection List sRGB Multiple Sub Function Selection Buttons Color Temperature Multiple Sub Function Selection Buttons Red Level Adjust Function Green Leve...

Page 12: ...in the Top Level of the OSD menu will deactivate the OSD 4 7 OSD MENU NAVIGATION CONTROLS MENU If the OSD is not visible press the MENU key once to activate the OSD Press the or keys to navigate to t...

Page 13: ...orizontal Level Adjust Function Vertical Level Adjust Function Blend Level Adjust Function Time Out Time Adjust Function Press the MENU key again to activate the OSD RESET menu The OSD will auto index...

Page 14: ...owing No Default Selection Do Not Perform Factory Reset Yes Perform Factory Reset If No is highlighted press the MENU or key to return to the OSD RESET menu If Yes is highlighted press the MENU key to...

Page 15: ...election will be highlighted with a raised background and a blue indicator dot See example below Press the or keys to navigate through the Selection List When the desired non Factory Reset selection i...

Page 16: ...150 CF24 101 16 of 19 4 10 OSD MENU SAMPLE IMAGES MAIN VGA MAIN DVI IMAGE PIP COLOR CONTROLS...

Page 17: ...150 CF24 101 17 of 19 OSD RESET...

Page 18: ...lay may have a Resistive Touch Option If it does please install the following Touch Driver If you require further assistance please contact Aydin Displays Customer Service at 610 404 7400 x 5322 http...

Page 19: ...is fuse replacement Any other corrective maintenance should be deferred to the depot or factory 6 3 Troubleshooting No Picture a If no front panel indicators are lit the most likely cause is no power...

Page 20: ...Aydin Displays CFP24W2 VESA Mount Options Bonded Faceplate Touch Screen Top Handles...

Reviews: