


150-CF24-
101
7 of 19
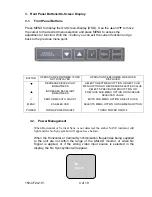
4.2.
OSD (ON SCREEN DISPLAY) – STORED VALUES
Values chosen during OSD interaction are stored in memory under the following
conditions:
•
The “
√
” is pressed
•
Timeout period expires
Values chosen during OSD interaction are not stored in memory under the
following conditions:
•
Unit power is turned off prior to pressing the “
√
” key
•
Unit power is turned off prior to the expiration of the timeout period
Values stored in memory are retained indefinitely. Unit power is not required to
retain stored values.
4.3.
OSD MENU NAVIGATION – MAIN MENU (VGA or DVI Main
Source)
If the OSD is not visible, press the “MENU” key once to activate the OSD.
Observe the following choices in the MAIN Menu Selection List:
•
Source
- (Multiple Sub-Function Selection Buttons)
NOTE
:
MAIN
Source and
PIP
Source,
VGA
and
DVI
selections, are
mutually
exclusive
.
MAIN
Source and
PIP
Source
cannot
be set to same input
source with the OSD.
•
Scaling -
(Multiple Sub-Function Selection Buttons)
•
Brightness -
(Level Adjust Function)
•
Contrast -
(Level Adjust Function)
•
Hue -
(Level Adjust Function)
•
Saturation -
(Level Adjust Function)
•
Black Level -
(Level Adjust Function
) (Not shown when DVI input
selected)
Press the “MENU” key again to activate the MAIN menu. The OSD will auto-index
to the first selection (Source) on the menu list. The selection will be highlighted
with a raised background and a blue indicator dot as per the example below.
Press the [
▼
] or [
▲
] keys to navigate through the Selection List
When the desired selection is highlighted, press the “MENU” key to access the
highlighted selection
After the desired selection is activated, press the [
▼
] or [
▲
] keys to perform the
following:
Source


