background image

Table Of Contents 

………………………………….……….


IMPORTANT WARNING 

This product includes instructions for installation which must be carefully   
followed. The instructions are worded in such a manner to assume that the 
installer is capable of completing these type of electronic installations. If you 
are unclear as to what you are instructed to do or believe that you do not  
understand the instructions so as to  properly and safely complete the   
installation you should consult a technician who does have this knowledge and 
understanding. 

Failure to follow these instructions carefully and to install the interface as  
described could cause harm to the vehicle or to safety systems on the vehicle. 
Interference with certain safety systems could cause harm to persons as well. 

PRECAUTIONS.……………………………………..…...3 

WIRING LEGEND AND DESCRIPTION…………4-5 

ASSIGNMENT OF SWITCHES…………….………….6 

FEATURE PROGRAMMING…….……….………...7-8 

DEVICE SETTINGS MENU…..…………………..…...9 

FAQ……………………………………………….....…….10 

QUICK START GUIDE ………………………...…11-12 

Summary of Contents for AXi-CANBOX1

Page 1: ...REVIEW THIS INSTALLATION MANUAL CAREFULLY BEFORE BEGINNING ANY WORK AXi JAGVIM C AXi GIG C AXi GIGCAM C AXi GIG AV C AXi GIG CAMAV C AXi QUAD C AXi QUAD1 CAM C AXi QUAD1 AV C AXi RRVIM C AXi SYNC C AXi SYNCAM10 C AXi SYNCAM12 C AXi UCT22 C AXi UCT22 CAM C AXi UNI C AXi UNI CAM C ...

Page 2: ...nderstand the instructions so as to properly and safely complete the installation you should consult a technician who does have this knowledge and understanding Failure to follow these instructions carefully and to install the interface as described could cause harm to the vehicle or to safety systems on the vehicle Interference with certain safety systems could cause harm to persons as well PRECA...

Page 3: ...nt to its intended way of operation may result in property damage personal injury or death Set Parking brake Remove the negative battery cable Protect fenders before starting Using protective blankets to cover front seats interior of the vehicle and center console Always install a fuse 6 12 inches away from AXXESS i interface 5 amp fuse should be used Always secure AXXESS i interface with Velcro o...

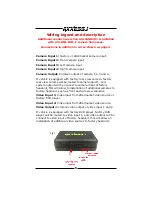
Page 4: ...nect to chassis ground or radio chassis CAN Wires If installation is going to be performed without plug and play harness CAN High and CAN Low Wires must be cut and the AXi CANBOX1 will be installed in line Orange Wire CAN High radio side Connect orange wire to radio side of vehicles CAN High wire Green Wire CAN Low radio side Connect green wire to radio side of vehicles CAN Low wire Yellow Wire CA...

Page 5: ...ill be routed to camera input 1 and camera output will be connect to camera input of factory headunit this will allow to installation of additional cameras to factory headunit such as front and side view cameras Video Input 1 Video input from aftermarket video source or factory DVD player Video Input 2 Video input from aftermarket video source Video Output Common video output of video input 1 and ...

Page 6: ... set to ON position in case where switches need to be set to ON positing this information will be available in AXi harness installation manual For most installations fig 2 and fig 3 shows correct switch position To access switches remove cover by removing two screws in each corner of AXi CANBOX1 fig 3 ON CTS ON ON OFF OFF 1 2 fig 2 ...

Page 7: ...r AXXESS i online updater is only compatible with Microsoft Windows based PC After installation is complete go to your start menu locate folder with AXXESS i online updater and run the program We have built in AXXESS i Team Viewer feature and live chat for tech support in case you have any question during update and require immediate support On the bottom left corner of the AXXESS i online updater...

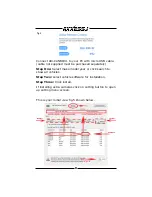
Page 8: ...ed separately Step One Select make model year or click search to show all vehicles Step Two select vehicle software for installation Step Three Click install If installing extra cameras click on setting button to open up setting menu screen This is your initial view fig 5 shown below fig 4 ...

Page 9: ...market rear view camera Left Camera Place check mark if installing left side view camera Right Camera Place check mark if installing right side view camera Video In Motion Place check mark to enable video in motion feature Refer to vehicle specific installation manual for camera operations and controls If any changes are made press ACCEPT button and all settings will register to the AXi CANBOX1 ...

Page 10: ... driving the screen goes blank and no camera is shown A Make sure camera is connected to 12V Accessory power and not to reverse lights Q Video In Motion or Navigation In Motion is not working when driving A This features are designed for off road use only and never when operating vehicle on public roads different makes and models have different activation sequences ex press mute button 4 times on ...

Page 11: ...different makes and models have different activation sequences ex press mute button 4 times on the steering wheel by activating control in motion via activation sequence you are acknowledging that you are either off road or in controlled environment away from public roads Rear View Camera Input Camera In Drive if you have installed a back up camera your aftermarket camera will turn on automaticall...

Reviews: