


ENGLISH
71
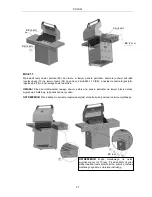
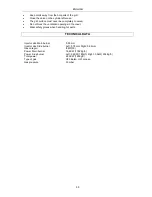
1
Warming rack
1
21
Swivel wheel
1
2
Grill rack (2)
2
22
Fixed wheel
2
3
Flame protection
4
23
Left door, trolley
1
4
Main burner
4
24
Right door, trolley
1
5
Flame control
3
25
Crossbar, trolley
1
6
Cover
1
26
Lock magnet
2
7
Drip tray
1
27
Back panel, trolley
1
8
Burner holder, right
1
28
Left panel, trolley
1
9
Side burner, right
1
29
Burner valve, left
1
10
Grill
1
30
Holder, drip tray
1
11
Electrode conductor
1
31
Front left upright, trolley
1
12
Burner valve, right
1
32
Drip tray
1
13
Electrode
1
33
Lighter chain
1
14
Shelf, right
1
34
Shelf, left
1
15
Holder, control knob
6
35
Left burner
1
16
Knob
6
36
Grill rack, burner
1
17
Right panel, trolley
1
37
Damper plate
1
18
Front right upright, trolley
1
38
Burner tray, left
x 1
19
Bottom panel, trolley
1
39
Burner tray, right
1
20
Lockable wheel
1
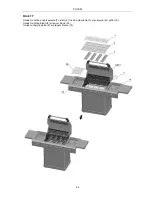
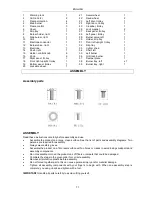
ASSEMBLY
Assembly parts
ASSEMBLY
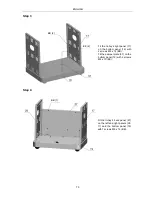
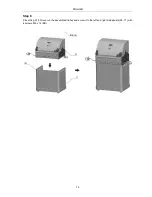
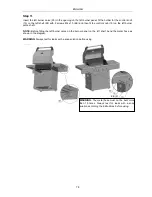
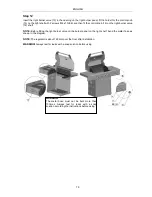
Read these instructions carefully before assembly and use.
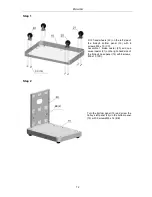
Assemble the product on a large, clean surface. See the list of parts and assembly diagrams. Two
persons are required for assembly.
Always wear safety gloves.
Assemble the product on a firm, level surface with no holes or cracks to avoid losing small parts and
assembly components.
Do not assemble or move the product on soft floors or carpets that could be damaged.
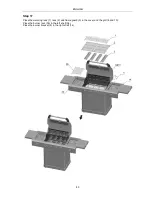
Complete the steps in the given order for correct assembly.
Remove all protective plastic before assembly.
Do not forced together parts, this can cause personal injury and/or material damage.
Tighten all assembly components with your fingers to begin with. When one assembly step is
complete, you can go back and tighten with a tool.
IMPORTANT!
Handle all parts carefully to avoid cutting yourself.
Summary of Contents for 761-033
Page 7: ...SVENSKA 7 BESKRIVNING Delar ...
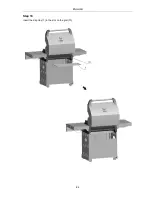
Page 21: ...SVENSKA 21 Steg 18 För in dropptråget 7 i spåret på grillen 10 ...
Page 28: ...NORSK 28 BESKRIVELSE Deler ...
Page 42: ...NORSK 42 Trinn 18 Før dryppfatet 7 inn i sporet på grillen 10 ...
Page 49: ...POLSKI 49 OPIS Części ...
Page 63: ...POLSKI 63 Krok 18 Wsuń tackę na tłuszcz 7 w szczelinę grilla 10 ...
Page 70: ...ENGLISH 70 DESCRIPTION Parts ...
Page 84: ...ENGLISH 84 Step 18 Insert the drip tray 7 in the slot on the grill 10 ...
Page 89: ......