background image


Installing Your Camera on a Network


AXIS 2100 User’s Guide


24


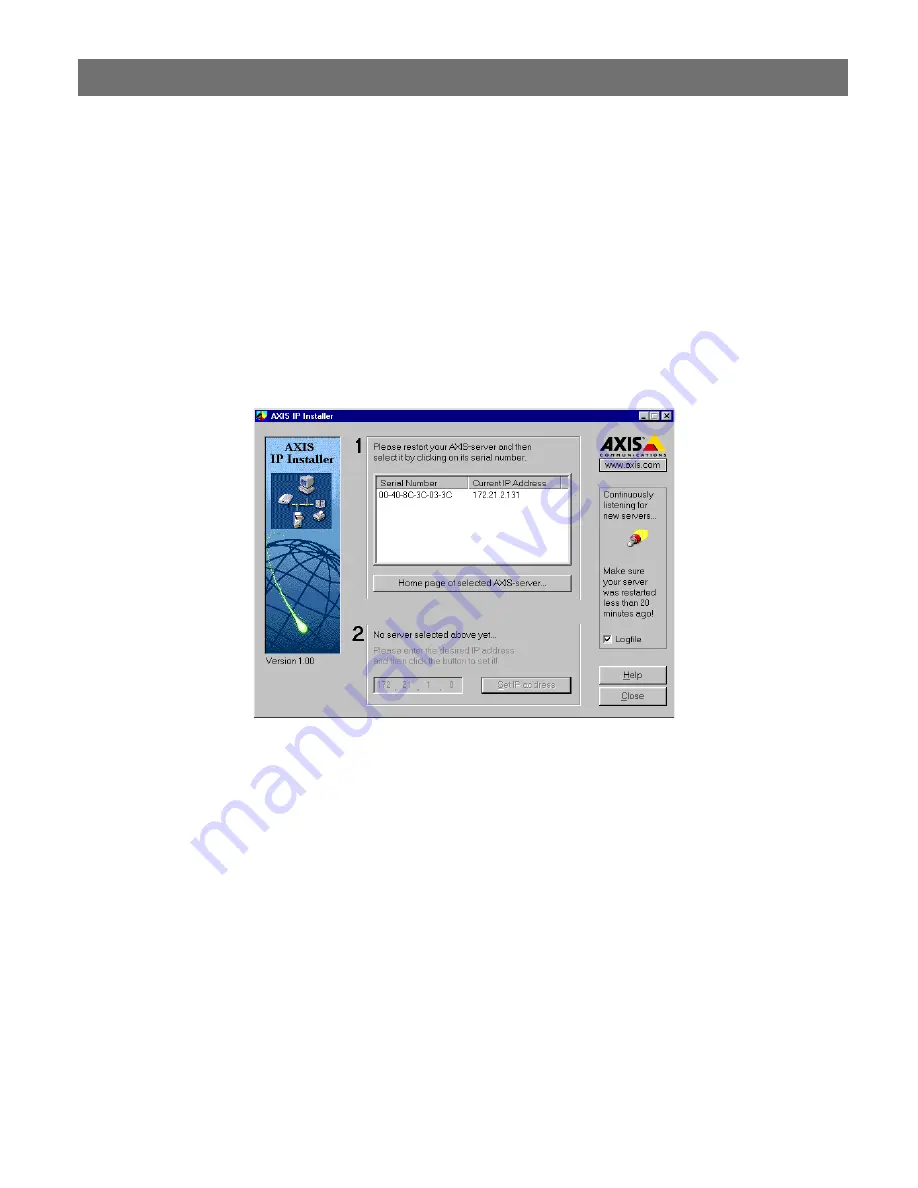
Using the AXIS IP Installer

AXIS IP Installer is a Windows 95/98 & NT/2000 program that is ideal for setting the IP addresses 
for 

multiple

 Axis’ networking products on your network. Also allowing you to conveniently access 

the home Web page of any Axis ThinServer device connected to your network, this freely 
distributed software is available for download from Axis’ Website at

 http://www.axis.com/

.


Installing the AXIS IP Installer:

1. Download the latest AXIS IP Installer software onto your desktop and run the 

Setup_IPInstaller.exe

 program to start the installation. 

2. The 

AXIS IP Installer - Setup 

dialog is displayed on the screen.

3. Follow the instructions as they appear on the screen. 

4. Click 

Finish

 to complete the installation.

Setting the IP Address with AXIS IP Installer:

1. Run the 

AXIS IP Installer

 from the 

Start

 menu. The 

AXIS IP Installer

 dialog is displayed on 

the screen. 

2. Restart your AXIS 2100 by disconnecting the power supply and then reconnecting it. 

3. Select the serial number of your AXIS 2100 from the list. The serial number is identical to the 

unit’s Ethernet address, found on the underneath of the unit.

4. Enter the desired IP address. Click 

Set IP address

. The IP address will now be set. 

5. To access the home page of the AXIS 2100, click 

Home page of selected Axis-server...


You can now configure the AXIS 2100 according to your requirements.

6. Click 

OK

 to exit the program. 

For more help during the installation of the IP address, click 

Help

 or press 

F1

.

Summary of Contents for NETWORK CAMERA 2100

Page 1: ...Live web images unleashed U S E R S G U I D E A X I S 2 1 0 0 N E T W O R K C A M E R A V 1 1...

Page 2: ...ll now see the message Request timed out repeatedly returned in the window To verify that the address has been set and that communication is established ping the unit once again with the new IP addres...

Page 3: ...AXIS 2100 Network Camera User s Guide...

Page 4: ...may be necessary to correct the interference Shielded cables should be used with this unit to ensure compliance with the Class A limits Europe This digital equipment fulfills the requirements for rad...

Page 5: ...our Browser 22 Alternative Methods of Assigning the IP Address 23 Using Your Camera with a Modem 26 Before You Begin 26 Adjusting the Camera Focus 32 The Focus Assistant 32 Replacing the Lens 34 Confi...

Page 6: ...sed control of the various management and configuration functions Use the camera for intruder detection bank security child protection process control industrial and public surveillance visual securit...

Page 7: ...on environments Open Standards Environment Supporting TCP IP SMTP e mail HTTP and other protocols the AXIS 2100 can be used in mixed environments such as Windows UNIX Macintosh and OS 2 Integrates eas...

Page 8: ...s for software developers are often added Follow the camera links and check it out at www axis com Linux Operating System Including a Boa Web server the Linux operating system provides a stable platfo...

Page 9: ...s on page 32 Lens Assembly Includes a wide angle lens with rotational focus control The supplied lens is removable and can be replaced with any standard C CS lens Serial Number Located on the undersid...

Page 10: ...nnector The AXIS 2100 is designed for 10 Mbps Ethernet and 100 Mbps Fast Ethernet networks and connects to the network via a twisted pair category 5 cable 10baseT and 100baseTX terminated using a stan...

Page 11: ...appropriately for your application three holes in the base unit allow the product to be securely fastened to any wall or ceiling Note If you need to mount your camera upside down the AXIS 2100 can be...

Page 12: ...esktop on your network However the AXIS 2100 offers more than just access to live video images By using the available Wizards to guide you through the process you can configure the camera for any numb...

Page 13: ...ntains average file sizes in kilobytes derived from real life tests Note Using a modern computer will avoid introducing any unnecessary bottleneck when viewing the images Lighting Conditions Just like...

Page 14: ...a larger audience for your images you should consider configuring your product to upload images to an FTP server on your network as described in Sequentially Uploading Images to a Remote FTP Server o...

Page 15: ...tially via e mail messages Installation and Configuration Overview Configure the AXIS 2100 to actively upload images to an FTP server as follows Note You can refine your application using the Web base...

Page 16: ...Note You can refine your application using the Web based Administration Tools 1 Connect the AXIS 2100 to your local network Refer to Installing Your Camera on a Network on page 20 2 Open the Home Pag...

Page 17: ...there is no network available The Null Modem Cable should not be used for any other purpose Note Once the Dial up modem connection has been created and the AXIS 2100 is physically con nected to the mo...

Page 18: ...Remote Imaging in a Custom designed Web Page The AXIS 2100 can be configured as a standalone application that is completely remote from any network Ideal for remote surveillance industrial control an...

Page 19: ...g the Installation Wizard to develop an active application that uploads live images to a designated ISP over normal phone lines Your image files are transmitted as a sequential stream or restricted to...

Page 20: ...taken and uploaded to your ISP You can also arrange for e mail alerts containing the alarm image buffer and a link to the camera 1 Connect the AXIS 2100 to the network if available Otherwise use the s...

Page 21: ...on refer to Using Your Camera with a Modem on page 26 3 Refine the Dial up parameters 4 Initiate the Dial up connection 5 Referring to Configuring Your Camera on page 35 open the Home Page in your bro...

Page 22: ...dem see Using Your Camera with a Modem on page 26 Do not use the default or IP address featured in the following examples when installing your AXIS 2100 Acquire an unused IP address from your Network...

Page 23: ...o access the AXIS 2100 from your Web browser as described in the next section Attach the external Power Supply Attach the external Power Supply to the unit and connect it to your local mains supply Wa...

Page 24: ...portant 2 Continue the setup process and configure your own application using the Installation Wizard or Administration Tools as described in Configuring Your Camera on page 38 http 172 21 1 200 To en...

Page 25: ...hermore all Axis products are shipped with the same password as default For further information refer to System Security on page 39 Ethernet Address The AXIS 2100 is pre configured with a unique Ether...

Page 26: ...s displayed on the screen 3 Follow the instructions as they appear on the screen 4 Click Finish to complete the installation Setting the IP Address with AXIS IP Installer 1 Run the AXIS IP Installer f...

Page 27: ...to download the IP address default router address and subnet mask Mapping a Host Name to the IP Address If you are using host names you can also map a unique host name to the acquired IP address Refe...

Page 28: ...sh the basic settings using the Wizards and Administration Tools See the following pages for more information This type of connection is only a temporary solution that provides initial access to the c...

Page 29: ...your Dial up Networking session and enter any URL the AXIS 2100 emulates a DNS server and will respond to this regardless 5 Start the Installation Wizard and Administration Tools to further configure...

Page 30: ...Windows Help Connect the supplied Null Modem Cable between the COM port on the AXIS 2100 and the serial port on your computer From the Start menu open the Control Panel and double click the Modems ic...

Page 31: ...ave now successfully created your dedicated Dial Up Networking connection for your AXIS 2100 The telephone numbers requested in the following dialog are not required for use in the logical connection...

Page 32: ...ed used in this and previous examples Select Properties In the Advanced options field check Enable software compression All other check boxes should remain unchecked In the Allowed network protocols f...

Page 33: ...Dial up connection Step by step instructions on how to do this are provided on the preceding pages of this section Double click the Dial Up connection icon that was previously created for your AXIS 21...

Page 34: ...ed cameras where the distance between the AXIS 2100 and your viewing workstation is often considerable Focus Quality Once set to Focus Mode the Status Indicator displays the following colors that repr...

Page 35: ...gorithm that regularly calculates the quality of focus within the camera s field of view 4 In order for the Focus Assistant to access the full focusing range for your application environment you now t...

Page 36: ...Focus Assistant is closed Replacing the Lens Because the AXIS 2100 is designed with a CS mount the lens supplied with your camera can be replaced with any standard CS or C lens typically used in the...

Page 37: ...rior to commencing with this section If not please refer to Choosing Your Application on page 10 and the respective sections for your installation Installing Your Camera on a Network on page 20 or Usi...

Page 38: ...om the Administration Tools It provides a quick and easy way of defining the settings for your application as defined in the Administration Tools Overview on page 39 Starting the Application Wizard 1...

Page 39: ...Modem Cable in the location address field Example 2 The AXIS 2100 Home page is now displayed Click Administration Tools Note When entering these pages for the first time in a Web browser session you...

Page 40: ...8 3 The Administration Tools are now presented as links in the margin of the Administration Page Simply click the relevant link for the parameters you want to configure As an Administrator you configu...

Page 41: ...passive Mode Scheduler Set the times for recording images Upload Make the settings for how images are uploaded Layout General Determine the Layout for the Web page in which your images will appear cu...

Page 42: ...ecting the power cable 2 Press and hold the Control Button depressed and reconnect the power supply cable 3 Continue to keep the Control button depressed until the Status Indicator displays yellow not...

Page 43: ...ing your camera when there is no network available Q Can I set up my camera to run as a PC cam on my computer A No The AXIS 2100 is a network camera for use only on Ethernet networks or with a modem Q...

Page 44: ...to troubleshoot TCP IP problems on your network 1 Disconnect your AXIS 2100 from the network 2 Start a DOS window 3 Type ping x x x x where x x x x is the IP address of the AXIS 2100 The subsequent re...

Page 45: ...rol Panel and Network 2 Specify the TCP IP adapter and click on Properties In Properties click IP Address 3 Check that the first 3 numbers in the IP address of your AXIS 2100 match the first 3 of your...

Page 46: ...of a known unit on your network 2 If the cabling is OK and your network is reachable you should receive a reply similar to this bytes 32 time 2 ms The Active and Network indicators are flashing every...

Page 47: ...pe lens If you have previously replaced the supplied CS type lens you may have inadvertently installed a C type lens without first fitting the required adaptor See also page 34 Noisy images Video imag...

Page 48: ...www axis com or from your local distributor Upgrading the Software The AXIS 2100 Flash memory is upgraded over the network using FTP See the detailed instructions supplied with each new software rele...

Page 49: ...standalone unit independent of any computer network When a local network connection is unavailable at the point of installation connect your PC to this connector using the supplied Null Modem Cable to...

Page 50: ...ese buttons Pin Function 1 Common Ground 2 Positive Connection for DC Power Input or Output Electrically in parallel with the derived DC power for the unit this pin may be used as a power input or out...

Page 51: ...AXIS 2100 User s Guide The Unit Connectors 49 Connection Diagram for a Simple Door Switch GND o o 1 2 o o 4 3 IN OUT DC Power AXIS 2100 Door Switch...

Page 52: ...The Unit Connectors AXIS 2100 User s Guide 50 Connection Diagram for an LED indicator Output GND o 1 2 o o 4 3 IN OUT DC Power AXIS 2100 o LED Resistor LED Indicator Output...

Page 53: ...ed for external equipment such as an Infrared sensor When connecting other equipment using this connector the maximum current of 50mA must be strictly observed Failure to do so may cause a loss of pow...

Page 54: ...ard that allows a local area network LAN to use one set of IP addresses for internal traffic and a second set of addresses for external traffic A NAT box located where your LAN meets the Internet will...

Page 55: ...ngle modem ISDN or high speed line such as xDSL or cable modem connection and effectively shares a single Internet connection with almost any type of client computer running TCP IP For more advanced u...

Page 56: ...rammable digital input output for remote image storage via FTP or SMTP pre post alarm image storage Image Updating Up to 10 frames second over 10Mbps or 100Mbps networks Pre Post Alarm Buffer Up to 50...

Page 57: ...et 5 Ethernet address 23 ETRAX 100 54 F Factory Default Settings 40 Fast Ethernet 5 File sizes 11 Firewalls 52 Focus Assistant 32 Focus Mode 32 Focus Quality 32 H Home page 22 HTTP 5 I I O Connector 8...

Page 58: ...ndex AXIS 2100 User s Manual 56 RS232 connector 8 diagram 47 S Serial number 7 SMTP 5 Status Indicator 32 T technical specifications 54 triggering images 48 troubleshooting 41 47 W WinGate 53 X xDSL 5...

Page 59: ...mage format used widely for photographs Also known as JPG LAN A local area network LAN is a group of computers and associated devices that typically share common resources within a limited geographica...

Reviews: