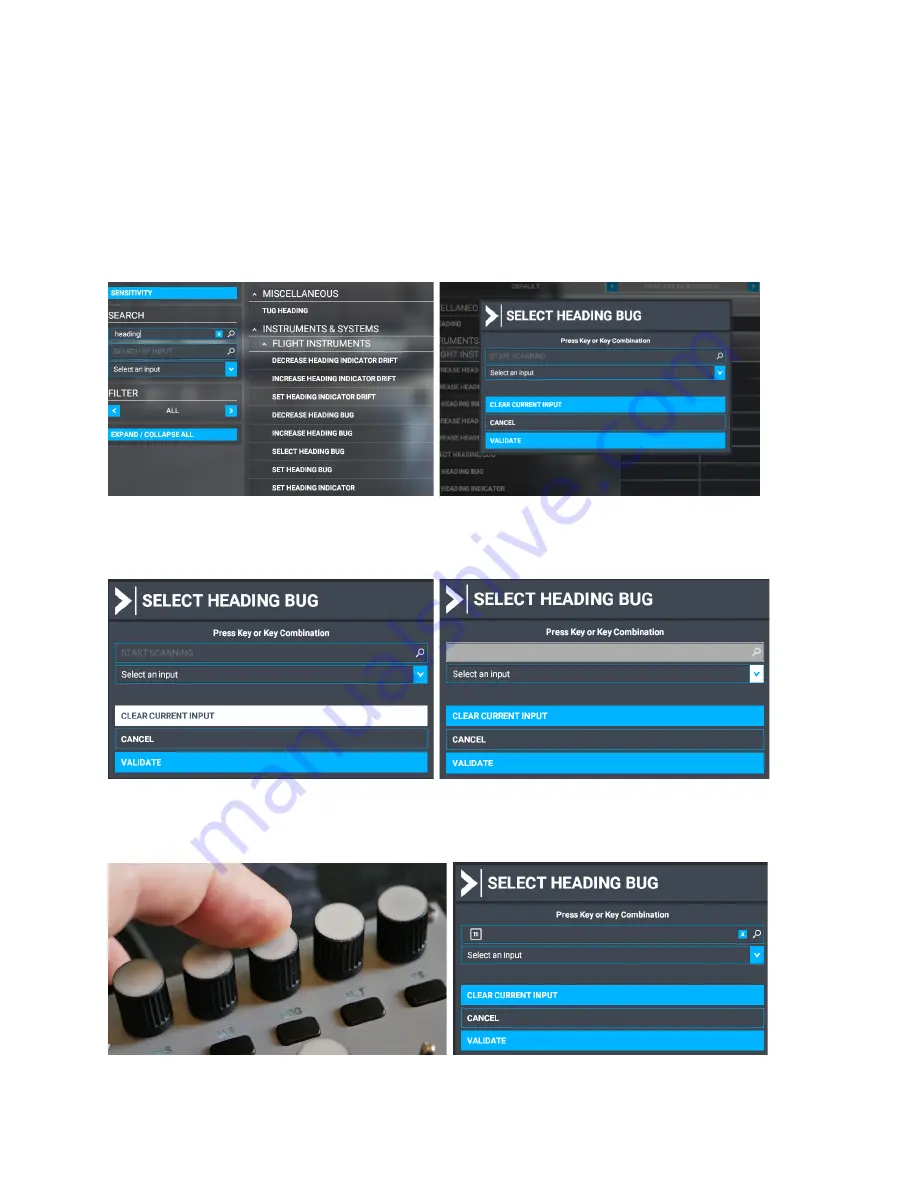
Axair MIAP V2 Manual Download Page 8

MIAP V2-V5 MANUAL 

Step 3:


On the left side of the assignment window select ALL under the FILTER option. This 
will show all possible controller settings for the MIAP. In the search bar, you can 
search for the button or switch you want to assign, which could be any function but, 
in this example, we will assign Heading bug functionality to the MIAP. Type Heading in 
the search and all assignment possibilities will be displayed. Next, click on the first 
dark grey square to open the current function to the button assignment window. 


Click on the box with the text ‘START SCANNING’

. The box will grey out and is waiting 

for input from the MIAP.  


Click on the corresponding MIAP button, in this case, press swiftly on the top of the 
rotary button with the HDG text. Press VALIDATE after Nr 15 has appeared. 


Summary of Contents for MIAP V2

Page 1: ...1 MIAP V2 V5 MANUAL MANUAL MIAP V3 V5 Mini Autopilot...

Page 2: ...2 MIAP V2 V5 MANUAL Contents INTRODUCTION 3 CONNECTIONS 4 BUTTON AND SWITCHES 4 SOFTWARE 5 ASSIGNMENT EXAMPLES 6 Warnings and notes 13 Troubleshooting 13...

Page 3: ...es have a limited power output so it is advised to use different USB buses built in your PC over a non external powered USB hub The MIAP unit consists of 6 rotary knobs with a top press switch functio...

Page 4: ...obs can rotate 360 degrees left and right and have a switch build in activated by pressing the top of the rotary knob All the switches have momentary functionality except the frequency knob 18 which a...

Page 5: ...ike to use the MIAP to control keyboard buttons for instance for Video editing software We would however recommend checking out the recently released AXIAR EASY unit which might better suit for other...

Page 6: ...to show a maximum of 32 buttons Button 33 will however operate as normal in your flight simulator software The MIAP unit is assigned as shown in the picture which corresponds to the numbers showing up...

Page 7: ...the FS2020 software is already running a selection windows will pop up where you can choose to customize which will take you to the control settings menu automatically Step 2 You can now create a new...

Page 8: ...will assign Heading bug functionality to the MIAP Type Heading in the search and all assignment possibilities will be displayed Next click on the first dark grey square to open the current function to...

Page 9: ...the knob clockwise this time After validating again the numbers become visible and the button can be tested by pressing or rotating the HDG knob on the MIAP The number next to text will flash to white...

Page 10: ...1 SWAP Note that the time this manual is written FS2020 still has a bug that makes the SWAP functionality show up double Only the top one will work Click on the first small dark grey rectangle On the...

Page 11: ...Now make sure your COM NAV toggle switch is set to NAV again Assign the function DECREASE COM1 WHOLE by clicking on START SCANNING and thereafter switching the toggle switch to COM and after that rota...

Page 12: ...rotate the FREQ knob anti clockwise Now 18 11 32 will show up and the button is now programmed to change frequencies in both Mhz and Khz for COM You can now repeat the steps to program the same butto...

Page 13: ...PC your adapter is not stable enough Please contact AXAIR in this case If your simulator software does not detect the MIAP check if the hardware is detected under Windows 10 by clicking on the window...

Reviews: