background image

The Dallas Retro Frame must be installed on the wall as there is no 
connecting part between BP and TB 


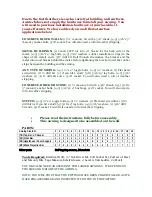
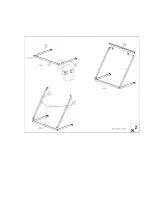
 STEP 1: Separate all of the parts by part number so they will be easy to 
assemble. 
 
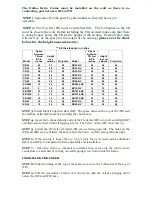
 STEP 2: The Top Bar (TB) must be installed first.   The C-Channel on the TB 

must be close to the wall.  Before installing the TB you must make sure that there 

is enough space below the TB for the height of the awning.  Example R22 style 
will need 31” of the space for the height of the awning (please see the chart 
below for the height measurements
).  


*** all the sizes are in inches 

Model 

Space 

between 

TB and 

BP in 

inches 

Height 

incl. 

valance Projection Model 

Space 

between 

TB and 

BP in 

inches 

Height 

incl. no 

valance Projection 

RR22 24  31  24 

RR22-NV  24  24  24 

CR32 36  44  24 

CR32-NV  36  36  24 

CR33 36  44  36 

CR33-NV  36  36  36 

CR34 36  44  48 

CR34-NV  36  36  48 

CR43 48  56  36 

CR43-NV  48  48  36 

CR44 48  56  48 

CR44-NV  48  48  48 

ER2442 18 

24 

42  ER2442-NV  24 

24 

42 

ER12 8  12  24 

ER12-NV 12 12  24 

ER1836 12 

18 

36  ER1836-NV  18 

18 

36 

ER1230 8 

12 

30  ER1230-NV 12 

12 

30 

ER1030 10 

16 

30  ER1030-NV  16 

16 

30 

ER23 18  24  36 

ER23-NV  24  24  36 

ER24  

18 

24 

48 

ER24-NV 

24 

24 

48 


STEP 3: Install Black Projection Bars (BP).  The space between the top of the (TB) and 
the Bottom of the (BP) must be according the chart above. 
 
STEP 4:  Insert the L shaped plastic ends of the Front Bar (FB) in to Left and Right (BP) 
and then secure them with self tapping screws.  The Velcro on the (FB) must face up. 
 
STEP 5:  Install the NC (left and right) with arrows facing upwards.  The holes on the 
(FB) and (FB) are pre drilled.  Make sure that the Velcro on (NC) facing left and right 
 
STEP 6: If  the  awning  is  larger  then  4’  (52.5”)  wide  then  you  must  install  additional 
(NC)s and (BP)s to complete the frame assembly and installation 
 
STEP 7:  Once the frame is completely installed then secure all the joints where 
connectors are attached by driving one self tapping screw from inside the frame.   


INSTALLING THE COVER 
 
STEP 8: Slide the tubing at the top of the fabric cover into the C-Channel at the top of 
(TB). 
 
STEP 9: Pull the remainder of fabric over the frame with the valance hanging down 
below the (NC) and (FB) bars. 
 

Summary of Contents for Dallas Retro CR32

Page 1: ...ce RR22 NV ER23 NV CR32 NV CR34 NV CR43 NV CR44 NV ER2442 NV ER12 NV ER1836 NV ER1230 NV ER1030 NV ER24 NV CR33 NV All the awning sizes over 9 wide come in two sections Example Top Bar TB consists of TB1 TB2 and Front Bar FB consists of FB1 FB2 See the chart below for the width of the awning Awning Size Width in inches Awning Size Width in inches 3 40 5 12 148 5 4 52 5 13 160 5 5 64 5 14 172 5 6 7...

Page 2: ...g CONCRETE BRICK OR STONE 1 masonry bit with a 3 8 shank 4 5 5 16 x 3 masonry anchor bolts 4 5 5 16 x1 4 bushings 9 16 socket You will also need a roll of weather stripping STUCCO 4 5 x 4 toggle bolts 4 5 washers 1 Flat head screwdriver 1 drill bit or if you hit a stud 4 5 16 x4 lag bolts 4 5 5 16 washers 1 3 16 drill bit and a 9 16 socket You will also need a roll of weather stripping Please read...

Page 3: ...ER1836 12 18 36 ER1836 NV 18 18 36 ER1230 8 12 30 ER1230 NV 12 12 30 ER1030 10 16 30 ER1030 NV 16 16 30 ER23 18 24 36 ER23 NV 24 24 36 ER24 18 24 48 ER24 NV 24 24 48 STEP 3 Install Black Projection Bars BP The space between the top of the TB and the Bottom of the BP must be according the chart above STEP 4 Insert the L shaped plastic ends of the Front Bar FB in to Left and Right BP and then secure...

Page 4: ...er may also be required to pay a deposit until the defective parts are returned to Awntech Corporation for inspection The purchaser must obtain a return authorization form from Awntech Corporation s customer service department prior to the return of any merchandise and after having received such authorization return the part or product freight prepaid to Awntech Corporation E WHAT IS COVERED UNDER...

Page 5: ...the website to appear slightly different than the actual fabric does in full sunlight TRIPLE CHECK YOUR MEASUREMENTS In order to avoid disappointment and frustration please triple check all measurements see Measuring Guide Page 6 of Awntech Catalog to assure that your awning will fit properly in the location you intend Please make sure that you have at least 1 2 extra wide area available to instal...

Page 6: ...DALLAS RETRO STYLE AWNINGS MUST BE ASSEMBLED ON THE BUILDING For frames sizes 2 4 ...

Page 7: ......

Page 8: ...For frame sizes 5 7 Additional parts will be enclosed for the large size awnings such as NC BP ...

Page 9: ......

Reviews: