background image


18 

è

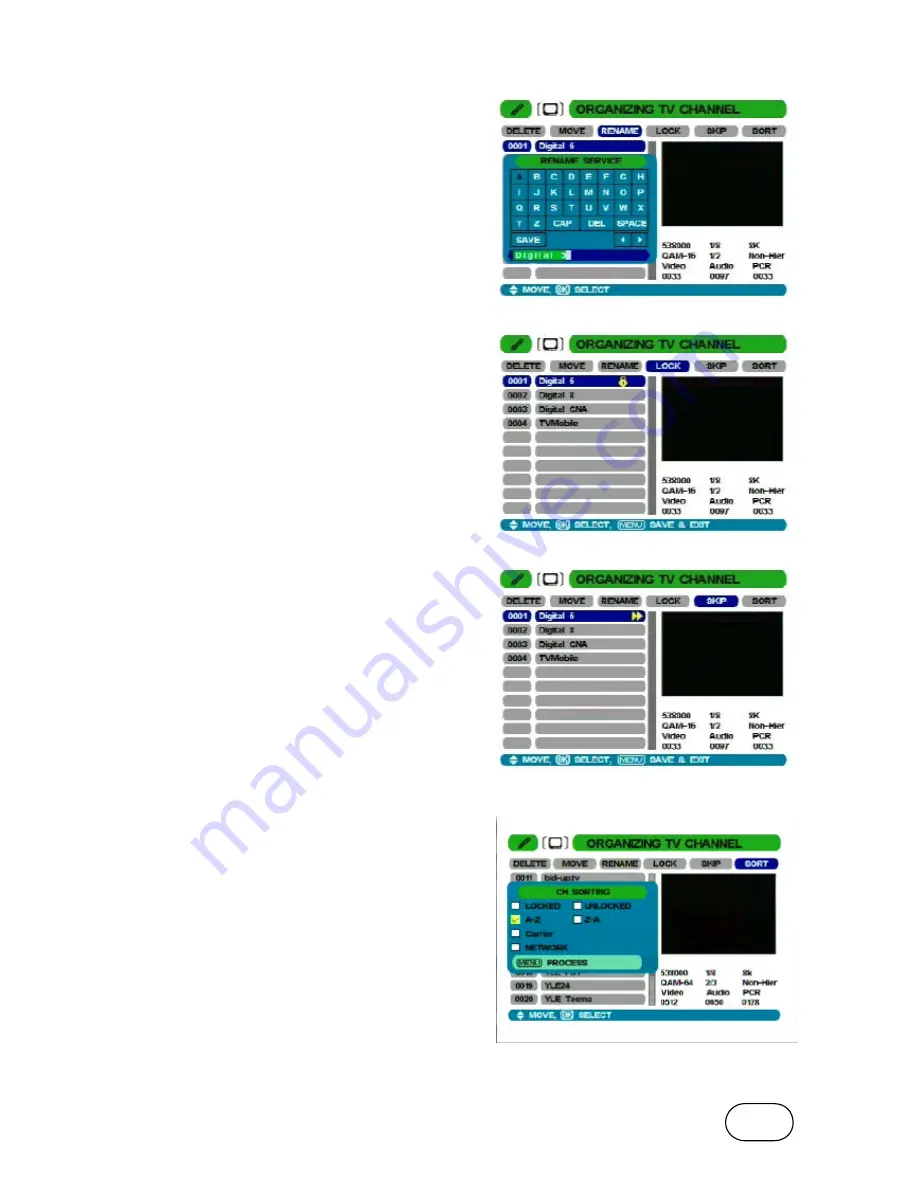
 To RENAME a channel


Press V-/V+ (

3

/

4

) buttons to select RENAME. 

Select the channel you want to rename with the 
OK button. 
The Alphabet Table will appear. Enter in the 
desired channel name by using the Up/Down 
(

5

/

6

), V-/V+ (

3

/

4

) and OK buttons. 

Numbers can be entered into the new channel 
name by using the numeric keys on the Remote 
Control Unit. 
Select “SAVE” to save the new channel name. 


è

 To LOCK a channel


Press V-/V+ (

3

/

4

) buttons to select LOCK. 

Press OK to lock the selected channel from the 
channel list. Press OK on a locked channel to 
unlock it. 
The 

Ï


icon is shown for channels that are 

locked. 
All locked channels will require the PIN Code to 
be entered in order to view the channel. The 
ACCESS CONTROL must be set to ON in order 
for the lock function to work. Refer to Page 22. 


è

 To SKIP a channel


Press V-/V+ (

3

/

4

) buttons to select SKIP. 

Press OK to turn on the skip function for the 
selected channel. Press OK on a channel with 
the skip icon to turn it off. 
The 

8

 icon is shown for channels that will be 

skipped. 

è

 To change the order of the CHANNELS 

Press V-/V+ (

3

/

4

) buttons to select SORT.  

Press OK to bring up the CH SORTING window. 
Move the cursor and press OK to select the 
required sorting criteria. 

LOCK / UNLOCK

: Will line up all the Locked or 

Unlocked channels at the beginning of the list. 

A-Z / Z-A

: To arrange the channels by 

alphabetic order from A to Z or from Z to A.


CARRIER

: To arrange the channels by 

frequency  in ascending order.  

NETWORK

: To arrange channels in the 

alphabetic order of the network name. 
Press MENU to sort the channel list as per the 
selected criteria. 
Note: The sort function will not work if the 
Logical Channel Number option is switched on. 
(See page 22) 


Summary of Contents for DPRS100

Page 1: ...DPRS100 SD Digital Set Top Box DVB T Receiver User Manual ...

Page 2: ...9 Clear All TV Channel 20 Clear All Radio Channel 20 Clear All Favorite Channel 20 System Setup 21 OSD Language 21 UHF Modulator 21 A V Output 21 Time Setting 22 Parental Control 22 OSD Transparency 22 Display Time 22 Sleep Timer 22 Logical Channel Numbers LCN 22 Installation 23 Manual Search 23 Auto Search 24 Carrier Edit 24 Automatic Tuning 24 Factory Default 25 Information 26 Receiver Status 26...

Page 3: ...ver where it is exposed to direct sunlight or near a heater Never stack other electronic equipment on top of the receiver Do not use any attachments that are not recommended by the manufacturer as these may cause hazardsor damage the equipment Do not expose the receiver to dripping or splashing Do not place objects filled with liquids such as vases on the receiver The ventilation should not be imp...

Page 4: ...4 Accessories supplied User Manual Remote Control Unit Batteries 2xAAA Power Cord ...

Page 5: ... PAT Customized Channels Memory Data Carriers Frequency Table Editing with Add Delete Rename Modify Small Screen Picture on EPG and TV Channel List Graphic P in P Supports TELETEXT Decoding or Re insert into VBI Supports Subtitle Supports NTSC PAL SECAM Advanced Automatic Tuning 1000 TV Radio Channels Capability 3 Favorites Channel Groups and Parental Lock Function 8 Event Timer 120 minutes Sleep ...

Page 6: ...n TV or Radio operation mode C SIGNAL LED Lights up with signal locked D TV RADIO LED Lights up when in TV Mode E Remote SENSOR Detects infrared signal from Remote Control Unit F POWER LED Lights up when in STANDBY Mode G CH Down Button Change channel down H CH Up Button Change channel up ...

Page 7: ...Rear Panel For Two Types of Models DPRS100 MK I DPRS100 MK II ...

Page 8: ...re upgrades ANT IN Connect to TV VCR output to loop the RF signal through the modulator TV OUT UHF Modulator output Connect to the TV set or VCR RF input to receive the built in RF modulator signal POWER INLET Connect this to the mains outlet 90 260V 50 60Hz AUDIO OUT L R Left Right audio output S PDIF Out Sony Philips Digital Interface output for digital audio VIDEO Composite video output S VIDEO...

Page 9: ...Changes the volume level in viewing mode and adjusts settings while in menu mode 9 OK Confirms the choices and selection with the highlighted menu item While watching TV or listening to radio pressing the OK button will enter the channel list 10 EXIT Exit from the menu or escape from the current mode 11 PG UP DOWN Move to the next or previous list text page if more than one page is available 12 AU...

Page 10: ...tal channels transmitted on other channels are difficult or even impossible to receive The problem can be solved by replacing the antenna with a high quality digital ready antenna Some outdoor aerials are directed towards an analogue transmitter The aerial must be directed towards a digital TV transmitter It is not always advisable to position the aerial as high as possible If problems arise exper...

Page 11: ...put of the Set Top Box Connect the TV VCR output to the ANT IN terminal on the Set Top Box Connect the TV OUT output on the Set Top Box to the Antenna input of your TV Turn on the Set Top Box and the TV Select a program number on the TV that is not currently used refer to TV manual Follow the instructions in your TV manual to tune the TV channel selector to UHF channel 69 this is the factory prese...

Page 12: ... Video input connector you can connect your TV to the Set Top Box using an S Video lead instead of the composite video lead You must also connect the Left and Right Audio cables in order to get sound Turn on the Set Top Box and the TV Select the AV input mode on the TV refer to TV manual Optional audio connections Instead of connecting the Left and Right Audio outputs to your TV they can be connec...

Page 13: ...F input of the TV Connect the A V outputs of the Set Top Box to the A V inputs of the VCR Connect the A V outputs of the VCR to the A V inputs of the TV Turn on the Set Top Box VCR and the TV Select a program number on the TV that is not currently used refer to TV manual Follow the instructions in your TV manual to tune the TV channel selector to UHF channel 69 this is the factory preset UHF chann...

Page 14: ... 4 buttons to select the state where you are using the Set Top Box Press MENU to save the settings and return to the SYSTEM SETUP menu Press MENU to return to the Main Menu Use the Down 6 button to highlight the INSTALLATION menu bar Press OK to enter the INSTALLATION menu Use the Down 6 button to highlight the AUTOMATIC TUNING menu bar Press OK to enter the AUTOMATIC TUNING menu Press OK to begin...

Page 15: ...et Top Box also indicates the actual function of these buttons for a particular menu on the blue bar shown at the bottom of the screen Press the Up Down 5 6 button to move the cursor Press the V V 3 4 buttons to select or adjust the current setting Press the Double arrow Up Down button on the remote control to jump to the next page Press OK to select the item currently highlighted by the cursor or...

Page 16: ...n the small screen will have the channel number highlighted in the TV Channel list Under the small picture screen the following information is displayed 1 Carrier frequency 2 Guard Interval 3 Transmission Mode FFT 4 Constellation 5 Puncture Rate FEC 6 Hierarchy Mode 7 VPID APID PCR 8 SIGNAL LEVEL Indicator 9 SIGNAL QUALITY Indicator Press the Double arrow Up Down button on the remote control to ju...

Page 17: ...o will have the channel number highlighted in the Radio Channel list Under the small picture screen it displays also the receiving parameters such as 1 Frequency 2 Guard Interval 3 Transmission Mode FFT 4 Constellation 5 Puncture Rate FEC 6 Hierarchy Mode 7 APID PCR 8 SIGNAL LEVEL Indication bar 9 SIGNAL QUALITY Indication bar Press the Double arrow Up Down button on the remote control to jump to ...

Page 18: ...ons and exit Press EXIT to exit the menu without making any changes è To DELETE a channel Press V V 3 4 buttons to select DELETE Press OK to select the channel s to be deleted from the list Press OK on a highlighted channel to de select it Selected channels will have the channel number highlighted You can select more than one channel at a time to be deleted Press MENU to delete the highlighted cha...

Page 19: ... lock function to work Refer to Page 22 è To SKIP a channel Press V V 3 4 buttons to select SKIP Press OK to turn on the skip function for the selected channel Press OK on a channel with the skip icon to turn it off The 8 icon is shown for channels that will be skipped è To change the order of the CHANNELS Press V V 3 4 buttons to select SORT Press OK to bring up the CH SORTING window Move the cur...

Page 20: ...vailable for you to store your favourite channels Press the INFO button to switch between the three favourite groups You can select any available channel from the list in the left hand side of the screen and put in into your favourite channel list on the right hand side of the screen You can assign any channel to any one of the favourite groups 1 2 or 3 Use the cursor to select the desired channel...

Page 21: ...HANNEL Use this function to clear all of the stored Radio channels from the Radio channel list The confirmation window will appear If you select the Yes then all of the available Radio channels will be erased CLEAR ALL FAVOURITE LIST Use this function to clear all of the stored Favourite channels from the favourite groups The confirmation window will appear If you select the Yes then all of the fa...

Page 22: ...NNEL NO Select the RF modulator output UHF channel The default channel is set to CH69 à STANDARD Select the audio sound system standard You can select PAL B G PAL I PAL D K or NTSC M The default setting is PAL B G Press MENU to save and exit A V OUTPUT à VIDEO OUTPUT Select the Video Output according to your TV The Set Top Box converts the input signal into any one of the selected signal formats Y...

Page 23: ...entering the Organizing Services Installation and Event Timer sub menus à CHANGE PIN CODE Use this function to change the parental control PIN Code The default PIN code is 0000 OSDTRANSPARENCY Adjust the OSD transparency level The transparency can be adjusted between 10 and 90 DISPLAY TIME Set the period of time that the Info Box is displayed on screen The time steps available are 3 5 8 10 and 15 ...

Page 24: ...ist contains information such as Carrier Center Frequency Guard Interval and Modulation system The Channels contained within each Network Carrier are stored in the TV and Radio Channel Lists The first time you set up your Set Top Box you will need to scan the entire TV band in your area to find all of the available digital TV carriers and then scan those carriers for the available channels The Aut...

Page 25: ...omatic Tuning process will scan the entire TV band within the limits of the VHF and UHF start and end frequencies For Australia the default settings are VHF Start Frequency 177500kHz VHF End Frequency 226500kHz UHF Start Frequency 529500kHz UHF End Frequency 816500kHz Press OK to start the Automatic Tuning process The AUTOMATIC TUNING window will appear and a list of available digital broadcast ca...

Page 26: ...ed channels carriers and favourite lists will be deleted after you select this option Select your country from the Country List and press OK All menu settings and options will be restored to the factory defaults for the selected country ...

Page 27: ...ate SIGNAL INFORMATION This menu allows you to check the following parameters relating to the signal currently being received by the Set Top Box CARRIER FREQUENCY GUARD INTERVAL FFT CONSTELLATION Modulation PUNCTURE RATE FEC MODE PID VPID APID PCR SERVICES NAME PROVIDER SYSTEM NAME SIGNAL LEVEL SIGNAL QUALITY Note You must select the channel for which you wish to view the signal information before...

Page 28: ...NO Select the required event number à MODE Select the desired operation mode Once Daily Weekly Monthly Off à DATE Enter the event starting date à START TIME Enter the event starting time à Duration Enter the event duration à CHANNEL NO Enter the channel number required for the event à ACTIVE Set to YES to activate the current event à OK Press OK Key each time Event Timer is set ...

Page 29: ...l XW 1 1 Current Audio Mode Audio Channel of total available audio channelsAlso displayed are the receiving parameters Signal quality Date Clock Pressing the INFO button again will show the program detail information Use the V V 3 4 buttons to cycle between the current and next event details When listening to radio programs the screen will display a still picture as the background and the program ...

Page 30: ...he small screen Press the EXIT button to return to normal viewing FAVORITE CHANNEL LIST When watching the TV or listening to the Radio you can access the favorite channel lists by pressing the FAV button on the remote control Use V V 3 4 buttons to cycle between the three favourite lists VOLUME CONTROL Use 3 4 V V button to decrease or increase the output volume level Press MUTE button to decrease...

Page 31: ...titles are on to bring up the Teletext Subtitle window Use 3 4 V V buttons to select OFF and press OK to turn off the subtitles TELETEXT To activate teletext press the F1 button on the remote control Use the numeric keys on the remote control to navigate through the teletext pages Press EXIT to close teletext ...

Page 32: ... A preview of the channel will appear in the small window Press V V 3 4 to select the day The program guide for the selected day will appear in the lower window Press F1 to move the cursor to the lower window Press Up Down 5 6 to select the desired program and press OK to view the program information Press F2 to enter an event for the selected program ...

Page 33: ...set up properly Check that if you have selected the correct channel or A V input on your TV Check that the antenna is correctly connected to the Set Top Box No sound Check the volume level of the TV Set Top Box Check the A V and or RF connections between the Set Top Box and the TV Check the MUTE status of the TV Set Top Box Remote Control doesn t operate Point Remote Control directly towards the S...

Page 34: ...4 354 IF BW 7MHz to 31 67 IF BW 8MHz Eb No Performance Exceeds DVB rec VIDEO DECODE Decoding MPEG 2 MP ML ISO IEC 13818 2 11172 2 Data Rate Max 15Mbit s TV Standard Auto PAL NTSC and SECAM according to Source Aspect Ratio 4 3 16 9 Active Pixel 720 x 576 PAL 720 x 480 NTSC maximum Output Level 1Vpp 10 Bandwidth 100Hz to 5MHz 2dB S N 55 dB min C L Delay 75 nS DG 5 max DP 5 max Line Time Distortion 3...

Page 35: ...3 MPEG BitStream RS232 Data Port Transfer rate 115 200 bps 9pin D sub Female Type FRONT PANEL DISPLAY 4 Keys Power TV Radio Channel Up Channel Down POWER LED RED Lights up when in Standby Flashes when remote control operates SIGNAL LED AMBER Lights up when locked onto a signal TV Radio LED GREEN Lights up when in TV mode POWER SUPPLY Input Voltage 90 to 260 VAC Input Frequency 50 60 Hz Input Ratin...

Page 36: ...ablished by the International Standards Organization whichhas and continues to develop Standards for digital compressed moving pictures and associated audio OSD On Screen Display Packet Identifier PID A unique integer value used to identify elementary streams of a program in a single or multi program MPEG 2 stream PAL NTSC and SECAM Standards for encoding colour in an analogue TV signal PCR Progra...

Page 37: ...a Copyright 2005 All rights reserved Reproduction or publication of the content in any manner without express written permission of the publisher is prohibited The Menu structure and Specifications may change without prior notice ...

Reviews: