background image


18


APPENDIX 2. SET FLOW COUNTING / VIRTUAL FENCE / ONE-WAY PASS 

IVS, Intelligent Video Surveillance, is the advanced application for motion detection, but more precise and smarter. 
It can be applied to different situations with one of the following three modes: FLOW COUNTING, VIRTUAL 
FENCE, and ONE WAY PASS. 

Note: 

Four camera channels are supported for this function. For 16CH and 8CH models, users are 
allowed to select four camera channels randomly to use this function; for 4CH models, all the four 
camera channels are supported. 

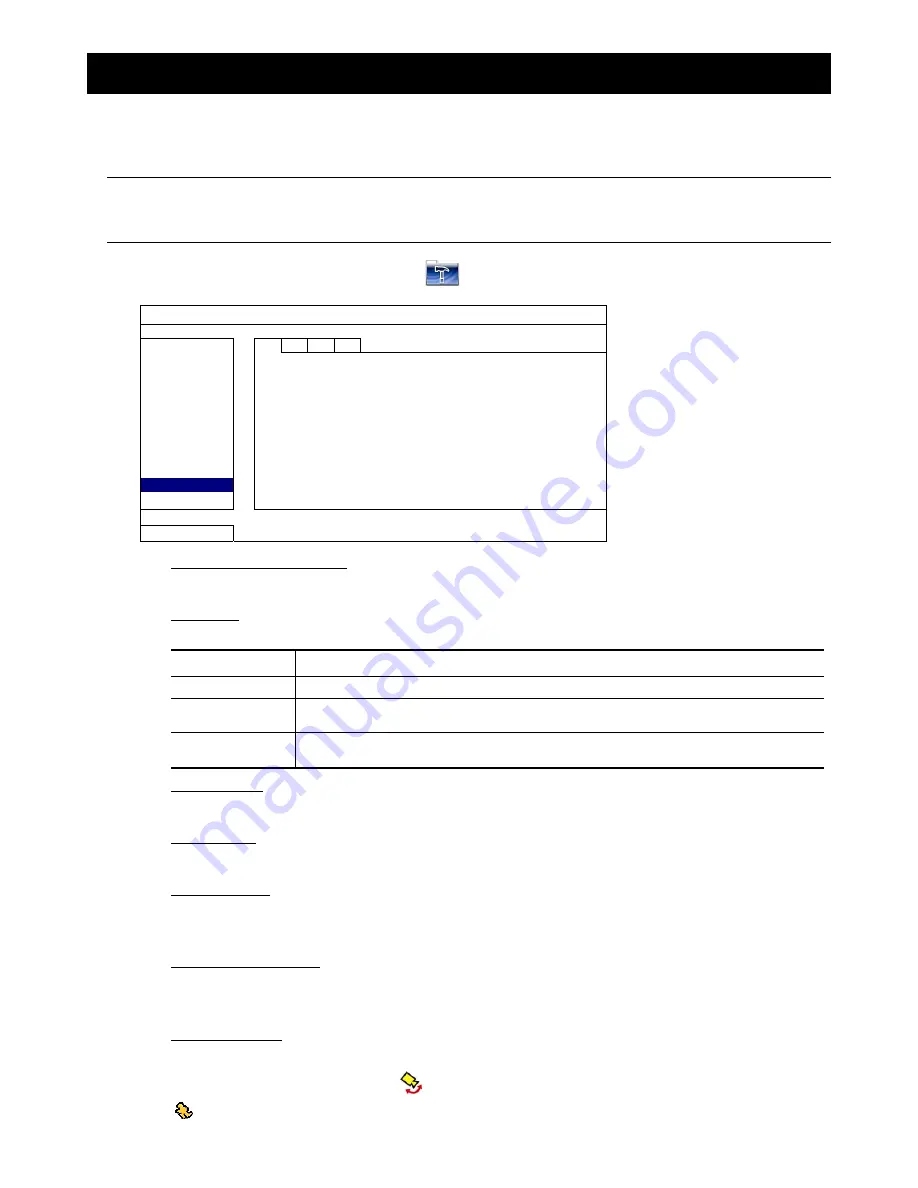
Right click to show the main menu, and select “

” 

 “ADVANCED CONFIG” 

 “IVS”. 

ADVANCED CONFIG 


CANERA  

IVS1 

IVS2 

IVS3  IVS4   


DETECTION  

CAMERA

 (For AVC799B & 797B only)

 CH3 

ALERT  

IVS MODE 

FLOW COUNTING 

NETWORK  

DISPLAY LINE 

OFF 

SNTP  

SENSITIVITY 07 

DISPLAY  

RESET COUNT 

SUBMIT 

RECORD  

VIRTUAL FENCE AREA 

SETUP 

DEVICES  

SCENE CHANGE 

OFF 

DCCS  

SCENE CHANGE SENSITIVITY 

MIDDLE 

IVS 


NOTIFY  


EXIT  


1) CAMERA

 (For AVC799B & 797B only)


Select the camera channel that you want to use the IVS function. 

2) IVS 

MODE 

Select one of the following three modes depending on your environment: 

MODE DESCRIPTION 

FLOW COUNTING 

A virtual detection line is set to detect the moving direction of pedestrians for flow counting. 

VIRTUAL FENCE 

A virtual detection line is set to detect intruders crossing the detection line, and an alarm will be 

triggered. 

ONE WAY 

A virtual detection line is set to detect intruders from the specified direction, and an alarm will be 

triggered. 

3) DISPLAY 

LINE 

Select to display the detection line for IVS on the screen or not.   

4) SENSITIVITY 

Set the sensitivity for IVS from 00 ~ 15. The larger the value, the more sensitive the IVS will be.   

5) RESET 

COUNT 

Click “SUBMIT” to reset the flow counting number to 0 when the IVS mode is set to “FLOW COUNTING” and 
activated. 

6) VIRTUAL 

FENCE 

AREA 

Click “SETUP” to draw the detection line for IVS, and set the detection direction from left to right, or right to 
left. This area setting is the detection base for IVS MODE.   

7) SCENE 

CHANGE 

Select “ON” to trigger a motion event when the camera is sensed to be moved and the camera scene is 

changed. At the same time, the icon “

” will be also shown on the screen in addition to the motion icon 

”. 

Summary of Contents for AVC794

Page 1: ...allation Guide Intelligent Video Surveillance GUI Display with USB Mouse Control Please read instructions thoroughly before operation and retain it for future reference For the actual display operatio...

Page 2: ...free to download from your mobile phone for remote access and device control In addition to mobile phones remote access via different PC software is also widely supported For web browsers Internet Exp...

Page 3: ...names and logos are the property of Research In Motion Limited and are registered and or used in the U S and countries around the world Used under license from Research In Motion Limited Android is a...

Page 4: ...ject to the copyright of the corresponding author Further source codes which are subject to the GPL licenses are available upon request We are pleased to provide our modifications to the Linux Kernel...

Page 5: ...onnect USB Mouse 7 3 2 Quick Menu Bar 7 3 3 Main Menu 8 4 FRONT AND REAR PANELS 10 4 1 Front Panel 10 4 2 Rear Panel 11 5 BASIC OPERATION 12 5 1 Live Page 12 5 2 Record Icon 12 5 3 Playback 12 Playbac...

Page 6: ...1 1 PRODUCT OVERVIEW...

Page 7: ...instructed in 2 9 Examining Signal Transmission at page 5 when the connection is completed to ensure this system can work normally It s not allowed to use a signal booster or modem to amplify signals...

Page 8: ...racket back to the DVR Step5 Replace the top cover and fasten the screws you loosened in Step1 2 3 Installing DCCS Camera Install the camera on the wall or ceiling based on your installation environme...

Page 9: ...hange the date or time accidentally when the recording function is activated it s recommended to clear all HDD data and start recording again Note For the first time to use the DVR please power it on...

Page 10: ...PASSWORD SETUP USB BACKUP OPERATOR PASSWORD SETUP DVD BACKUP UPGRADE SUBMIT BACKUP CONFIG SUBMIT RESTORE CONFIG SUBMIT EXIT 2 9 Examining Signal Transmission Right click to display the main menu and s...

Page 11: ...is connected properly to the correct channel which supports DCCS For iPhone Push Notification to work properly please refer to APPENDIX 1 SET IPHONE PUSH NOTIFICATION at page 15 2 10 1 For a PTZ camer...

Page 12: ...o extend the quick menu bar and show the six functions as follows Quick Menu Open Click to show the channel switch panel and select the channel you want For details please refer to 3 2 Quick Menu Bar...

Page 13: ...DEVICES DCCS IVS NOTIFY SCHEDULE SETTING Click to set record timer and detection timer Main Menu Structure QUICK START GENERAL CHANNEL TITLE EVENT STATUS DATE DISPLAY RECORD CONFIGURATION TIME SETUP D...

Page 14: ...REEN DURATION For AVC799B 797B Only DWELL SCREEN DURATION DISPLAY COVERT HDD DISPLAY MODE ALPHA BLENDING VGA OUTPUT RECORD MANUAL RECORD ENABLE EVENT RECORD ENABLE TIMER RECORD ENABLE EVENT RECORD IPS...

Page 15: ...atest recorded data 8 LIST Event List Search Press to quickly search the recorded files by event lists RECORD MOTION ALARM TIME HUMAN DETECTION IVS STATISTIC or select FULL to show all the event logs...

Page 16: ...g Note To make a video backup with audio make sure the camera which supports the audio function is connected to the video in channel and audio in channel For example the audio data from audio CH1 will...

Page 17: ...an detection event Flow counting enabled Smart zoom Record mode Frame Record mode Field Record mode CIF 5 2 Record Icon 1 Manual Recording By defaults manual recording is on when the DVR is powered on...

Page 18: ...orded during this whole hour A to B Playback Click to set point A and point B in a video clip and the system will play only the specified range in that clip Backup Click to open the backup menu for vi...

Page 19: ...G CAMERA DE INTERLACE For AVC799B 797B Only OFF DETECTION FULL SCREEN DURATION 03 ALERT QUAD SCREEN DURATION For AVC799B 797B Only 03 NETWORK DWELL SCREEN DURATION 03 DISPLAY DISPLAY COVERT ON RECORD...

Page 20: ...his function make sure you have checked the following You have an iPhone with our self developed program EagleEyes installed For details please refer to A1 2 1 Program Download at page 15 A human dete...

Page 21: ...R Step3 Make sure all the information is correct and select Save on the top right corner to save your setting and return to the address book page Column Description Required Column Title Give a meanin...

Page 22: ...ic Step4 To check whether your configurations are correct select to immediately access the DVR you just added You should be able to see the live view of the DVR A1 2 3 Push Notification On Step1 In th...

Page 23: ...ion 2 IVS MODE Select one of the following three modes depending on your environment MODE DESCRIPTION FLOW COUNTING A virtual detection line is set to detect the moving direction of pedestrians for fl...

Page 24: ...ng REVERSE Step2 Finish the IVS setting and return to the live view The IVS icon will be shown on the status bar Click it to show the flow counting panel as follows When anyone walks across the detect...

Page 25: ...h the IVS setting and return to the live view When anyone walks across the detection line the system will determine his movement is in or out and VIRTUAL FENCE An event happens for anyone walking acro...

Page 26: ...click SUBMIT in STATISTIC to show the event statistics by DAY in LIST default or CHART To check the statistics in the bar chart click CHART To switch to the MONTH or YEAR view click DAY at the bottom...

Reviews: