background image


17 


Local Time:

 Set the system time manually. 

NOTE:

 If the NTP Server and Local Time have been set, the NTP Server will be the first 

priority (the HD Player Pro is already connected to the network). 


Local HTTP Server: 

Enable/ Disable the HTTP command function. 


Local HTTP Server Setup: 

To set the “Port”, “User ID” and “Password” of the HD Player Pro. 

(The Default Port: 80, User ID: root, Password: admin) 


NOTE: 

Press the “SETUP” button on the remote control to save the settings, and it will auto exit 

the settings screen, then restart the HD Player Pro. 


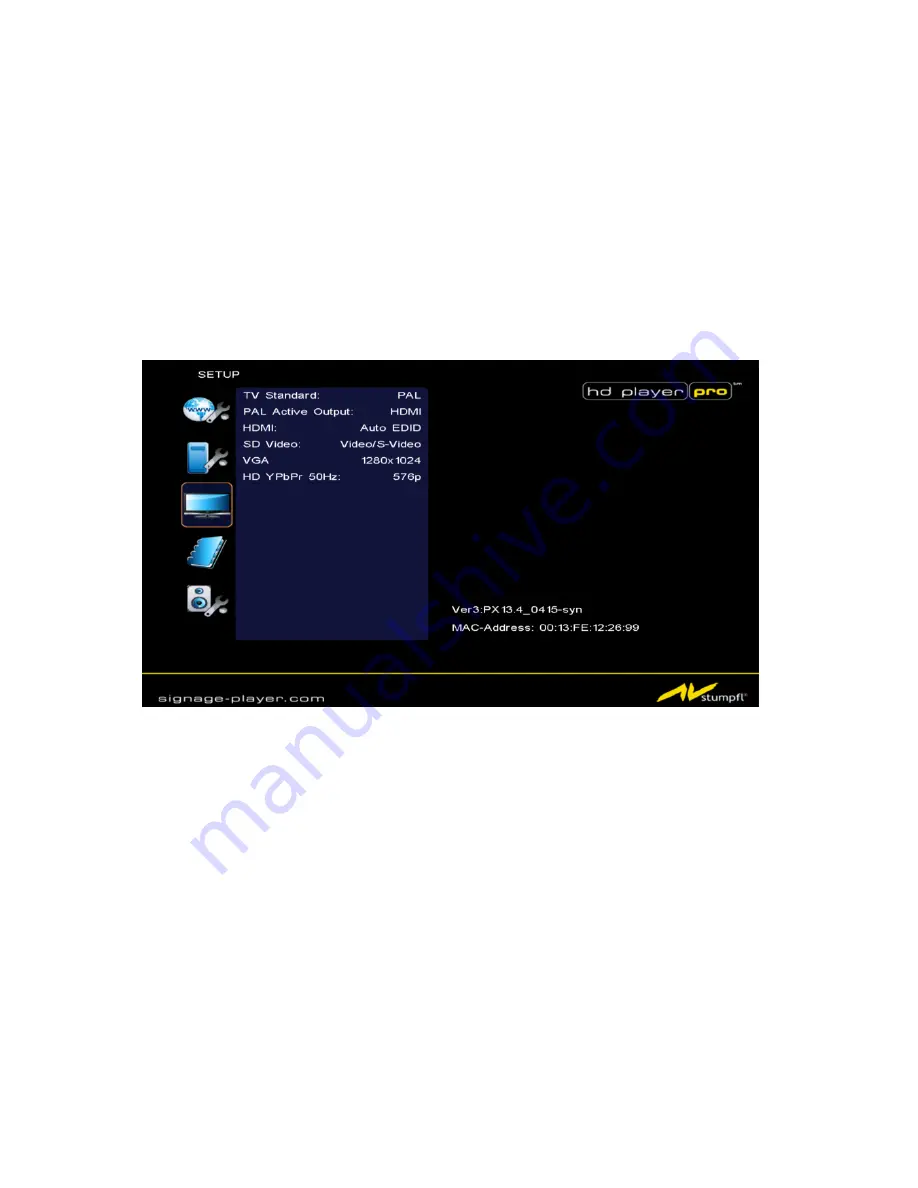
7.3 Video Setup 


TV Standard: 

Select the output TV video format (NTSC / PAL). 


NTSC Active Output: 

Select the output mode. (HDMI/ SD Video/ VGA/ HD Y.Pb.Pr)


You can also press directly the “TV MODE” button on the remote controller to select output mode.


HDMI: 

Select the HDMI output resolution among 480i / 480p/ 720p / 1080i/ 1080p. 

Select the “Auto EDID”, the HD Player Pro will scan the display device connected and set the 

correct resolution automatically. 


SD Video: 

Select the SD output mode. (“Video/ S-Video” or “Y.Cb.Cr”) 


VGA: 

Select the VGA output resolution. 

(640x480 / 800x600/ 1024x768/ 1280x1024/ 1360x768/ 1366x768) 


HD Y.Pb.Pr: 

Select the Y.Pb.Pr output resolution among 480p / 720p / 1080i. 

Summary of Contents for HD Player Pro

Page 1: ...1 User Manual HD Player Pro Rev 2 AV Stumpfl GmbH Mitterweg 46 A 4702 Wallern Tel 43 7249 42811 Fax 43 7249 428114 E Mail AVstumpfl AVstumpfl com Internet http www AVstumpfl com ...

Page 2: ...nce to radio communications However there is no guarantee that interference will not occur in a particular installation If this equipment does cause harmful interference to radio of television reception which can be determined by turning the equipment off or on the user is encouraged to try to correct the interference by one or more of the following measures Reorient or relocate the receiving ante...

Page 3: ...etup 15 7 3 Video Setup 17 7 4 Other Setup 18 7 5 Scrolling Text Setup 20 8 USING THE HD PLAYER PRO 21 8 1 Play media files on the CF Card 21 8 1 1 Using the Remote Control when Media File is playing 22 8 2 Multiple display zones 24 8 3 Log function 25 8 4 Seamless Function 25 8 5 FTP auto download function 26 8 6 Controlling the HD Player Pro RS232 TCP 29 8 7 How to sync several HD Player Pro 30 ...

Page 4: ...ENT 46 11 1 Play Button Box SCV HDZ PBB 46 11 2 IR cable SCV HDZ IRC 46 11 3 PIR sensor SCV HDZ PIR 47 11 3 1 Using the PIR Sensor 47 11 4 Touch sensor button SCV HDZ WIR5SB 47 11 4 1 Features of the Touch Sensor Buttons 47 11 4 2 Ex Using the wireless Touch Sensor Buttons 48 11 4 3 Connect to the Touch Sensor Buttons 48 11 4 4 Play the Demo Files 48 11 5 LED button box 49 14 USB AUTO COPY FUNCTIO...

Page 5: ...acceleration ensures smooth full HD playback and clear images Flexible playback control and configuration options allow the HD Player to be adapted to a variety of different requirements Integration into the Iseo system and media update via the Internet provides for a decentralized Digital Signage network The HD Player does not contain any wear or shock sensitive parts and is therefore the optimum...

Page 6: ...I and scrolling text on the screen simultaneously The display speed of scrolling text can be adjusted and scrolling text supports multi languages Latin1 Latin2 Japanese Greek Schedule Function The HD Player Pro will auto play the specific file at the specific date Supports Log Function Recording the file name and start time of the played files Ethernet network supports up to 100Mbps Supports CF me...

Page 7: ...7 4 HARDWARE OVERVIEW ...

Page 8: ...arting the HD Player Pro 5 REMOTE CONTROL 1 2 3 4 5 6 7 8 9 10 11 12 13 14 15 16 17 18 19 20 21 22 23 24 Power on off Select the output mode Numeric Key Delete last entry Select a function or to play the selected file Open the setup menu OSD display function on off Auto play function on off Mute sound Volume up down Move the cursor Confirm the selection entry Go back one layer Select the TV type N...

Page 9: ...ard on which music images or videos are stored NOTE Never insert both cards in the Slot at the same time Press the POWER button to power on the HD Player Pro and then press the TV MODE button to select the output mode Status After Power On Status 1 If the AUTOPLAY Movie Picture All Files MultiLayer function is enabled and there are media files on the CF card or the HD Player Pro is already connect...

Page 10: ...p FTP Setup Video Setup Other Setup and Scrolling Setup In the settings screen you can use the buttons to select an item and press the ENTER button to confirm the selection Press the SETUP button on remote control to save and quit the settings screen 7 1 Networksetup 7 1 1 Setting the Network from the OSD Menu Network with Select your network connection Disable RJ45 IP Assigned by DHCP If you have...

Page 11: ...heck the network information of your PC Please follow the steps below to get the network information of your PC Step 1 Click on Start Run and type in command then press ENTER The MS DOS window will appear type in ipconfig and then press ENTER to get the network information Step 2 Assign IP Address Mask Subnet Mask and Gateway Default Gateway for the HD Player Pro Enter the same values of the Subne...

Page 12: ... steps as below Step1 Insert the driver CD into your CD ROM drive then open the Folder IP Detect and run the IPSetup exe Step2 Click on the Install IP Detect to install the IP detect tool NOTE The IP Detect Tool doesn t support all Network adapters Click Next to continue Select the installation folder and click Next to continue Create a desktop icon and click Next to continue Click Install to star...

Page 13: ... under a DHCP enabled network user sometimes does not know which IP address is assigned to HD Player Pro User could also use this tool as a Finder for locating the IP address of HD Player Pro By pressing the Connect button IE browser will show up and access to the build in web of HD Player Pro automatically Step5 Select the HD Player Pro that you want to configure by identifying the MAC address ...

Page 14: ... HD Player Pro Then enter the preferred IP Net Mask and Gateway in the Network Setting Finally click on the Setup button for completing the setting NOTE The IP setting will not show on the OSD menu instantly but it should be available after pressing Setup button The prefer IP address will show on the OSD menu when HD Player Pro restart ...

Page 15: ...e this number If the FTP site uses a port other than 21 you should enter the correct port User ID Enter the user name of the Remote FTP server Password Enter the Password of the Remote FTP server FTP Path Enter the folder path that you want to share NTP Server Enable Disable the NTP server function if the HD Player Pro isn t connect to internet please disable the NTP Server function Time Setup Set...

Page 16: ...ndland GMT 06 00 Astana Dakar GMT 03 00 Greenland GMT 08 00 Irkutsk Ulan Bator GMT 03 00 Buenos Aires Georgetown GMT 08 00 Kuala Lumpur Singapore GMT 03 00 Brasilia GMT 08 00 Taipei GMT 02 00 Mid Atlantic GMT 08 00 Perth GMT 01 00 Capo Verde Is GMT 09 00 Seoul GMT 01 00 Azores GMT 09 00 Yakutsk GMT 00 00 Greenwich GMT Dublin Edinburgh Lisbon London GMT 09 00 Osaka Sapporo Tokyo GMT 00 00 Casablanc...

Page 17: ...screen then restart the HD Player Pro 7 3Video Setup TV Standard Select the output TV video format NTSC PAL NTSC Active Output Select the output mode HDMI SD Video VGA HD Y Pb Pr You can also press directly the TV MODE button on the remote controller to select output mode HDMI Select the HDMI output resolution among 480i 480p 720p 1080i 1080p Select the Auto EDID the HD Player Pro will scan the di...

Page 18: ...rectly execute Multiple Display after power on Off Turn off the Auto Play function SlideShow Interval Set the time each photo is shown to 10 15 30 seconds or 1 10 15 30 minutes or 1 hour Lock Remote Controller Enable disable the auto key lock function The HD Player Pro will auto lock when there is no further input for 1 minute Lock Password Setup Press the Enter button to open the Set Password win...

Page 19: ...y the completed file HDPlayerSetting txt from PC to CF card Insert the CF card to the HD Player Pro the HD Player Pro will apply the new settings automatically Play Button Only for used with play buttons The HD Player Pro supports two options Repeat Default Repeat All when the demo file finishes playing Log Function Enable or disable the Log function Auto Power Enable or disable the Auto Power fun...

Page 20: ...olor Select the color of the text you can choose between white yellow green or rotation of this three colors Scrolling text background Turn on or off the background of the scrolling text Scrolling text speed Adjust the speed of the scrolling text RS232 Control Enable or disable the RS232 control function Sync Control Enable or Disable the Sync Control Sync Type Select the Sync Type of the HD Playe...

Page 21: ...elect the type of data VIDEO AUDIO PICTURES you want to play and then press the ENTER button on remote control to switch into the VIDEO LIBRARY AUDIO LIBRARY or PICTURE LIBRARY Note If the symbol return appears on the screen you can use RETURN button of the remote control to go back one layer Step 3 Select the file you want to play and press ENTER or PLAY button on the remote control to play the f...

Page 22: ...ic is playing VOLUME Increase decrease the volume while the video or music is playing SHUFFLE Turn on off the shuffle function PREV NEXT Play the previous next file REPEAT Select the repeat mode REV FWD Rewind forward movie or music file STOP Stop playing and go back one layer INFO Display the file information File Information SEARCH Search video movie timeframe Press the SEARCH button and enter t...

Page 23: ...23 Original Size First Press ZOOM 01 Second Press ZOOM 02 Third Press ZOOM 03 ...

Page 24: ... name the picture files 0 png 9 png If you select the Match Video item of the picture slide mode the file name of the picture must be the same of the corresponding movie file Text File Use the Notepad to create a text file on your PC Enter the message that you want to display and name the file message txt Step 2 Select the Multiple Display Zones item to display the movies and pictures with scrolli...

Page 25: ...on allows the HD Player Pro to transition between videos using LED Buttons Box page 50 or Play Button Box page 47 without any delay To enable the Seamless Playback function put the setting file seamless ini and videos only supports MOV video file to CF card Use Notepad to create a file and name the file seamless ini this File must be empty NOTE 1 MOV video file limitation Frame rate up to 30fps Bi...

Page 26: ...rent time of the HD Player Pro is 00 10 and the entered value is 45 15 The HD Player Pro will connect to the FTP server and check whether the commands file in the FTP server at 00 45 than again every 15 minutes 01 00 01 15 01 30 01 45 02 00 dlplay 0 Enable or disable the function play files FTP auto download simultaneously 0 Disable the function the speed of download will be faster 1 Enable the fu...

Page 27: ... Latin1 Set the font of scrolling text Please enter Latin1 Latin2 Japanese or Greek background Off Enable or disable the scrolling text background On Enable the background Off Disable the background model Model1 Set the model of the multiple display zone Model1 Play videos with scrolling text Model2 Play videos pictures and scrolling text simultaneously and the pictures are on the left Model2 Play...

Page 28: ...files command file ex d0013fe098819 txt schedule ini message1 txt to the FTP server The HD Player Pro will read the command file ex d0013fe098819 txt and download the specified files NOTE The filename of the media files in FTP server cannot have any spaces Step4 The download status will be displayed in lower right corner of the screen Blinking Green Light indicate the HD Player Pro is downloading ...

Page 29: ...ion is enabled refer to section 7 5 3 Use an crossed RS232 Cable for controlling the HD Player Pro 4 For controlling the HD Player via RS232 the Autoplay function must be turned on Command Table q POWER VOL w SLOW R RETURN VOL NEXT REPEAT MUTE PREW SETUP S SELECT u UP TV MODE p PLAY d DOWN AutoPlay P PAUSE STEP l LEFT i INFO x STOP r RIGHT m NTSC PAL f FFW s ENTER SEARCH b REW C CLEAR XXXXX XXX Pl...

Page 30: ...nnect all HD Player Pro via a RJ 45 Cable with an Ethernet Switch Step2 Assign IP Address to HD Player Pro The Address must be in the same Subnet Gateway and DNS e g Master e g Slave 1 Please make sure that you never assign the same IP Address several times ...

Page 31: ...31 Step3 Turn on the Sync Control on every HD Player Step4 Set Master Slave Set one HD Player Pro to be the Master and the other units up to 254 units to be Slaves ...

Page 32: ...ou are able to export the Settings File of the HD Player onto the CF Card Insert the CF Card with the HDPlayerSettingsd txt in your PC Open the HDPlayerSettings txt File with notepad exe or wordpad exe or any other text editor Press Enter to Export Settings File ...

Page 33: ...nnected to the HD Player Pro Master unit only or RS 232 commands to master unit The Repeat settings of the different HD Player Pro must be the same Repeat Default All Video content The video file on the CF Card must have the same length Bitrate Framerate on every HD Player Pro For starting another Video file on the CF Card this File must have the same Name on every CF Card For playing a single vid...

Page 34: ...rewall and open the port 80 for the HD Player Pro The following figure is an example please refer to your user s manual of router for opening ports Start IE Browser on PC and type the HTTP site or IP In the local PC please type http 192 168 1 100 In the remote PC please type http 61 30 13 40 80 Type the User Name Password and click OK to log on Default User Name root Default Password admin There a...

Page 35: ...e next file Volume Adjust the volume Up Cursor up Down Cursor down Autoplay Select the auto play mode Enable Enable or disable the auto play function Movies Auto play movie files on the CF card after power on Pictures Auto play picture files on the CF card after power on slideshow function All Auto play all the media files on the CF card after power on Multi Layer Directly execute Multiple Display...

Page 36: ...rface Select your network connection Ethernet wired or Wireless General Setup Enable DHCP Enable or disable the DHCP function IP Subnet Gateway DNS server Enter the fixed IP address Subnet Gateway and DNS for the HD Player Pro Wireless Setup not used for this type of Player ...

Page 37: ...e FTP server Password Enter the password of the remote FTP server Local FTP Server Setup Enable Turn on off the HD Player Pro server Port Enter the port of the HD Player Pro ID Enter the user name of the HD Player Pro default ID root Password Enter the password of the HD Player Pro default password admin FTP Server Address Click on the address to directly connect to the HD Player Pro server Enter ...

Page 38: ...38 9 4 Time NTP Server Enable Enable or disable the NTP server function GMT Server Enter the NTP server IP address like 66 187 233 4 Time Zone Set the time zone of your location ...

Page 39: ... Enter the user name of the HD Player Pro default ID root Password Enter the password of the HD Player Pro default password admin Scrolling Text Enter the message that you want to display and press Send to display the scrolling text message on the screen immediately the message you entered through the http function will not be stored on CF card ...

Page 40: ...duler and run the IPSetup exe Step2 Click on the Install IP Detect to install the IP detect tool Step3 After installing the schedule software the Schedule Maker icon should appear on your desktop Or you could also find the shortcut of Schedule Maker by click on Start Programs Schedule Maker 20090217 Schedule Maker Select the installation folder and click Install to continue Installing Click Finish...

Page 41: ...ollowing diagram appears Click on Add Video In button for instructing the player to play the HDMI input only Click the Browser button to search for files that you want to add You can also set up the Play Times and Volume of the file in this window Click the OK button to complete the setup Click the Add button again to add other file If you choose Video In in the previous step the Add button will b...

Page 42: ...he file that you want to modify in the list and press the Modify button Remove Click this button to remove the file from the list Move Up Move Down Click these buttons to change the order that the files are played ...

Page 43: ...2 2 Advance Schedule In the Advance Schedule mode you can select files that you want to play and can also set up the play times and the initial and end time of each file There are Time Setup and File Setup in the Advance Schedule Step 1 Click the Add button in the Time Setup section to open the Advance Schedule Editor window Set up the Start and Stop Date Start and Stop Time and the Week Day then ...

Page 44: ... up the Play Times of the file in the window Click the OK button to complete the setup Step 3 Repeat the steps 1 and 2 to add other files Step 4 After finishing all setup press the SAVE button and a pop up window will appear Select the path then click the SAVE button to save NOTE Do not rename the file schedule ini otherwise the HD Player Pro will not be able to read the file ...

Page 45: ...le Check the date time of the schedule for conflict or error No any schedule file in advance schedule Can t Save There is no schedule file in the advance schedule Please add files that you want to play in the advance schedule 10 3 Apply the Schedule on the HD Player Pro Put the schedule ini file and the associated media files on the memory card and insert the memory card to the HD Player Pro The H...

Page 46: ...le 1 1abc xxx Demo File 2 33 xxx Demo File 3 A01 xxx Demo File 4 a01 xxx Demo File 5 b55 xxx Step 2 Insert the CF card to the HD Player Pro and the HD Player Pro will play the default file automatically while powered on Step 3 Press one of the buttons 1 5 to play the corresponding demo file Step 4 The HD Player Pro supports two options Repeat Default Repeat All when the demo file finishes playing ...

Page 47: ...will play the default file automatically while powered on Step 3 After sensing approaching subjects the HD Player Pro will play all the demo files once 11 4 Touch sensor button SCV HDZ WIR5SB 11 4 1 Features of the Touch Sensor Buttons The number of touch sensor buttons can be customized to 12 24 or 36 for OEM project Used with various operating environment glass plastics and acrylic material exce...

Page 48: ...ensor Buttons Open the battery cover and place the batteries AA size as shown below Pay attention to the polarity of the batteries 11 4 4 Play the Demo Files Step 1 Insert the CF card to the HD Player Pro and the HD Player Pro will play the default file automatically while powered on Step 2 Press one of the touch sensor buttons 1 5 to play the corresponding demo file Step 3 The HD Player Pro suppo...

Page 49: ...ro will play the default file automatically while powered on Step3 Make sure the Play Button item is set Repeat Default refer to section 7 4 Play Button Repeat Default Step4 Make sure the RS232 Control item is set Led Button Box refer to section 7 5 RS232 Control Led Button Box Step5 Restart the HD Player Pro and it will play the default file continuously Step6 Press one of the buttons 1 5 to play...

Page 50: ...e AUTOCOPY ini onto the USB flash driver Step3 Insert the USB flash drive to the HD Player Pro and it will automatically copy the files from USB flash drive to CF card it takes about 30sec until the HD Player starts copying the Files ATTENTION All Files on the CF Card SDHC Card will be deleted Step4 After copying all Files the HD Player automatically reboot and playback the new Files ...

Page 51: ...while pressing the wirelesstouch sensor buttons 1 Confirm the polarity of the battery 2 Check that there are no obstacles between the touch sensor buttons and the sensor window Network Not Working 1 Check your IP settings on the Network Setup page refer to 7 1 2 If using wired network make sure the network cable is plugged in on both the HD Player Pro and your network hub Players are not in sync 1...

Page 52: ...reme 8 SanDisk Extreme III 2 SanDisk Extreme IV 4 SanDisk Extreme IV 8 Transcend 600x 8 Transcend 400x 16 Kingston ultimate600x 16 16 RECOMMENDED VIDEO FILE FORMATS MPEG 4 10 H 264 BP L3 SMPTE 421M VC 1 MP HL and AP L3 WMV9 MP HL MPEG 2 MP HL MPEG 4 2 ASP L5 720p 1 point GMC max Bitrate 40 Mbps max Framerate 30fps ...

Reviews: