


Appendices
Page 58
APPENDIX C: Jacq3G Module Troubleshooting and Adjusting Guide
This document provides information regarding troubleshooting and adjustment of the Jacq3G hook modules. The points covered in this
document address a very large percentage of potential issues and adjustments that the user may encounter. However, not all potential
concerns are addressed by this guide. Please consult with your AVL technical support representative if you cannot solve your issue from this
guide. Additionally,
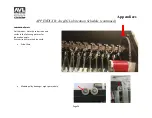
CAUTION: The Jacq3G hook module has both pinch and electrical shock hazards. The pinch hazards include: bearing surfaces, between knives
and module frame, and between cables and stationary frame. The electrical shock hazards are anywhere on the printed circuit board, at the
solenoid connectors and at the power entry connection. Working around these areas while the loom is powered and mechanisms are moving
requires special care. Keep hands and tools away from these areas to avoid injury. Power down the loom or disconnect power to the module to
eliminate electrical shock hazard.
There are two primary causes for hook inaccuracy or weaving errors: threading errors and equipment issues. You might be surprised how often
people have an issue with their warp – even with very experienced weavers. From our experience, it is by far the most common cause of
weaving errors. We think this is partially due to the fact that Jacquard machines, whether it be an AVL or some other brand, are much more
‘warp’ sensitive than harness looms, requiring very high accuracy in warping, threading and sleying. Jacquard looms, do not tolerate twisted
threads behind or in front of the hooks, steep side-to-side angles coming off the beam or from the reed, or even large variations in thread
tension across the warp. This is the place to begin your troubleshooting. Look for mis-threading, mis-sleying or thread crossover by weaving
tabby and observing the opening shed. You want to be extra certain to solve any warp related issues before proceeding with equipment testing
and fixes.
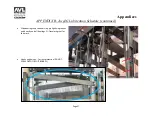
Equipment Tests
We have put together the following tests to diagnose equipment issues. You will need to closely observe the equipment behavior to distinguish
causes. Because you may not be accustomed to observing machinery, you may need to perform several iterations of the tests in order to really
see what is occurring.
Summary of Contents for TECHNICAL EDUCATION LOOM
Page 27: ...Loom Manual Page 27 Cloth Clamp Closed Cloth Clamp Open Fixed Clamp Open Fixed Clamp Hanging ...
Page 29: ...Loom Manual Page 29 Module Hooks Exposed Front Cover Removed Hooks Close Up ...
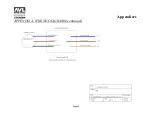
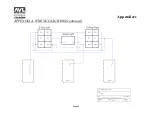
Page 33: ...Appendices Page 33 APPENDIX A WIRING DIAGRAMS continued ...
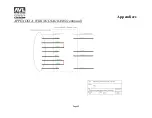
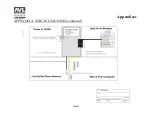
Page 34: ...Appendices Page 34 APPENDIX A WIRING DIAGRAMS continued ...
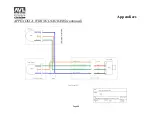
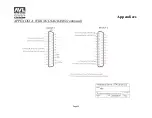
Page 35: ...Appendices Page 35 APPENDIX A WIRING DIAGRAMS continued ...
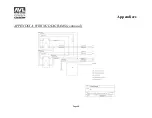
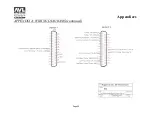
Page 36: ...Appendices Page 36 APPENDIX A WIRING DIAGRAMS continued ...
Page 37: ...Appendices Page 37 APPENDIX A WIRING DIAGRAMS continued ...
Page 38: ...Appendices Page 38 APPENDIX A WIRING DIAGRAMS continued ...
Page 39: ...Appendices Page 39 APPENDIX A WIRING DIAGRAMS continued ...
Page 40: ...Appendices Page 40 APPENDIX A WIRING DIAGRAMS continued ...
Page 41: ...Appendices Page 41 APPENDIX A WIRING DIAGRAMS continued ...
Page 42: ...Appendices Page 42 APPENDIX A WIRING DIAGRAMS continued ...
Page 43: ...Appendices Page 43 APPENDIX A WIRING DIAGRAMS continued ...
Page 44: ...Appendices Page 44 APPENDIX A WIRING DIAGRAMS continued ...
Page 45: ...Appendices Page 45 APPENDIX A WIRING DIAGRAMS continued ...
Page 46: ...Appendices Page 46 APPENDIX A WIRING DIAGRAMS continued ...
Page 47: ...Appendices Page 47 APPENDIX A WIRING DIAGRAMS continued ...
Page 48: ...Appendices Page 48 APPENDIX A WIRING DIAGRAMS continued ...
Page 49: ...Appendices Page 49 APPENDIX A WIRING DIAGRAMS continued ...
Page 50: ...Appendices Page 50 APPENDIX A WIRING DIAGRAMS continued ...
Page 51: ...Appendices Page 51 APPENDIX A WIRING DIAGRAMS continued ...
Page 52: ...Appendices Page 52 APPENDIX A WIRING DIAGRAMS continued ...
Page 53: ...Appendices Page 53 APPENDIX A WIRING DIAGRAMS continued ...
Page 54: ...Appendices Page 54 APPENDIX A WIRING DIAGRAMS continued ...


