


Loom Manual
Page 14
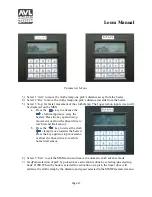
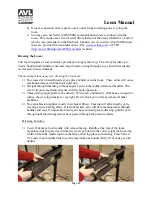
4)
The user pulls the beater forward to beat the weft yarn into the shed.
5)
Using the left button, the user changes
shed, and then returns the beater to its
rear position.
6)
The user repeats the process starting at
step 3.
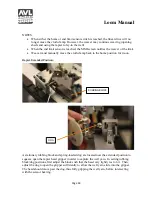
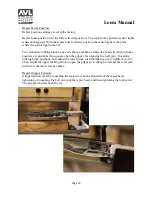
NOTES:
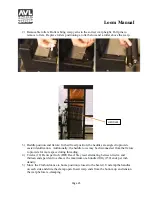
a)
At first weft insertion, the user must pre-
position the weft for the rapier. To
accomplish this:
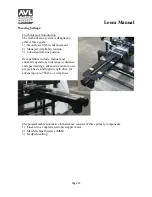
1.
The beater is pulled forward to
the stops.
2.
The weft yarn is pulled from the tensioner, through the open scissor and held the
end at the left side of the reed holder, which will be the fell line location. This
positions the weft yarn to be grabbed by the rapier.
3.
The beater is pushed back, then the rapier is activated.
b)
Selecting and holding the left (SHED)
button on the beater for a count of 15
seconds will switch shed modes. The two
shed modes are:
1.
Double shed (normal operation)
2.
Single step shed
(maintenance/diagnostics); Use
single step when lubricating the
hooks and when diagnosing hook
selection issues.
c)
The loom controller will automatically shut off all solenoids after fifteen seconds of
activation, which may occur in single step mode at center shed. In addition, the solenoids
are automatically inactivated at open shed.
Summary of Contents for TECHNICAL EDUCATION LOOM
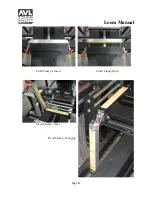
Page 27: ...Loom Manual Page 27 Cloth Clamp Closed Cloth Clamp Open Fixed Clamp Open Fixed Clamp Hanging ...
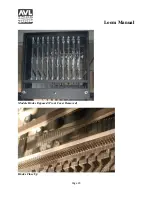
Page 29: ...Loom Manual Page 29 Module Hooks Exposed Front Cover Removed Hooks Close Up ...
Page 33: ...Appendices Page 33 APPENDIX A WIRING DIAGRAMS continued ...
Page 34: ...Appendices Page 34 APPENDIX A WIRING DIAGRAMS continued ...
Page 35: ...Appendices Page 35 APPENDIX A WIRING DIAGRAMS continued ...
Page 36: ...Appendices Page 36 APPENDIX A WIRING DIAGRAMS continued ...
Page 37: ...Appendices Page 37 APPENDIX A WIRING DIAGRAMS continued ...
Page 38: ...Appendices Page 38 APPENDIX A WIRING DIAGRAMS continued ...
Page 39: ...Appendices Page 39 APPENDIX A WIRING DIAGRAMS continued ...
Page 40: ...Appendices Page 40 APPENDIX A WIRING DIAGRAMS continued ...
Page 41: ...Appendices Page 41 APPENDIX A WIRING DIAGRAMS continued ...
Page 42: ...Appendices Page 42 APPENDIX A WIRING DIAGRAMS continued ...
Page 43: ...Appendices Page 43 APPENDIX A WIRING DIAGRAMS continued ...
Page 44: ...Appendices Page 44 APPENDIX A WIRING DIAGRAMS continued ...
Page 45: ...Appendices Page 45 APPENDIX A WIRING DIAGRAMS continued ...
Page 46: ...Appendices Page 46 APPENDIX A WIRING DIAGRAMS continued ...
Page 47: ...Appendices Page 47 APPENDIX A WIRING DIAGRAMS continued ...
Page 48: ...Appendices Page 48 APPENDIX A WIRING DIAGRAMS continued ...
Page 49: ...Appendices Page 49 APPENDIX A WIRING DIAGRAMS continued ...
Page 50: ...Appendices Page 50 APPENDIX A WIRING DIAGRAMS continued ...
Page 51: ...Appendices Page 51 APPENDIX A WIRING DIAGRAMS continued ...
Page 52: ...Appendices Page 52 APPENDIX A WIRING DIAGRAMS continued ...
Page 53: ...Appendices Page 53 APPENDIX A WIRING DIAGRAMS continued ...
Page 54: ...Appendices Page 54 APPENDIX A WIRING DIAGRAMS continued ...


