background image

4

EN

Section 1 


Getting to Know Your Camcorder

Overview

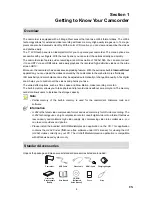
The camcorder is equipped with a 5 Mega Pixel sensor that can take H.264 format videos. The H.264 
technology allows for extended video recording with less memory. High quality images up to 16 mega-

pixels can also be delivered smoothly. With a color LCD monitor, you can view and examine the videos 
and photos easily. 
The 3” LCD touch panel is an ideal platform for you to operate your camcorder. The menu options are 

accessible with your fingers. With the touch panel, you can select the options directly and quickly.  
The camcorder also features video recording at an HD resolution of 1920x1080. You can also connect 
it to an HDTV via an HDMI cable, and easily playback the recorded high-definition videos on the wide 
screen HDTV. 
Moreover, the camcorder has an advanced uploading feature. With the exclusive built-in 

Internet Direct


application, you can upload the videos captured by the camcorder to the web site more effortlessly .

ISO sensitivity and color balance can either be adjusted automatically or changed manually. A 16x digital 
zoom helps you to control over the videos and photos you take. 
The varied effect options, such as Time Lapse and Slow Motion, make recording more fun.
The built-in memory allows you to take photos and to record videos without a memory card. The memory 

card slot allows users to increase the storage capacity. 

  Note

Partial  memory  of  the  built-in  memory  is  used  for  the  camcorder’s  Firmware  code

• 

  and 

software

.

  Information

H.264 is the latest video compression format and used commonly for HD video recording.  

• 

The 

H.264 technology uses a high compression rate to convert digital video into a format that takes 
less capacity and maintains high video quality. By compressing video into smaller size , you 
can take more videos and photos. 
Please install the bundled ArcSoft MediaImpression application on the CD. This application 

• 

contains the H.264 Codec (ffdshow-a free software under GPL license) for viewing the AVI 
(H.264) videos correctly on your PC. The ArcSoft MediaImpression application is compatible 
with Windows based systems only.

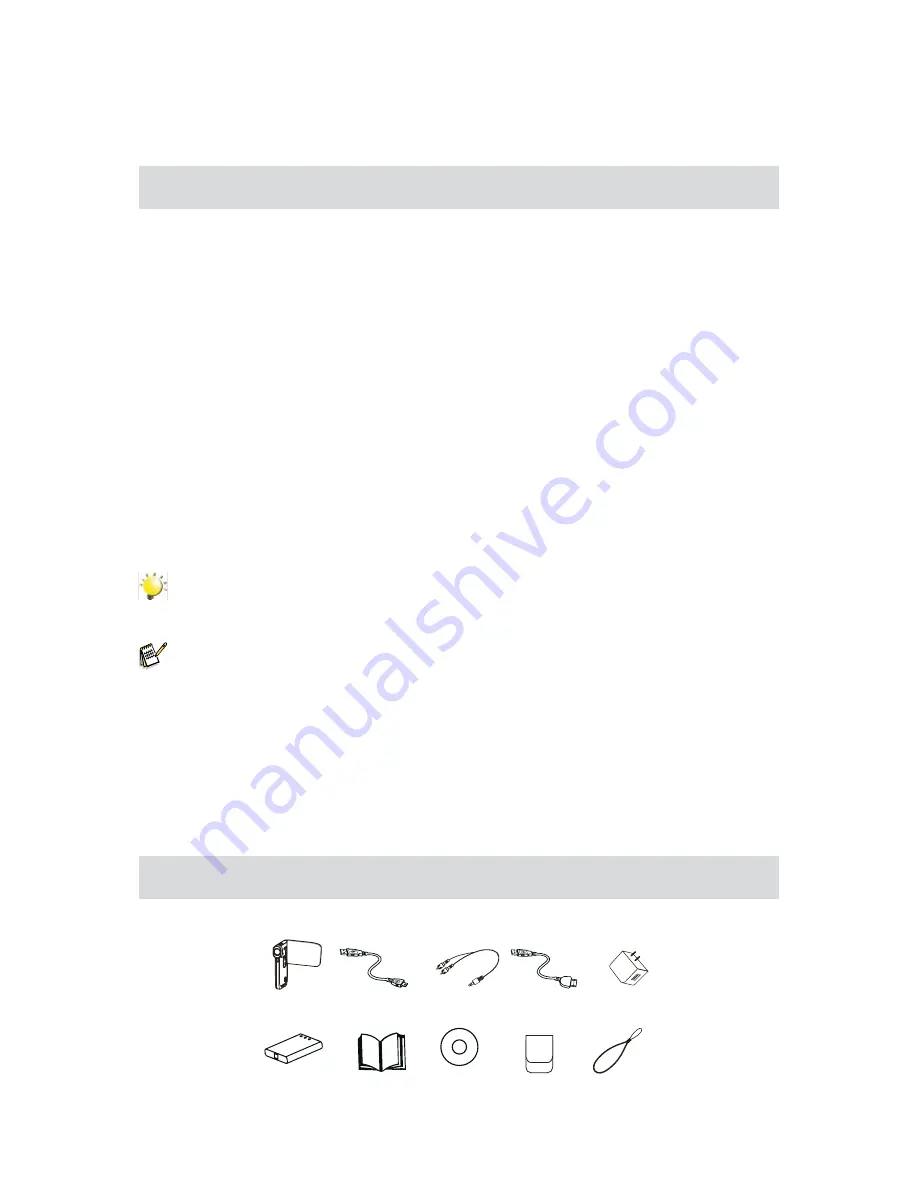
Standard Accessories

Unpack the package and make sure all standard accessories listed are included:

Charging Adaptor


USB Cable


HDMI Cable


Camcorder


Lithium-ion

Rechargeable

Battery


User Manual

CD-ROM

(Software &

User’s Manual)


Strap

Pouch 

Video Cable

Summary of Contents for V22

Page 1: ......

Page 2: ... before using the camcorder Only use accessories supplied by the manufacturer Use only the type of battery that came with your camcorder Remove the battery if the camcorder is not going to be used for long periods Product Information Designs and specifications of the camcorder are subject to change without notice This includes primary product specifications software and this user s manual This Use...

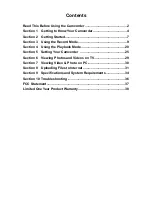
Page 3: ...ord Mode 9 Section 4 Using the Playback Mode 20 Section 5 Setting Your Camcorder 25 Section 6 Viewing Photos and Videos on TV 29 Section 7 Viewing Video Photo on PC 30 Section 8 Uploading Files to Internet 31 Section 9 Specifications and System Requirements 34 Section 10 Troubleshooting 36 FCC Statement 37 Limited One Year Product Warranty 38 ...

Page 4: ...digital zoom helps you to control over the videos and photos you take The varied effect options such as Time Lapse and Slow Motion make recording more fun The built in memory allows you to take photos and to record videos without a memory card The memory card slot allows users to increase the storage capacity Note Partial memory of the built in memory is used for the camcorder s Firmware code and ...

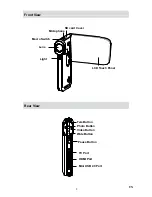
Page 5: ...5 EN Front View Rear View Photo Button Video Button Tele Button HDMI Port TV Port Mini USB 2 0 Port Wide Button Pause Button SD card Cover Lens Light Macro Switch LCD Touch Panel Microphone ...

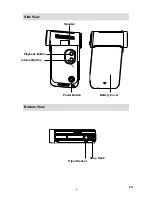
Page 6: ...6 EN Side View Bottom View Tripod Socket Strap Hook Power Button Battery Cover Speaker Playback Button Internet Button ...

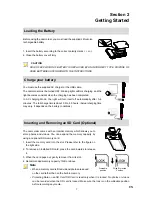
Page 7: ...o 4 5 hours Actual charging time may vary It depends on the battery conditions Inserting and Removing an SD Card Optional The camcorder comes with an internal memory which allows you to store photos and videos You can expand the memory capacity by using an optional SD memory card Insert the memory card into the slot Please refer to the figure on 1 the right side To remove an installed SD card pres...

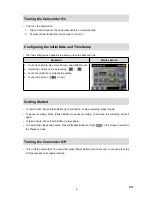
Page 8: ...ing 2 Touch the OK icon to validate the setting 3 Touch the Exit icon 4 to exit Getting Started To record video Press Video Button to record video To stop recording press it again To pause recording Press Pause Button to pause recording To continue the recording press it again To take a photo Press Photo Button to take photo To view stored videos and photos Press Playback Button or touch on the sc...

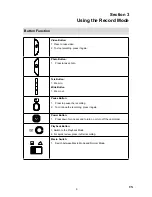
Page 9: ...o Tele Button Zoom In 1 Wide Button Zoom out 1 Pause Button Press to pause the recording 1 To continue the recording press it again 2 Power Button Press down for one second to turn on or turn off the camcorder 1 Playback Button Switch to the Playback Mode 1 For quick review press it after recording 2 Macro Switch Switch between Macro Mode and Normal Mode 1 ...

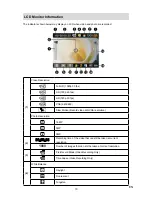
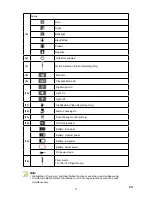
Page 10: ... 720p 30 fps VGA 640X480 Slow Motion Record video at QVGA resolution Photo Resolution 16MP 5MP 3MP 2 00 05 30 Recording time of the video that can still be taken at current resolution 1000 Number of images that can still be taken at current resolution 3 Pre Record Mode Video Recording Only Time Lapse Video Recording Only 4 White Balance Daylight Fluorescent Tungsten ...

Page 11: ...ion Video Recording Only 12 Macro Focusing On 13 Date Printing On Photo Only 14 SD Card Inserted 15 Battery full power Battery medium power Battery low power Battery empty power DC power mode 16 Zoom meter 1X 16X 16X Digital zoom Note Stabilization Pre record and Slow Motion functions cannot be used simultaneously Pre Record Motion Detect Slow Motion and Time Lapse functions cannot be used simulta...

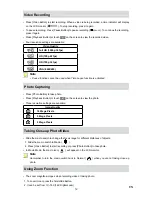
Page 12: ...Capturing Press Photo Button to take photo Press Playback Button or touch on the screen to view the photo Three resolution settings are available Image Quality 16 Mega Pixels 5 Mega Pixels 3 Mega Pixels Taking Close up Photo Video Slide the macro switch to change the focus range for different distances of objects Slide the macro switch to Macro 1 Press 2 Video Button to start recording or press Ph...

Page 13: ...deo Photo Effect Setting Resolution Stabilization Motion Detect Slow Motion Time Lapse Pre record Resolution ISO Self Timer Light Scene WB White Balance Face Tracking Sound TV Language Time Setting Date Printing Format Default Setting Please refer to Section 5 for the detailed information about Setting Operations for Record Mode Operation Display Screen T 1 ouch on the screen in Record Mode The me...

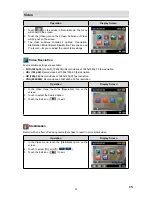
Page 14: ...l HD 1080p30 Record videos at 1920x1080p 30 fps resolution HD 720p 60 Record videos at 1280x720p 60 fps resolution HD 720p 30 Record videos at 1280x720p 30 fps resolution VGA 640X480 Record videos at 640x480p 30 fps resolution Operation Display Screen In the Video menu touch the Resolution icon on the 1 screen Touch to select the desired option 2 Touch the Exit icon 3 to exit Stabilization Record ...

Page 15: ...time will be longer than the actual recording time Operation Display Screen In the Video menu touch the Slow Motion icon on the 1 screen Touch to select 2 On or Off Touch the Exit icon 3 to exit Time Lapse Record still images at specific intervals you can set and play them as one video file Off Disable Time Lapse 1 Second Record one frame per second 3 Seconds Record one frame every 3 seconds 5 Sec...

Page 16: ... Operation Display Screen T 1 ouch on the screen in Record Mode The menu will show on the screen Touch the Photo icon on the screen Submenu of 2 Photo will pop out on the screen The Photo submenu contains 3 options Resolution 3 ISO and Self Timer for you to adjust the camcorder settings Photo Resolution Three resolution settings are available 16MP Shoot photo at 4608 x 3456 16MP quality 5MP Shoot ...

Page 17: ...mage may become noisy when the ISO number is large Self Timer The self timer allows you to take photos with a ten second time delay The LED light on the front of the camcorder will also blink The speed of blinking will increase just before the photo is taken Operation Display Screen In the Photo menu touch the Self timer icon on the 1 screen Touch to select 2 On or Off Touch the Exit icon 3 to exi...

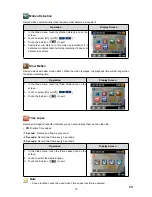
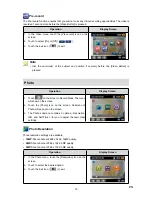
Page 18: ... Auto Shoot without any special effect on the image Skin Shoot with an effect that makes skin tones more natural Night Use Night Mode for night scenes or low light conditions Backlight You can take shots when the bright light is behind the subject Black White The image is converted to black and white Classic The image is converted to a sepia look Negative The image is converted as the negative of ...

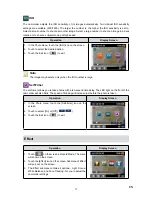
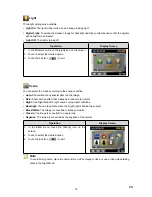
Page 19: ...e screen Touch to select the desired option 2 Touch the Exit icon 3 to exit Face Tracking Photo Only The camcorder can detect human face s and focus on the face s automatically This function can work with photo capturing It is wonderful for capturing beautiful portraits in backlight situation Operation Display Screen In the Effect menu touch the Face Tracking icon on 1 the screen Touch to select 2...

Page 20: ... the Record Mode 1 Tele Button Volume increase 1 Zoom in the photo 2 Wide Button Volume decrease 1 Zoom out the photo 2 Pause Button In Video Playback Mode press to pause the recorded video 1 Playback Button Switch to the Playback Mode 1 For quick review press it after recording 2 Internet Button In Video Playback Mode press to select the current video to upload to 1 the Internet ...

Page 21: ...ution Full HD 1080p 30 fps HD 720p 60 fps HD 720p 30 fps VGA 640X480 Slow Motion QVGA Photo Resolution 16MP 5MP 3MP 2 00 09 25 Video playback time counter 0003 0005 Current number Total number of photo video 3 The current file is selected to upload to the Internet 4 Volume 5 Return Video stop 6 Previous video photo 7 Video fast rewind ...

Page 22: ...cation Indicator Operations for Playback Mode The Playback Mode is for viewing and managing videos and photos on the built in memory or on an SD Card Operation Display Screen Press 1 Playback Button or touch on the screen to switch to the Playback mode Touch to select the specific option 2 Touch 3 to back to Record Mode ...

Page 23: ...he Internet Note When the LCD is idle for a few seconds the playback function icons will disappear automatically Delete Videos Operation Display Screen T 1 ouch to go to the Delete option screen Touch Yes to delete the current video or No to cancel 2 the operation and to exit touch All Delete All to delete all videos Before all videos are about to be deleted a confirmation 3 screen will appear tou...

Page 24: ...w Touch 6 to exit Note When the LCD is idle for a few seconds the playback function icons will disappear automatically Delete Photo Operation Display Screen Touch 1 to go to the Delete option screen Touch Yes to delete the current photo or No to cancel 2 the operation and to exit touch All Delete All to delete all photos Before all photos are deleted a confirmation screen will 3 appear touch Yes t...

Page 25: ...etting Sound Enable or disable the keypad tone and the operation sound Operation Display Screen In the Setting menu touch the Sound icon on the 1 screen Touch to select On or Off 2 Touch the Exit icon 3 to exit TV Ensure that the appropriate TV standard of your area is selected either NTSC or PAL Wrong TV system setting may cause image flickers NTSC 60Hz USA Canada Japan South Korea and Taiwan etc...

Page 26: ... Time Setting icon on the 1 screen to enter the time setting screen Touch Year Month Day Hour Minute and AM PM to set 2 Adjust the numeric value by touching 3 Touch the OK icon to validate the setting 4 Touch the Exit icon 5 to exit Date Printing Imprint the date and time on the photo Operation Display Screen In the Setting menu touch the Date Printing 1 icon on the screen Touch to select On or Of...

Page 27: ... Yes to enter the confirmation screen Touch the Yes 3 icon to execute the operation and the No icon to cancel the operation Note All the data will be erased if the SD card is formatted Make sure all the data are copied to your PC before formatting the SD card Default Setting To restore the default factory setting select this option Operation Display Screen In the Setting menu touch the Default Set...

Page 28: ...ult Factory Setting Resolution FHD 1080p 30 for Video 5MP for Photo Stabilization Off Motion Detection Off Slow Motion Off Pre Record Off Time Lapse Off Self Timer Off ISO Auto Scene Auto White Balance Auto Light Off Sound On TV NTSC Language English Date Printing Off Volume Level 6 ...

Page 29: ... LCD screen do not display when the camcorder is connected to an HDTV Some functions may not be accessible while the camcorder is connected to an HDTV Connecting to a non high definition 4 3 TV Connect one end of the AV cable to your camcorder s AV out port 1 Connect the other end of the cable to a television 2 The steps for viewing stored videos and photos on TV are exactly the same as for viewin...

Page 30: ...structions to complete the installation Note Detailed information can be found in the online help of all the bundled software Install the bundled software application ArcSoft MediaImpression for viewing the video correctly on a PC Transferring Photos or Videos to a Computer You can transfer photos or videos stored on your camcorder to a computer and send them in e mails to friends or post them on ...

Page 31: ...ayback mode by pressing the Internet Button 1 Connect the camcorder to your computer by using the supplied USB cable 2 Press Internet Button 3 on the camcorder to launch the Internet Direct application automatically The main screen appears automatically on the desktop 4 To view the recorded clips on Internet Direct it is necessary to install ArcSoft MediaImpression first Note The social media Web ...

Page 32: ...nt information before uploading or you can fill in the information before uploading by clicking on the icon Click CANCEL to stop uploading To upload video files selected manually to a Web site Follow the steps 2 and 3 on the previous page 1 On the thumbnail screen click the up down icon to change pages Click on the video clips you 2 want to upload Click on UPLOAD to start uploading 3 ...

Page 33: ... icon 2 to play pause Click on the Return icon to return to the thumbnail preview screen To setup your account information for the web site 1 Click on to go to the setup screen 2 Fill in your account information in the blanks Then click on Save If you do not have an account please sign up on the Web site first ...

Page 34: ...DHC SDXC card slot support up to 64GB Image resolution 16MP 4608 x 3456 16M pixels Interpolated 5MP 2592x1944 5M pixels 3MP 2048x1536 3M pixels Video resolution Full HD 1080p 30 1920X1080 30fps HD 720p 60 1280X720 60fps HD 720p 30 1280X720 30fps VGA 640X480 640X480 30fps White balance Auto Manual Daylight Fluorescent Tungsten ISO Auto 800 1600 Self timer 10 seconds delay Light Light On Digital Lig...

Page 35: ...he LCD screen These dots are a normal result of the manufacturing process and do not affect the recording Trademarks ArcSoft and MediaImpression are registered trademarks of ArcSoft Inc www arcsoft com YouTube and the YouTube logo are registered trademarks of Google Inc Microsoft Windows and Windows XP Vista 7 are either registered trademarks or trademarks of Microsoft Corporation in the United St...

Page 36: ...onds when taking photos The shutter will sound when photo is being taken How do I charge battery 444 You must use the supplied AC charger and the USB cable The camcorder must be turned OFF A blinking light will indicate active charging and a solid light indicates that charging is complete In AC charging mode the full charging time is about 3 5 4 5 hours and the light will turn off automatically af...

Page 37: ... in accordance with the instructions may cause harmful interference to radio or television reception which can be determined by turning the equipment off and on the user is encouraged to try to correct the interference by one or more of the following measures Reorient or relocate the receiving antenna Increase the separation between the equipment and receiver Connect the equipment into an outlet o...

Page 38: ...be fulfilled in the form of an Office Depot Merchandise card Claims fulfilled in this manner take approximately 90 days to process SATPROVIDESTHISLIMITEDWARRANTYINLIEUOFALLOTHERWARRANTIESEITHEREXPRESS OR IMPLIED EXPRESSLY EXCLUDED ARE ALL WARRANTIES OF FITNESS FOR A PARTICULAR PURPOSE OR MERCHANTABILITY SAT S SOLE OBLIGATION AND THE USER S EXCLUSIVE REMEDY UNDER THIS WARRANTY SHALL BE LIMITED TO T...

Reviews: