background image

Snake Card

4

5  

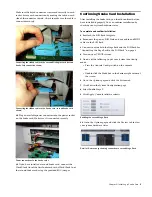
Remove the Snake card from its packing material. Hold the 

card by its edges.

6  

Gently slide the Snake card into a Snake card slot. 

7  

When the card is seated in its slot, secure both sides of the 

Snake card to the inside of the FOH Rack chassis with the two 
provided mounting screws (accessible from the open front 
panel of the FOH Rack).

8  

Secure the Snake card to the back panel of the FOH Rack us-

ing four of the provided mounting screws.

9  

Do one of the following:

• If you are installing a second Snake card, attach the pro-

vided ribbon cable from the connector labeled “Snake” 
on the second Mix Engine card (the card immediately ad-
jacent to the innermost Mix Engine card) to the ribbon 
connector on the second Snake card.

– or –

• If you are replacing the existing Snake card, attach the 

provided ribbon cable from the connector labeled 
“Snake” on the first Mix Engine card (the backmost card 
when viewed from the open front panel) to the ribbon 
connector on the Snake Card.

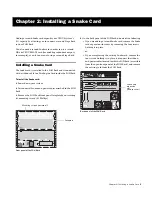
Snake card showing brackets and connectors

Installing the Snake card in the FOH Rack’s expansion slot

Mounting bracket

Power cable port

Ribbon cable port

Securing the Snake card to the FOH Rack chassis

Securing the Snake card to the back panel of the FOH Rack

Make sure that any HDx or VENUE MADI cards are con-
nected to the Mix Engine cards in the same manner. If the 
top Snake card is connected to the first Mix Engine card, 
then make sure the bottom HDx or MADI card is also con-
nected to that same Mix Engine card.

Summary of Contents for Snake Card

Page 1: ...PN 9321 62795 00 REV A 08 10 Snake Card for VENUE Systems...

Page 2: ...t EditPack Eleven HD Core HD Process Hybrid Impact Interplay LoFi M Audio MachineControl Maxim Mbox MediaComposer MIDI I O MIX MultiShell Nitris OMF OMF Interchange PRE ProControl Pro Tools M Powered...

Page 3: ...nd Capabilities 1 Conventions Used in This Guide 2 Chapter 2 Installing a Snake Card 3 Installing a Snake Card 3 Confirming Snake Card Installation 5 Connecting the Stage Rack to the FOH Rack 6 Chapte...

Page 4: ...Snake Card iv...

Page 5: ...For Snake card installation instructions see Installing a Snake Card on page 3 For instructions on connecting Stage Racks to your FOH Rack using the Snake card see Connecting the Stage Rack to the FOH...

Page 6: ...s System Config In the VENUE software screen click Options to display the Options page then click the Sys tem Config tab Ctrl N Hold down the Control key and press the N key Ctrl click Hold down the C...

Page 7: ...r down your system 2 Disconnect all audio and power cables attached to the FOH Rack 3 Remove the FOH Rack front panel faceplate by unscrewing its mounting screws 1 Phillips 4 On the back panel of the...

Page 8: ...nt to the innermost Mix Engine card to the ribbon connector on the second Snake card or If you are replacing the existing Snake card attach the provided ribbon cable from the connector labeled Snake o...

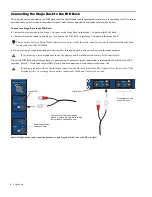
Page 9: ...e FOH Rack faceplate 2 Reconnect the power FOH Link and any audio and MIDI cables to the FOH Rack 3 Connect your snake to the Stage Rack and the FOH Rack See Connecting the Stage Rack to the FOH Rack...

Page 10: ...mary snake connection is indicated by the solid Active LED marked Active If the Snake Signal LEDs flash a Snake connection has not been established The The connectors on Avid s Digital Snake cable are...

Page 11: ...o that the bottom Snake card is connected to the first Mix Engine card and therefore the Stage Rack connected to it is identified as Stage Rack 1 Stage Rack 2 is then connected to the top Snake card I...

Page 12: ...Snake Card 8...

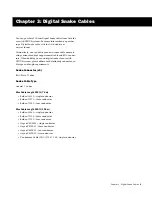
Page 13: ...wn digital snakes for use with VENUE systems please adhere to the following connector ca ble type and length requirements Snake Connector x4 BNC Male 75 ohm Snake Cable Type Coaxial 75 ohm Max Cable L...

Page 14: ...Snake Card 10...
Page 15: ...ls including lead known to the State of California to cause cancer and birth defects or other reproductive harm Wash hands after handling DECLARATION OF CONFORMITY We Avid 2001 Junipero Serra Boulevar...

Page 16: ...r 6 Clean only with dry cloth 7 Do not block any ventilation openings Install in accordance with the manufacturer s instructions 8 Do not install near any heat sources such as radiators heat registers...

Page 17: ...ro Serra Boulevard Daly City CA 94014 3886 USA Technical Support USA Visit the Online Support Center at www avid com support Product Information For company and product information visit us on the web...

Reviews: