background image

S4 Installation Guide

16

Positioning Cables

Before installing modules, make sure all power and Ethernet cables are positioned as needed in each chassis. 

Frames include cables pre-positioned for standard configurations, with multiple pairs of power and Ethernet cables already fed into 
each chassis from the built-in PDB (Power Distribution Board) and Ethernet switch. These pairs are ready for connection to Chan-
nel Strip, Display, and master modules. 

Display Modules and certain Option module configurations require pre-positioning cables as described below. 

If your system includes Display Modules, do the following to remove port covers and position cables: 

1

Remove the black plastic coverings from the small openings on the back of each chassis where you will install Display Modules. 

2

Feed one pair of Ethernet and power cables through the hole in the back of each chassis where you will be installing Display 
Modules. If necessary, feed cables from a neighboring chassis through holes in the chassis wall(s). 

Be sure to position enough cables for all Option modules, if any, in their chassis. If you are only installing a single Option Module 
into a chassis you should not need to position any additional cables. However, if you will be filling a chassis with three Option mod-
ules 

and

 a Display Module make sure there are four pairs, total, of power and Ethernet cables in that chassis. 

If your system includes any Option modules, do the following before proceeding: 

1

Identify the chassis into which the Option modules will be installed. 

2

Make sure there is an available pair of Ethernet and power cables for each module that will be installed in that chassis. 

3

If necessary, feed available built-in cables from a neighboring chassis through the holes in the chassis wall(s) to the Option mod-
ules chassis. 

• Cable ties secure cables to the bottom of the chassis. If necessary, cut one or more cable ties that are closest to the ends of ca-

bles, then route the cables between chassis as needed. 

• A bag of new cable ties is also included with the frame. Use these to re-secure cables in their new chassis location(s). 

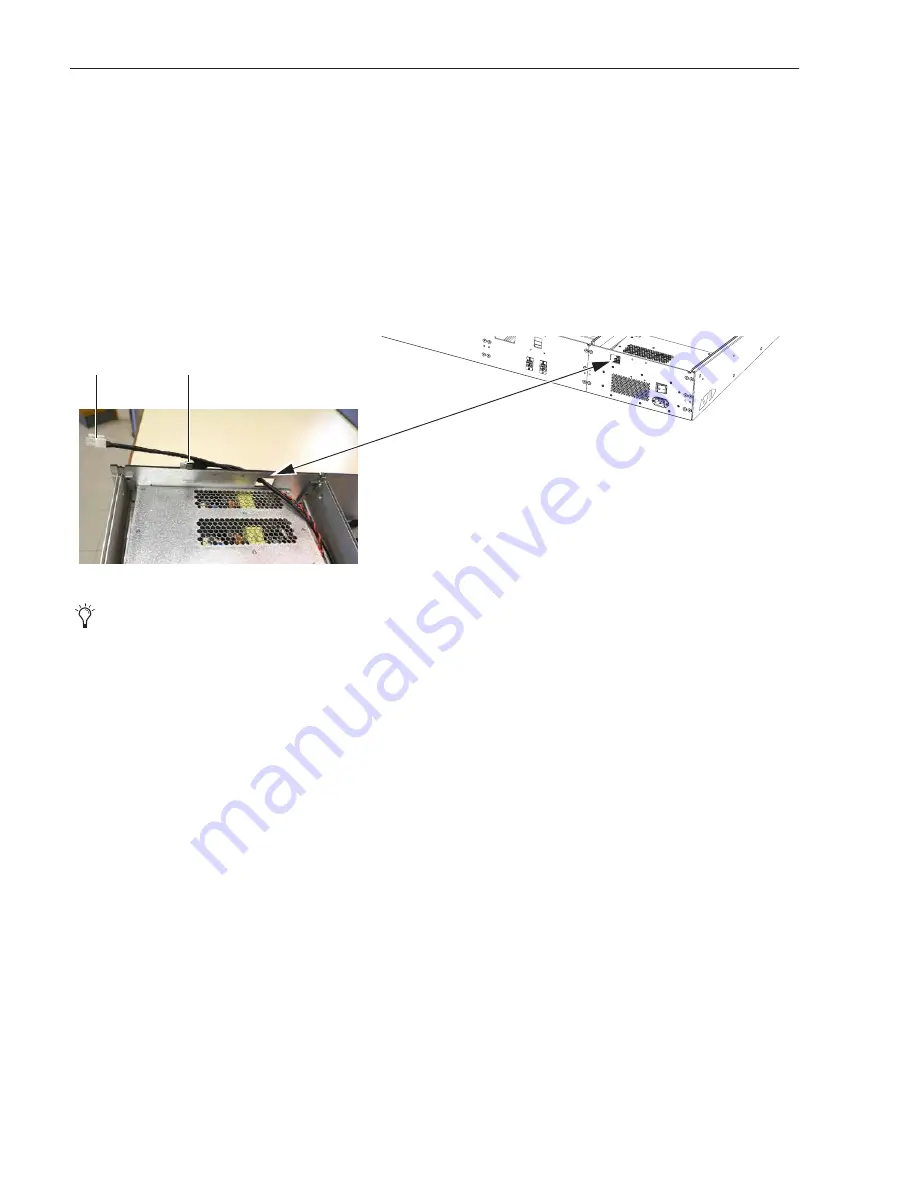
Figure 4. Routing Ethernet and power cables for a CDM

You can also remove the large black plastic covering from the opening in the back of the chassis where you plan to install the Mas-
ter Module, or wait until you are installing the Master Module as instructed later in this guide. 

Ethernet

Power

Summary of Contents for S4

Page 1: ...Avid S4 Installation Guide ...

Page 2: ...ces Bonjour the Bonjour logo and the Bonjour symbol are trademarks of Apple Computer Inc Thunderbolt and the Thunderbolt logo are trademarks of Intel Corporation in the U S and or other countries This product may be protected by one or more U S and non U S patents Details are available at www avid com patents Product features specifications system requirements and availability are subject to chang...

Page 3: ...equipment Warning To reduce the risk of fire or electric shock do not expose this equipment to rain or moisture Do not defeat the safety purpose of the polarized or grounding type plug A polar ized plug has two blades with one wider than the other A grounding type plug has two blades and a third grounding prong The wide blade or the third prong are pro vided for your safety If the provided plug do...

Page 4: ......

Page 5: ...Chapter 3 Hardware Assembly 13 Important Installing and Handling Modules 13 Overview of Installation 14 Installing the Frame 15 Positioning Cables 16 Connecting and Installing Modules 17 Fill Panels Compression Panels and T Strips 24 Connecting Ethernet and Power 27 How to Proceed 28 Part III Software Installation Chapter 4 Confirm Installation and Update Software 31 Starting Up and Shutting Down ...

Page 6: ...endix B Expanding an S4 System 45 Overview 45 Updating the Surface Settings 46 Shutting Down the System 46 Removing T Strips Compression Panels and Fill Panels 47 Installing Modules 48 Re assemble the System 48 Update the Surface Configuration 48 Appendix C Compliance 49 Environmental Compliance 49 EMC Electromagnetic Compliance 50 Safety Compliance 51 ...

Page 7: ...Part I Introduction ...

Page 8: ......

Page 9: ...turdy table or other flat surface preferably with padding to protect the hardware Make sure you have another person available to help lift turn and move the system during and after assembly Identify and organize the packages that make up your purchased system see Figure 1 to simplify the assembly process All re quired tools are in the Side Covers package see What s Included on page 4 Components an...

Page 10: ...tware updates Chapter 6 Confirm Installation and Update Software What s Included The Master Module package contains the following items Master Module S4 and S6 Installation Guide binder with the following items in the pouch of the binder Activation Card System Restore USB Flash Drive Power Adapter cable for Master Module Health Safety Guide Do not use the System Restore drive for anything other th...

Page 11: ...Activation Activate your S4 system software online as instructed later in this guide You must use the System ID on the included S4 System Software Activation Card to activate and download all S4 system software and documentation You will also need to activate your S4 software license after installing the software If you are upgrading a system check your Avid account for the latest S4 system softwa...

Page 12: ... manuals browse the Compati bility documents for system requirements search the online Knowledge Base or join the worldwide Avid user community on the User Conference https www avid com learn and support For S4 support trouble shooting and downloads visit http avid force com pkb articles faq Avid S6 Support Videos on YouTube Check out the new Avid Pro Tools S6 Workflows and original Get Started Fa...

Page 13: ...dule In S4 systems the Master Module supports up to 24 fader strips and can control up to two connected workstations Automation Module The Automation Module provides transport and locate controls the Attention fader strip Jog Shuttle wheel a numeric keypad and additional Soft Keys The Automation Module is most often installed directly below and in the same chassis as the Master Module Master Modul...

Page 14: ...witches The upper knob section has eight columns each with four knobs associated displays and switches Option Modules S4 systems can be expanded by adding the following Option modules One Master Joystick Module One Master Post Module Up to two Knob Modules as Expand Zones Attention Track Knob Modules Up to four Display Modules one of which can be defined as a Master Meter Display Not all configura...

Page 15: ...our Display Modules can be installed Three Display Modules can be installed above channel modules One additional Dis play Module can be configured as a Master Meter Display Each channel Display Module provides a large display that shows names meters waveforms and other data for up to eight strips Display Modules designated as Master Meter Displays provide dedicated display of up to 24 channel mete...

Page 16: ...only one restriction the Master Module cannot be installed at the far left For example for an S4 16 fader system in a 3 foot frame the master section modules can be located in two possible locations as shown below How to Proceed Later after you have assembled the system you will use the Touchscreen to tell the system where you have installed which mod ules choosing arrangements as available in the...

Page 17: ...Part II Hardware Assembly ...

Page 18: ......

Page 19: ...Panels Compression Panels and T Strips Confirming Hardware Installation Updating Software Important Installing and Handling Modules When installing the Master Module or any module into a frame lower them gently into position DO NOT DROP into position If necessary when installing the Master Module tilt the Touchscreen to its full upright position and lock it in place by tightening the thumbscrew on...

Page 20: ...position slot 2 behind it and so on The following table and diagram show the specific modules and their arrangement in our example configuration Fill Panels fill any empty slots Compression Panels secure modules in place Your exact installation procedure will differ slightly from this example configuration depending on your system and arrangement of modules The Master Module requires special conne...

Page 21: ...witch is oriented differently than in 3 and 4 foot Also built in power and Ethernet cables are not show in all images If you are installing S4 into custom furniture you can remove the side covers end caps Use an M4 hex driver to remove the five M4x6 fasteners from each side cover For dimensions of each S4 frame with and without side covers see the S4 Mechanical Specifications pdf Components and sy...

Page 22: ...re only installing a single Option Module into a chassis you should not need to position any additional cables However if you will be filling a chassis with three Option mod ules and a Display Module make sure there are four pairs total of power and Ethernet cables in that chassis If your system includes any Option modules do the following before proceeding 1 Identify the chassis into which the Op...

Page 23: ...t these to the Display Module later 3 Identify the required 2x pairs of Ethernet and power cables in the chassis CSMs require 2x Ethernet and 2x power connections 4 Holding the Channel Strip Module close to its location in its chassis do the following Use two of the longest RJ 45 Ethernet cables in that chassis and connect them to both Cat 5e ports on the back of the module Connect two 2 pin Molex...

Page 24: ... chassis repeat the previous steps If you are not installing a CSM in the next chassis see Installing Master Section Modules on page 19 or Installing Option Modules on page 22 as appropriate for your chassis 2 Refer back to these CSM instructions if you are installing one or more additional CSMs Figure 7 Channel Strip Module in chassis 1 cables not shown Later after all modules are in place they w...

Page 25: ...of the chassis where you plan to install the Master Module 3 Hold the Automation module above its chassis and do the following Connect the longest 2 pin Molex power cable in the chassis to the DC input on the side of the module Connect the longest Ethernet cable to the Ethernet port on the side of the module 4 Install the connected Automation Module into the chassis making sure it sits fully into ...

Page 26: ... chassis Ethernet cable to Ethernet port 2 right on the back panel of the Master Module Alternatively for advanced users if you are connecting S4 to an existing DHCP Server on your network connect the second chassis Ethernet cable to Ethernet port 1 left on the back panel of the Master Module If you are unsure of whether you have a DHCP server on your network consult your IT department 3 If you pl...

Page 27: ... the Touchscreen Angle and Removing Protective Film After installing the Master Module set the Touchscreen to your desired viewing angle and lock it in place by tightening the thumb screw on the stand Remove the protective film from the touchscreen When placing the Master Module into the frame guide cables around not over internal components such as the PDU or switch Reminder Do not install a Mast...

Page 28: ...le you want closest to the front and connect power and Ethernet to it as you did for the Automation Module Use the longest available power and Ethernet cables in that chassis 3 Install the connected module in the chassis Make sure it is oriented correctly and seated fully 4 Unpack an Attention Knob Module or whichever Option module you want in slot 2 and connect power and Ethernet to it as you did...

Page 29: ...nt them higher and closer to the operator If your Display Module packages include both brackets it is recommended to use the larger S4 brackets Fasteners are included in a small bag taped to the bracket Use the four flathead Hex fasteners to attach the brackets to the chassis Set the other four rounded fasteners aside these will be used to attach the module to the brackets later 2 Attach the first...

Page 30: ...rips After installing modules add Fill Panels Compression Panels and T Strips to secure the modules in place Installing Fill Panels After all modules are installed including Display Modules if any install Fill Panels Fill Panels are available in different sizes to fill empty chassis to fill large and small slots and to keep modules and panels aligned horizontally Mini Fill Panel Fits behind or in ...

Page 31: ...each chassis Compression Panels are spring loaded panels that seal the top of each chassis and hold the modules in place Compression Panels come in three sizes for S4 CSM For sealing CSM chassis 1x included in each CSM package Channel For sealing Option Module chassis if any Master For sealing master section chassis 1x included in each Frame package Installing Compression Panels is the same for S4...

Page 32: ...sion panel 1 Take the Master Compression Panel included in the Frame package and hold it so that the side with the springs faces the back of the frame 2 Holding the panel at an angle place the spring side of the panel against the back of the chassis Apply enough pressure to com press the springs then lower the front edge and snap it into place To install Channel Compression Panels for Option Modul...

Page 33: ...at the top back and use a small flat head screwdriver or similar tool to push down on the tab that holds the T strip in place then lift the strip out Connecting Ethernet and Power An individual Ethernet cable is provided to connect the S4 to your workstation s or to your network Multiple IEC power cables are provided to connect the S4 to power sources in any global region Installing the Ethernet C...

Page 34: ...e package appropriate for your region UK EU or US 2 Connect one end to the power connector on the back of the S4 and connect the other end to an AC source How to Proceed After all modules panels and cables are in place proceed to Chapter 6 Confirm Installation and Update Software Back panel power switch and connector ...

Page 35: ...Part III Software Installation ...

Page 36: ......

Page 37: ...itch to the On position 2 Confirm that the touchscreen displays the Master Module startup screen 3 When the system is fully running if the touchscreen displays an End User License Agreement and the following message you must install updated software before you can continue Welcome to your Avid Control Surface A critical software update is available Before continuing please follow the instructions ...

Page 38: ...e Software Workstation macOS or Windows and S4 S6 documen tation from your Avid account to your computer Insert a USB flash drive into an available USB port on your computer If necessary extract decompress the ZIP file containing the Master Module software to unzip it Copy the resulting file exe to the top root level of your USB drive then remove eject the USB drive Logging in as Administrator and...

Page 39: ...cense Activation page 4 Enter the following information making sure to enter all characters and numbers correctly fields are not case sensitive Enter yourActivation ID into the Activation ID field Once entered a System ID field appears Press Tab to go to the next field Enter your System ID into the System ID field Press Tab to go to the next field Enter your Device ID shown on the S4 Software Lice...

Page 40: ...ive containing the downloaded EUCON_WorkstationUnifiedInstall into a USB port on your workstation To install WSControl workstation software 3 Double click EUCON_WorkstationUnifiedInstall then double click the installer to launch it 4 Follow the instructions on screen select each option you want to install To only install S4 Workstation software click to select S4 S6 Workstation If you will be usin...

Page 41: ...ions To uninstall all User Preferences select Uninstall User Preferences your appsets will not be removed 3 Click Continue Mac or Next Windows How to Proceed Refer to the electronic S4 S6 Guide pdf included with S4 and S6 documentation downloads to configure the surface and learn how to use S4 You should also check out the Avid Pro Tools S6 Workflows and original Get Started Fast with S6 video tut...

Page 42: ...S4 Installation Guide 36 ...

Page 43: ...Part IV Reference ...

Page 44: ......

Page 45: ...or Exit 5 Press the flashing blue switch below the desired test to see choices for that mode For example entering Fader test mode lets you choose Sine Step Group or Triang OLED test mode offers Vegas 6 Press the flashing switch below the desired test 7 To end the test and return to the previous page of choices press the flashing switch below Exit channel 8 8 After performing a Utility Test on any ...

Page 46: ...e lists average and maximum power usage for all S4 and S6 modules Not all modules are supported on all sys tems as noted Power Specifications Average power consumption while playing back audio with moderate automation Power Consumption To determine the average power consumption for use in specifying air conditioning and similar add all the modules Average Con sumption values For Maximum Power Cons...

Page 47: ...es Module Weight Automation Module 5 02 lbs 2 28 kg Channel Strip Module 10 85 lbs 4 9 kg Display Module 3 52 lbs 1 60 kg Knob Module 4 1 lbs 1 84 kg Master Joystick Module 3 6 lbs 1 63 kg Master Module 15 4 lbs 7 kg Master Post Module 3 35 lbs 1 52 kg Table 2 Weights of assembled frames Frame Width Weight 3 feet 50 lbs 22 7 kg 4 feet 55 lbs 24 9 kg 5 feet 60 lbs 27 2 kg How to determine total S4 ...

Page 48: ...agrams below show total width including Side Covers end caps If your 3 bay frame does not include Side Covers subtract 40 mm 1 6 in from total frame width S4 3 Bay dimensions 962 0 mm 37 9 in 11 5 mm 0 5 in 57 9 mm 2 3 in 731 2 mm 28 in 141 7 mm 5 6 in ...

Page 49: ... below show total width including Side Covers end caps If your 4 bay frame does not include Side Covers subtract 40 mm 1 6 in from total frame width S4 4 Bay dimensions 1259 0 mm 49 5 in 12 1 mm 0 5 in 59 5 mm 2 3 in 731 2 mm 28 in 141 7 mm 5 6 in ...

Page 50: ...s below show total width including Side Covers end caps If your 5 bay frame does not include Side Covers subtract 40 mm 1 6 in from total frame width S4 5 Bay dimensions 1556 0 mm 61 in 731 2 mm 28 in 12 1 mm 0 5 in 59 5 mm 2 3 in 141 7 mm 5 6 in ...

Page 51: ... to a maximum of four optional Display Modules can be installed One Display Module can be designated as a Master Meter Display Module Optional Modules A maximum of three of the following optional expansion modules can be installed any combination not ex ceeding three total One Master Joystick Module One Master Post Module Two Expand Zones Attention Track Knob Modules Overview The basic steps for a...

Page 52: ... it to another system you can temporarily unclaim it after the new systems boots by holding the top two right most switches on that module However it will reset back to its previous owner after a power cycle if not properly claimed by another system by adding it to that system s arrangement Unclaiming Display Modules To unclaim a Display Module 1 Create a file named unclaim txt and copy it to a FA...

Page 53: ...hassis one at a time Start at the top back of the control surface and use a small flat head screwdriver to push down on the tab that holds the T strip in place then lift the strip out To remove Compression Panels Remove Compression Panels from the top most slot of each chassis Push them gently towards the back of the console to com press their built in springs then lift out the front edge and remo...

Page 54: ...y as explained in Fill Panels Compression Pan els and T Strips on page 24 Installing Display Modules To install Display Modules follow the instructions in Installing Display Modules on page 23 Re assemble the System After installing modules follow the instructions beginning in Fill Panels Compression Panels and T Strips on page 24 to re as semble the system Update the Surface Configuration After a...

Page 55: ...that it is recycled in a manner that protects human health and the environment For more information about where you can drop off your waste equipment for recycling please contact your local city recycling office or the dealer from whom you purchased the product Proposition 65 Warning This product can expose you to chemicals including Pb and Pb compounds which is known to the State of California to...

Page 56: ...and found to comply with the limits for a Class A digital device pursuant to Part 15 of the FCC Rules These limits are designed to provide reasonable protection against harmful interference in a res idential installation This equipment generates uses and can radiate radio fre quency energy and if not installed and used in accordance with the instructions may cause harmful interference to radio com...

Page 57: ...liquid has been spilled or objects have fallen into the equipment the equipment has been exposed to rain or moisture does not operate normally or has been dropped 15 For products that are a Mains powered device The equipment shall not be exposed to dripping or splashing and no objects filled with liquids such as vases shall be placed on the equipment Warning To reduce the risk of fire or electric ...

Page 58: ...d un cordon d alimentation Afin de prévenir les chocs électriques débrancher les deux cordons d alimentation avant de faire le dépannage 21 For products with an operator accessible fuse CAUTION For continued protection against risk of fire replace only with same type and rating of fuse ATTENTION Pour ne pas compromettre la protection contre les risques d incendie remplacer par un fusible de même t...

Page 59: ......

Page 60: ...75 Network Drive Burlington MA 01803 Technical Support USA Visit the Online Support Center at www avid com support Product Information For company and product information vis it us on the web at www avid com ...

Reviews: