background image

AVG-K12-VGA  


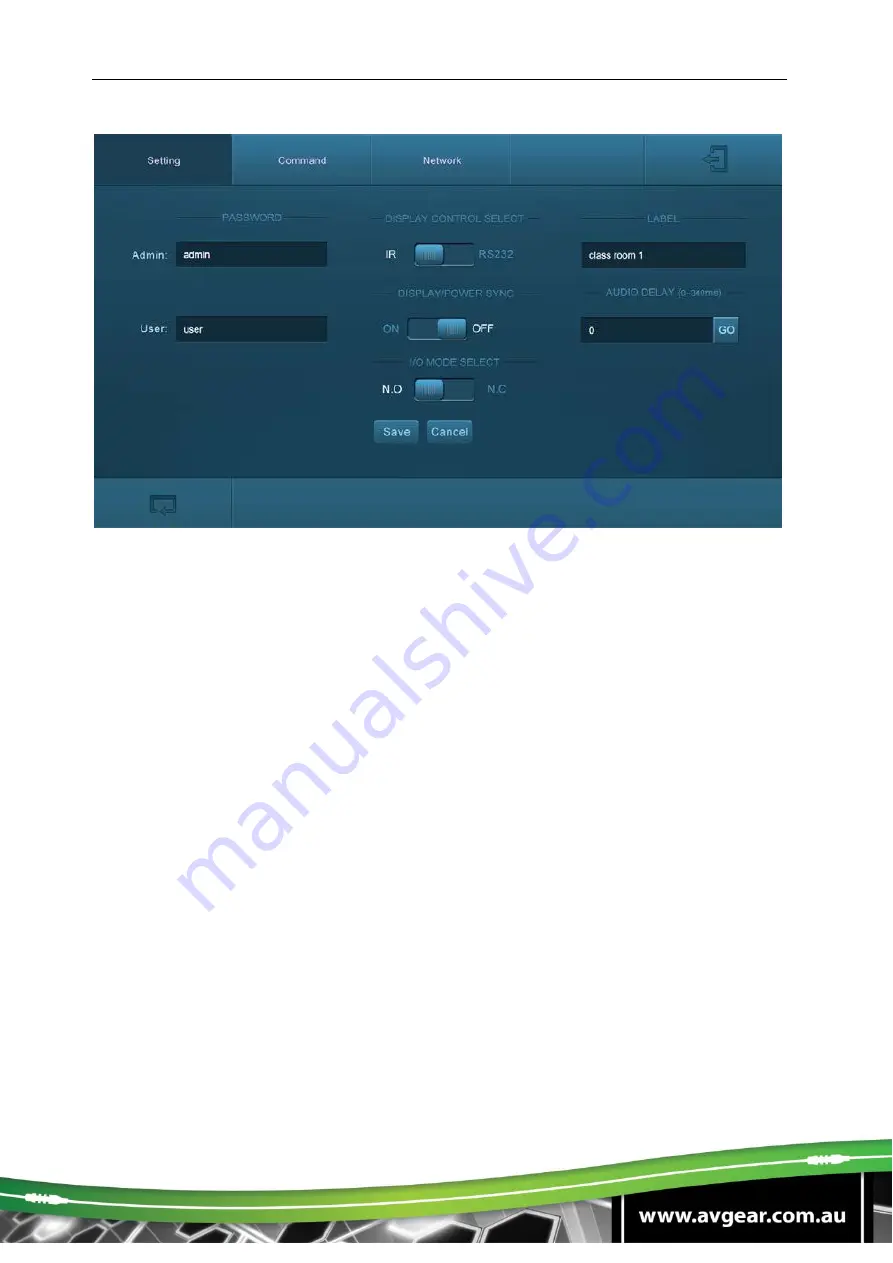
On this page, you can: 


You can modify the passwords on the left side of the GUI. 


Select the control mode for turning the projector on or off in 

DISPLAY CONTROL 

SELECT 

bar, default mode is IR control. 


Select 

ON

” or “

OFF

” in the

 DISPLAY / POWER SYNC

 bar to turn the 

synchronous control mode on or off for the projector and AVG-K12. This option is 
only active if the display is controlled via RS232.  


When synchronous control mode is 

ON

, press the buttons 

“ON”


or “

OFF

” on 

the Control Panel to turn the projector and the AVG-K12 on or off the 
concurrently. 


When synchronous control mode is 

OFF

, press 

“ON” 

on Control Panel

 to


turn on the projector or long-press it to start the AVG-K12, 

press “

OFF

” to 

turn off the projector or long-press it to put this AVG-K12 into standby. 


Select 

N.O

” or “

N.C

” in the

 I/O MODE SELECT

 bar to turn on / off the 

REMOTE 

MUTE

 port connected Fire Alarm System. Under 

N.O

” mode, when the fire alarm 

signal triggers, the audio output of 

signal source

 will be set to mute. 


You can modify the label displayed on the Log-in page. 


To set the

 AUDIO DELAY

, change the value in the Audio delay bar to ensure 

audio and video signal can output synchronously. The range is 0~340ms. 
 

Click “

Save

” to save these settings. 


Summary of Contents for AVG-K12-VGA

Page 1: ...gnals to the Receiver via CAT5e CAT6a cable up to a maximum distance of 30m at 1920x1080 60HZ Features Switch easily between two source signals HDMI HDMI or HDMI VGA HDMI output resolution up to 1920x1080 60Hz Transmission distance of 30m for 1080p 60Hz over single CAT5e CAT6a cable Supports HDMI 1 4 HDCP1 4 Microphone and line level input Built in 2x20 Watt 4ohm amplifier Customizable Control Pan...

Page 2: ...unctions and operational parameters will be updated in future manual versions Please refer to your dealer for the latest product details Version 1 0 25 08 16 IMPORTANT NOTICE Please note that the AV Gear K12 KIT is available in two versions The version available at launch has a wallplate with 2 x HDMI inputs In future we will offer a version with 1 x HDMI and 1 X VGA input This manual refers to bo...

Page 3: ...posed to extreme hot or cold temperatures 3 This unit will generate heat during operation please ensure that you allow adequate ventilation to ensure reliable operation 4 Please disconnect the unit from mains power if it will be left unused for a long time 5 Please DO NOT try to open the casing of the equipment DO NOT attempt to repair the unit Opening the unit will void the warranty There are hig...

Page 4: ...2 Control Panel 3 3 System Connection 4 Usage Precautions 4 1 Connection Diagram 4 2 Connection Procedure 4 3 PoC Solution 4 4 Application 4 5 System Operation 5 IR Learning 5 1 Front Panel Button Control 5 2 USB Signal Return 5 3 RS232 Control 5 4 IR Control 5 5 Web based GUI Control 5 6 Configuration Data 5 7 Specifications 6 Panel Drawing 7 Troubleshooting Maintenance 8 ...

Page 5: ...ms and boardrooms There are four buttons used to control far end devices such as projectors The AVG K12 supports front panel button control and Web based GUI control With its PoC solution connecting the DC adapter to the Receiver will power the Transmitter and Control Panel simultaneously Features Switch easily between two source signals HDMI HDMI or HDMI VGA HDMI output resolution up to 1920x1080...

Page 6: ...nal Block 4 pin block used for 2x20Watt 4 ohms 1 x Pluggable Terminal Block 3 pin blocks used for LINE OUT or RS232 port 1 x Pluggable Terminal Block 2 pin block used for REMOTE MUTE port 1 x IR emitter 1 x USB Control cable USB A to USB B 1 x White face plate 1 x Power Adapter DC 24V 2 71A 1 x User Manual Note Please confirm if the product and the accessories are all included if not please contac...

Page 7: ...Traffic without HDCP RESET Press this button to reset the Transmitter SOURCE SELECT Blue backlight button Press it to select one source press again to select next source switching circularly between HDMI 1 and HDMI 2 or HDMI and VGA Note Without any action for this button the second HDMI source connected to transmitter will be recognised as input signal To PC Connect PC to transmit USB control sig...

Page 8: ...put HDMI IN 2 VGA Connect with HDMI source FIRMWARE Micro USB port used for firmware update PoC IN HDBT OUT Connect to the HDBT IN PoC port on the Receiver via CAT5e CAT6a cable to transmit the AV and control signal With PoC solution the Transmitter can be powered by this port once Receiver has been powered up POWER RS232 RJ45 connector Connect to the POWER RS232 port on the Control Panel via CAT5...

Page 9: ...without HDCP Power OFF No power RED DC power present TCP IP Connect to a PC to control the following items by Web based GUI Input signal switching Volume adjusting Turn the projector on or off Put the system into standby or turn it on HDBT IN PoC Connect to the PoC IN HDBT OUT port of Transmitter with a CAT5e cable TO DISPLAY Connect your HDMI to the display HDBT IN PoC TO DISPLAY R L LINE OUT IR ...

Page 10: ...io in mixed mode Alternatively you could connect this to an Audio Recorder MIC LINE Input mode switch When the switch turns to MIC the microphone input is used for connecting with dynamic microphone There are two different connections 1 Unbalanced connection connects to ground and connects to signal 2 Balanced connection connects to positive connects to negative and connects to ground When the swi...

Page 11: ...peaker to play the HDMI embedded audio and MIC audio in mixed mode DC24V Connect with the supplied DC 24V 2 71A power adapter 3 3 Control Panel POWER RS232 11 MIC SOURCE VOLUME ON HDMI 1 OFF HDMI 2 CONFIG IR 7 8 9 10 3 4 5 6 1 2 12 FIRMWARE ...

Page 12: ...mote control s IR signal which is sent out or the Receiver s IR Out port Volume indicator Indicates the level for the MIC or the SOURCE OFF Button Blue backlight button The display s Power Off IR command can be learnt in here to remotely power off the display HDMI 2 VGA Blue backlight button Press it to select HDMI IN 2 or VGA signal as input source CONFIG USB A connector Connect with a U disk to ...

Page 13: ... sockets and power cords should be insulated and safe 3 All devices should be connected before power is turned on 4 Use shielded straight through Cat5e Cat6Acable with TIA EIA T568B terminations for best transmission results 4 2 Connection Diagram TCP IP CAT5e 6A Cable HDMI Cable Smart Board USB Cable IR RS232 PoC IN HDBT OUT POWER RS232 Sta ndb y Fire Alarm System USB Cable Wireless Mic RS232 Pro...

Page 14: ...232 port of the Receiver Step 7 Connect a smart board to the FROM TOUCH SCREEN port of Receiver with a USB control cable Step 8 Connect an amplifier or sound recording device to the LINE OUT port of Receiver if required Step 9 Connect a microphone to the MIC port of the Receiver Step 10 Connect the REMOTE MUTE port of Receiver to the Fire Alarm System Step 11 Connect your speakers to the 2x20Watt ...

Page 15: ...ard in class This section provides a brief introduction to scenarios the user may come across Scenario 1 Before Class 1 Press the ON button of the Control Panel to turn the projector on or long press it to start the system 2 Connect HDMI signal sources e g PCs to the HDMI IN 1 and or HDMI IN 2 VGA port of Transmitter 3 Turn on wireless microphone H D B T I N P o C T O D I S P L A Y R L L I N E O U...

Page 16: ...SOURCE audio to select which one you need to adjust Turn clockwise to increase the volume anti clockwise to decrease 3 Teachers can write some notes on the smart board The projector will receive these annotations by USB control cable and then display it on smart board Scenario 3 At the end of this class Press the OFF button to turn the projector off or long press it to put the system into standby ...

Page 17: ...ton 6 Finally Long press the button HDMI 2 VGA to exit programming mode To Test your IR codes 1 Press the button ON to turn on the projector 2 Press the button OFF to turn off the projector Notes When the system enters IR learning status long press the button HDMI 2 VGA for more than 5 seconds to exit IR Learning If you don t do anything for 60 seconds the system will exit IR Learning automaticall...

Page 18: ...o the HDMI signal source PC and then it will be transmitted to the projector for display Please refer to the return path of USB signal as shown below Note The distance between the Receiver and the Smart Board should be within 4m otherwise a special USB extension cable should be used PoC IN HDBT OUT POWER RS232 LINK RESET HDMI IN 1 FIRMWARE HDMI IN 2 TO PC SOURCE SELECT HDBT IN PoC TO DISPLAY R L L...

Page 19: ...onal system aim your IR remote for the projector at the IR sensor of the Control Panel Connect a 5V IR Emitter close to the far end projector and the Receiver You can then use the IR pass through on the Control panel to control your projector LINK RESET HDMI IN 1 FIRMWARE HDMI IN 2 TO PC SOURCE SELECT HDBT IN PoC TO DISPLAY R L LINE OUT IR OUT DC 24V TCP IP TOUCHSCREEN FROM RS232 Tx Rx OUTPUT CONT...

Page 20: ...xample the IP address of the PC can be modified to 192 168 0 100 Then type 192 168 0 178 default IP in your browser to view the GUI as below HDBT IN PoC TO DISPLAY R L LINE OUT IR OUT DC 24V TCP IP TOUCHSCREEN FROM RS232 Tx Rx OUTPUT CONTROL MIC NETWORK INPUT MIC 2x20Watt 4 Ω MIC LINE REMOTE MUTE AUDIO LINK RESET HDMI IN 1 FIRMWARE HDMI IN 2 TO PC SOURCE SELECT MIC SOURCE VOLUME ON HDMI 1 OFF HDMI...

Page 21: ... this interface you can Click 1 or 2 in the HDMI bar to choose the signal source Click ON or OFF in the DISPLAY bar to turn on or turn off the display device Select ON or OFF in the SYSTEM bar to turn on or turn off AVG K12 system Adjust the volume of Microphone and source by moving scrollbar or clicking the buttons below Click Mute to mute Mic or source click again to unmute Note When you using a...

Page 22: ...tor and the AVG K12 on or off the concurrently When synchronous control mode is OFF press ON on Control Panel to turn on the projector or long press it to start the AVG K12 press OFF to turn off the projector or long press it to put this AVG K12 into standby Select N O or N C in the I O MODE SELECT bar to turn on off the REMOTE MUTE port connected Fire Alarm System Under N O mode when the fire ala...

Page 23: ...nds as hexadecimal The default is ASCII Modify the baud rate for the projector s RS232 protocol the default value is 9600 and the selectable range is 2400 115200 Set the Input Select Delay The default time is 5 seconds The AVG K12 will send the command typed in Display ON box wait 5 seconds and then send the command typed in the Input Select box Please check the device manufacturer s manual for th...

Page 24: ...s and subnet mask gateway can be set 5 6 5 GUI update The GUI for the AVG K12 supports a network update via http 192 168 0 178 100 Type the username and password the same as the GUI log in settings a modified password will be available only after rebooting to log in the configuration page After that click Administration at the source menu to access the Upload Program as shown below ...

Page 25: ...oon as the buttons are released they will light up while the copying the data is in progress 3 Remove the thumb drive from the CONFIG port once the buttons go aren t lit up To Load configuration data 1 Insert a 4GB or smaller FAT32 formatted thumb drive with saved configuration data into the CONFIG port on Control Panel 2 Press HDMI 1 ON at the same time for three seconds on the Control Panel the ...

Page 26: ...1024x768 800x600 640x480 Deep Colour 24 Bit at 1920x1080 24 25 30 50 60Hz 4 4 4 48 Bit at 1920x1080 50 60Hz 4 4 4 Signal Extension Up to 30 metres 1080p 60 via Cat5e 6a cable Bandwidth 10 2Gbps HDMI Standard Supports HDMI1 4 and HDCP1 4 Temperature 0 50 Reference Humidity 10 90 Dimensions W H D 105 x 89 x 44mm Weight 242g Receiver Video Ports Input 1 x HDBT Power Output 1 x HDMI Input Connector RJ...

Page 27: ...0x800 1600x1200 1400x1050 1280x1204 1024x768 800x600 640x480 Deep Colour 24 Bit at 1920x1080 24 25 30 50 60Hz 4 4 4 48 Bit at 1920x1080 50 60Hz 4 4 4 Audio Format HDMI embedded audio PCM Dolby DTS MIC input audio PCM Dolby Digital DTS DTS HD Analog output Audio PCM Signal Extension Up to 30 metres 1080p 60 via Cat5e 6a cable Bandwidth 10 2Gbps HDMI Standard Supports HDMI1 4 and HDCP1 4 Power Suppl...

Page 28: ...ontrol Panel Program Port 1 x Micro USB Output Port 1 x RS232 Power Others 1 x Knob 4 x Buttons ON OFF HDMI 1 HDMI 2 1 x IR in built sensor Temperature 0 50 Humidity 10 90 Case Dimensions 114 x 70 x 34mm Weight 140g ...

Page 29: ...AVG K12 VGA 7 Panel Drawing Transmitter Receiver PoC IN HDBT OUT POWER RS232 LINK RESET HDMI IN 1 FIRMWARE HDMI IN 2 TO PC SOURCE SELECT 89 mm 105 mm 69 mm ON LINK HDCP FIRMWARE 250 mm 31 mm 130 mm ...

Page 30: ...AVG K12 VGA Control Panel MIC SOURCE VOLUME ON HDMI 1 OFF HDMI 2 CONFIG IR POWER RS232 FIRMWARE 114 mm 70 mm 71 mm 34 mm ...

Page 31: ...long to transmit high resolution HDMI signal successfully Shorten the length of HDMI cables No video output Communication cables have no connection or bad connection Recheck all cables and ports The display that you using is incompatible with this device It is recommended that you use a mainstream display No audio output Input source and output device are connected to the wrong ports Check again a...

Page 32: ...ication parameters or wrong control protocol Make sure the RS232 communication parameters are correct Cannot use the device The device is faulty Send it to an authorized dealer for testing If your problem persists after following the above troubleshooting steps seek further help from your authorised dealer ...

Reviews: