background image


Printing Labels  

2-1


P R I N T I N G   L A B E L S  

This chapter describes how to 


use the application 


print freshness labels 


print Use First labels. 

A b o u t   t h e   S y s t e m  

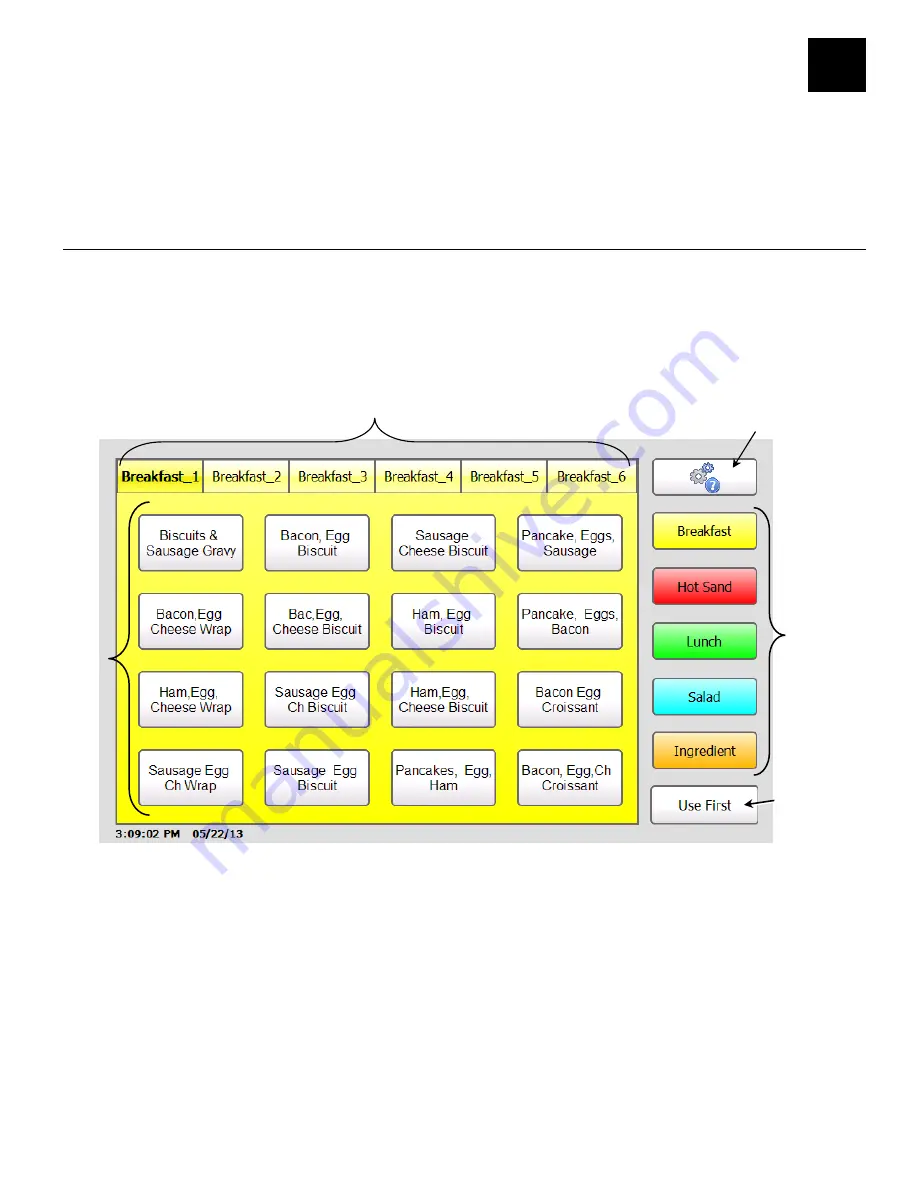
The main screen consists of a language toggle button, tools button, five product category 
buttons, each with six tabs of product buttons, and a “Use First” button. 
The product category buttons and their tabs of product buttons are color-coded so you can 
easily print freshness labels. 

Select a new category by touching one of the color-coded buttons on the right side of the 
screen.  

Note:  

All products in a category may not appear on the screen. Use the numbered tabs at 
the top of the screen to view more products. 

2  

P r o d uc t  
B u t t o n s  

C a t e g or y 
B u t t o n s  

T o o l s

U s e   Fir s t  
B u t t o n  

T a b s  

Summary of Contents for Monarch 8417

Page 1: ...Operator s Handbook 2013 Avery Dennison Corp All rights reserved TC9417OH Rev A 13 28028 0 Monarch 9417 Food Freshness System...

Page 2: ...tection against harmful interference when the equipment is operated in a commercial environment This equipment generates uses and can radiate radio frequency energy and if not installed and used in ac...

Page 3: ...e Power Cord Loading Labels Left Printer Loading Labels Right Printer PRINTING LABELS 2 1 About the System Printing Freshness Labels Printing Use First Labels CARE MAINTENANCE 3 1 Clearing Label Jams...

Page 4: ...ii Operator s Handbook...

Page 5: ...loading supplies 2 Printing Labels Printing product labels and Use First labels 3 Care Maintenance Clearing supply jams and cleaning the printer 4 Troubleshooting Common problems and their solutions...

Page 6: ...ecting the Power Cord 1 Plug the power cord into the socket on the side of the printer 6 above 2 Plug the other end of the power cord into a grounded electrical outlet 3 Turn on the printer Press the...

Page 7: ...pen the cover 3 Pull on the supply tab Supply Tab Getting Started 1 3 Note When loading supply open the supply lever as shown above 4 Unlock the supply guide Remove the supply guide from the supply ho...

Page 8: ...supply Lock the supply guide 7 Put the supply tab back 8 Guide the labels along the inside edge and into the slot behind the white roller The printer feeds the supply Note Tear a straight edge on the...

Page 9: ...9 Slide the supply lever next to the supply Close the supply lever 10 Close the cover Getting Started 1 5...

Page 10: ...g Labels Right Printer 1 Turn on the printer Press the power button on the side of the printer 2 Open the cover 3 Pull on the supply tab 4 Unlock the outer supply guide and remove it 1 6 Operator s Ha...

Page 11: ...up on the supply holder 6 Place the outer supply guide on the supply holder and lock it in place 7 Unlock the inner supply guide and move it until it touches the supply Lock it into place 8 Put the s...

Page 12: ...side edge and into the slot The printer feeds the supply Note Tear a straight edge on the supply before feeding it into the printer 10 Slide the supply lever next to the supply and close it 11 Close t...

Page 13: ...th six tabs of product buttons and a Use First button The product category buttons and their tabs of product buttons are color coded so you can easily print freshness labels Select a new category by t...

Page 14: ...d press Enter To print a single label press Enter Note If you have a dual printer your System Administrator can enable the Backup Printer selection option Select the number of labels to print then sel...

Page 15: ...e First category button on the right side of the screen Use First Button 2 Enter the quantity of Use First labels you need to print and press Enter OR Press Enter without entering a quantity to print...

Page 16: ...2 4 Operator s Handbook...

Page 17: ...rp or pointed objects to remove labels It may damage the printer 4 Remove any adhesive that might be on the platen roller See Cleaning the Platen Roller and Printhead for more information 5 Reload the...

Page 18: ...platen roller 7 Snap the cover into place 8 Reload the labels See Loading Labels in Chapter 1 for more information Cleaning the Display Make sure the printer is turned off when cleaning the display U...

Page 19: ...Description 004 005 Supply size is incorrect Reload the correct supplies See Loading Supplies in Chapter 1 for more information 267 271 410 413 Communication error See your System Administrator 703 7...

Page 20: ...4 2 Operator s Handbook...

Page 21: ...upply single printer 13 38 lbs 6 07 kg without supply dual printer Power 100 240V AC 47 to 63Hz input supplies 24V DC 90W to system Operating Limits Operating 32 to 122 F 0 to 50 C Storage 4 to 149 F...

Page 22: ...28028 0 Avery Dennison 170 Monarch Lane Miamisburg OH 45342 1 800 543 6650 In the U S A 1 800 387 4740 In Canada www monarch com...

Reviews: