Avermedia AVerDiGi EH5116 Pro Quick Intallation Manual Download Page 14

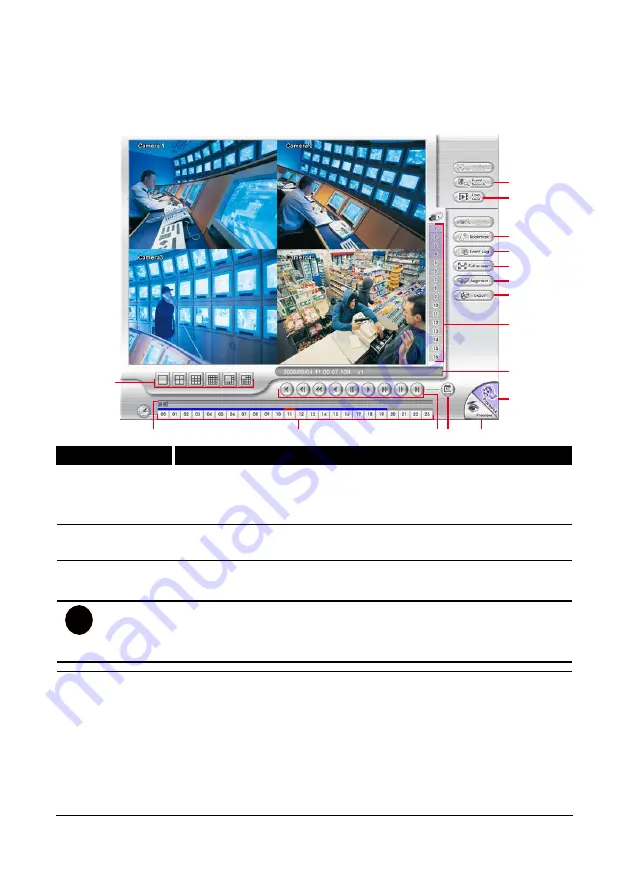
Familiarizing the Buttons in Playback Mode 

To switch in Playback mode, click 

Playback

 button at the lower right corner of 

Preview mode user interface. 

(1)

(2)

(3)

(4)(5)

(6)

(7)

(8)

(9)

(11)

(10)

(12)

(13)

(14)

(15)

(16)


Name 

Function 

(1) Split Screen 

Mode 

Select from 6 different split screen type to playback the recorded video 

file of all the camera, or one camera over the other or alongside on a 

single screen. 

(2) Progress bar 

Show the progress of the file being played. You may move the bar to 

seek at any location of the track. 

(3) Hour Buttons 

Select and click to playback the recorded video file on the specific time 

frame.  

i


The Hour buttons represent the time in 24-hour clock. The blue bar on top of the hour 

button indicates that there is a recorded video file on that period of time. While the red 

bar indicates that you are currently viewing the recorded video file. 


(4) Playback 

Control Buttons 

Begin: 

Move


at the beginning of the recorded video file. 

Previous:

 Go back to the previous frame. 

Slower: 

Play the recorded video file at the speed of 1/2X, or 1/4X 

Rewind: 

Wind back the recorded video file. 

Pause: 

Briefly stop playing the recorded video file. 

Play:

 Play the recorded video file. 

Faster: 

Play the recorded video file at the speed of 2x, 4x, 8x, 16x, 32x, 

or 64x. 

10 

Summary of Contents for AVerDiGi EH5116 Pro

Page 1: ...AVerMedia AverDiGi EH5116 PRO Quick Installation Guide...

Page 2: ......

Page 3: ...TO BE CONSIDERED FOR REFERENCE ONLY WARNING TO REDUCE RISK OF FIRE OR ELECTRIC SHOCK DO NOT EXPOSE THIS APPLIANCE TO RAIN OR MOISTURE WARRANTY VOID FOR ANY UNAUTHORIZED PRODUCT MODIFICATION Copyright...

Page 4: ......

Page 5: ...contents please contact with local dealer 1 EH5116 PRO unit 2 Remote Control Batteries are included 3 Quick Installation Guide 4 Power Cord The power cord may vary according to the local electricity s...

Page 6: ...vermedia com AVerDiGi Product Embedded Hybrid DVR NVR AVerDiGi EH5116 Hardware Recommendations Follow the illustrated instructions below to install the hard disk 1 Unlock the removable hard disk drawe...

Page 7: ...close the removable hard disk drawer cover 8 Slide the drawer back 9 Lock the removable hard disk drawer keylock 10 Power on the removable hard disk drawer 11 You may now connect all the cables and p...

Page 8: ...connect 16 cameras in analog and IP cameras combo DVR unit doesn t supply the power to connected external device Each time you change the video display output the power must be turned off and switch...

Page 9: ...as remote controller i For the first time using DVR unit using mouse and keyboard to setup all configurations B First Time Using DVR Unit 1 Connect the mouse and keyboard to DVR unit through USB inter...

Page 10: ...correct recording time and date Following the below steps to setup date and time a Click Setup and enter the password b Click System c In Time section click Setting button of System Time d Select the...

Page 11: ...P Setting f Enable Protocol and then select protocol mode video format resolution and channel of IP camera g Enter IP address or URL of IP camera h Enter ID and password if IP camera s access authorit...

Page 12: ...over the other or alongside on a single screen It also allows you to switch and view different camera number 3 Record Start stop video recording 4 EMap Display the map in each area and the location o...

Page 13: ...3 Event log Show the record of activities that take place in the system 14 AutoScan Start Stop video screen cycle switch 15 Full screen View in full screen To return press the right button of the mous...

Page 14: ...ect and click to playback the recorded video file on the specific time frame i The Hour buttons represent the time in 24 hour clock The blue bar on top of the hour button indicates that there is a rec...

Page 15: ...ed When you are in single screen mode click the camera ID number to switch and view other camera 10 Export Export includes Snapshot Output Video Clip and Backup function Snapshot Capture and save the...

Page 16: ...ence point when reviewing the recorded video file to which you may return for later reference 1 Click Bookmark button 2 In the Bookmark dialog box you may do the following Add to create the new refere...

Reviews: