AVerMedia
®
AVerDiGi EB1304 MOB
Mobile Security DVR System
User Manual
Page 1: ...AVerMedia AVerDiGi EB1304 MOB Mobile Security DVR System User Manual...
Page 2: ...ular purpose Information presented in this documentation has been carefully checked for reliability however no responsibility is assumed for inaccuracies The information contained in this documentatio...
Page 3: ...IF THERE IS ANY DAMAGE SHORTAGE OR INAPPROPRIATE ITEM IN THE PACKAGE PLEASE CONTACT WITH YOUR LOCAL DEALER WARRANTY VOID FOR ANY UNAUTHORIZED PRODUCT MODIFICATION NOTICE INFORMATION IN THIS DOCUMENT I...
Page 4: ...System Date and Time 12 2 2 Surveillance Screen 12 2 3 Playback the Video 12 2 3 1 To Playback Video 13 Chapter 3 OSD Navigation Tree 15 3 1 Menu Function 15 Chapter 4 Setup DVR in LED Mode 22 4 1 LED...
Page 5: ...an customize video recording setting sensor and alarm settings password protection hard drive recycling and more Surveillance video is recorded in high quality MPEG4 format Two recording modes are sup...
Page 6: ...PEG4 video compression Manually switch NTSC or PAL video system Supports 1 hard drive not included Full screen resolution Display 720 x 480 NTSC 720 x 576 PAL Recording 720 x 480 NTSC 720 x 576 PAL Di...
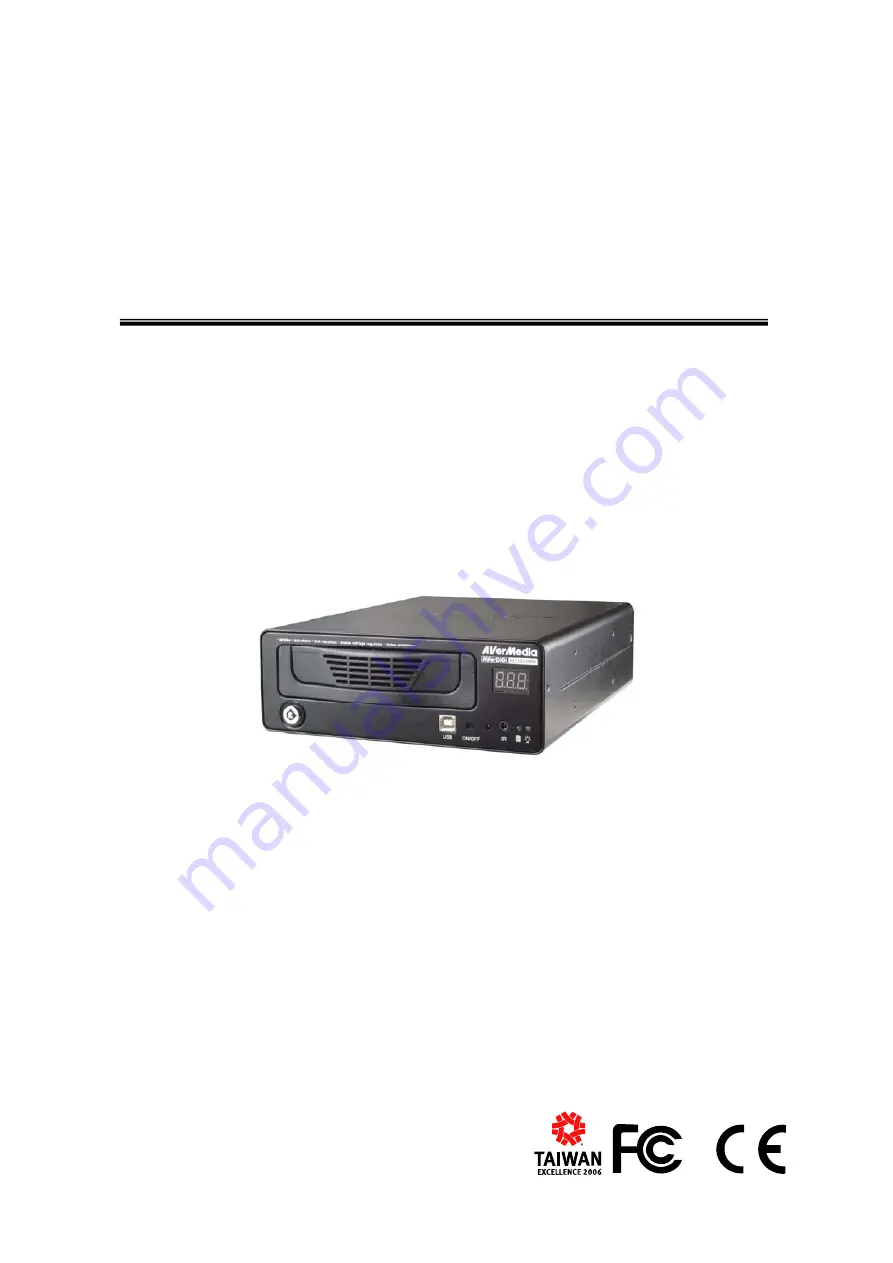
Page 7: ...k Lights when the HDD is running 7 DVR Power LED Lights when the unit is on 8 LED Control Panel To configure DVR unit without connecting to monitor Also LED panel will display HDD usage and DVR system...
Page 8: ...display it on channel 4 Output the video signal to a TV 7 Video Out BNC The DVR unit support 2 video output ports and you can only select to output the video either from the VGA OUT or VIDEO OUT 8 VGA...
Page 9: ...k the hard disk key lock 2 Pull removable hard disk drawer out 3 Connect the power connector to the hard disk master and connect the IDE cable to hard disk 4 Turn the drawer over and secure the hard d...
Page 10: ...a on your information handling system or otherwise This includes direct indirect incidental special or consequential damages resulting from the incompatibility caused by the usage of these hard disks...
Page 11: ...to reset the DVR unit When the power cable is connected to vehicle batter remember to stop recording and shutdown the DVR unit to avoid running out of vehicle battery when the vehicle engine is off 1...
Page 12: ...etc is being transmitted to the unit and this triggers the system to respond and send signal to relay device i e alarm telephone etc Pin Definition 1 Sensor 1 Ground signal 2 Sensor 1 signal 3 Sensor...
Page 13: ...9 16 15 14 10 11 12 13 Button Function Switch to Channel 1 1 1 As a number key for entering password Switch to Channel 2 2 3 As a number key for entering password Switch to Channel 3 3 7 As a number k...
Page 14: ...To enter the OSD Main menu Exit from the main menu or sub menu display To move the selection to the left and right 13 To go up and down and select the items in the menu list or change the settings SPE...
Page 15: ...The DVR unit supports two system types NTSC and PAL Please select the correct video system before power on the unit Before set up the DVR unit please make sure the setup mode that is the one user wan...
Page 16: ...record mode To know if the channel is being recorded the record symbol would appear beside the channel number The microphone and speaker indicate the availability of audio The information below the s...
Page 17: ...re you want to begin the video playback Use and buttons to move the selection to the left and right Use the and or and buttons to select the date and time Then press or play again to make the selectio...
Page 18: ...y continue recording when interrupted S Sensor Recording It records when the sensor has activated M Motion Recording It records when any movement is detected B Button Recording It records when the REC...
Page 19: ...E SUBMENU HARD DRIVE SETUP SENSOR SETUP MOTION SETUP LANGUAGE SETUP IR JACK SETUP 2006 04 20 17 54 50 ON ON OFF NO SUBMENU PASSWORD CHANGE VIDEO ADJUSTMENT DATE TIME AUTO RECORD AUTO SCAN PASSWORD SET...
Page 20: ...der D1 mode the video recording is in full screen resolution and takes turns from one channel to the next one when Auto Scan enables Each channel is recorded only at a maximum frame rate of 15fps User...
Page 21: ...EC ALWAYS REC ALWAYS REC ALWAYS REC ALWAYS REC ALWAYS REC ALWAYS REC RECORD SCHEDULE By default in 24 hours the recording schedule is set to always record every hour Refer to the table below to custom...
Page 22: ...wer breakdown video playback or configuration setup It starts to record after 10 second of idleness This is applicable in Always Record mode AUTO SCAN Enable disable auto cycle switch to display the n...
Page 23: ...e hard disk temperature is higher than limited temperature the fan will be active The default value is 50 C LOW THRESHOLD Set a specific temperature limited for fan stop When the hard disk temperature...
Page 24: ...or and buttons to go up and down and select HDD FORMAT Then press or play 2 In the CHECK PASSWORD screen press play or Then use the and or and buttons to select the security combination number Press...
Page 25: ...tate Condition Description NOT INSTALLED Indicates that there is no sensor connected NORMAL OPEN Indicates that the initial state of the sensor is normal open Video recording initiate when there is a...
Page 26: ...nction description Press button to enter or exit setup function Use and button to select setup function Press button to confirm selection The following table list the symbols display in LED mode Funct...
Page 27: ...23 Function Symbol of Title Symbol of Selection Record mode NOTE The recording function must be stopped when set up this function D1 mode CIF mode Record Framerate PAL Record Framerate NTSC...
Page 28: ...24 Function Symbol of Title Symbol of Selection Video Quality NOTE The recording function must be stopped when set up this function Best High Good Medium Normal Low Hard Disk Setup...
Page 29: ...Disk Overwrite Yes No Hard Disk Format Password Check NOTE 1 The recording function must be stopped when set up this function 2 When display user can start to enter the password by using the number k...
Page 30: ...icating as right column shown Using the number key buttons of remote control to enter the password When all the password is entered press or play button to confirm Enter 1st digit Enter 2nd digit Ente...
Page 31: ...disk plug out Hard disk is full Hard disk shutdown higher than limited temperature LED display current temperature and flash Warning indication Hard disk stop lower than limited temperature LED displa...
Page 32: ...int at right of display information and falshing means the system is recording Press SPEED to display system temperature To change temperature display type please refer to Chapter 3 1 of TEMPERATURE T...
Page 33: ...D into the CD ROM drive When the installation main screen appears click Install USB Playback Console and then follow the on screen instructions 2 Select the language you prefer 3 Click OK to install t...
Page 34: ...video file for playing The playback application supports dvr and avf file type DVR Recorded File HD To playback the recorded video from the hard disk which was recording video on the DVR system Also...
Page 35: ...ou may move the bar to seek at any location of the track 14 Playback Controller Begin Move at the beginning of the recorded video file Previous Go back to the previous frame by frame Slower Play the r...
Page 36: ...filename and select the video format 5 3 2 Playback DVR Recorded File from Hard Disk 1 Click Open File button 2 Select DVR Recorded File HD and click OK 3 Select the hard disk drive from Select Disk w...
Page 37: ...to get the recorded video file from the hard disk And EB1304 MOB will stop recording automatically 3 And then the Select Disk window will appear as below 4 Select the hard disk drive from Select Disk...
Page 38: ...t the hard disk drive 5 Target Path To locate on where user wants to save the file 6 Event Display the backup progress rate of event in percentage 7 Total Display the total backup progress rate in per...
Page 39: ...application click the Watermark button on USB Playback Console main interface 2 In the ImageVerification screen click Load Source Image and locate the image source 3 Click Verify Image to begin the p...
Page 40: ...eginning of the video file Previous Go back to the previous frame Rewind Wind back the video file Pause Temporary stop playing the video file Play Play the video file Faster Play the video file at the...
Page 41: ...r Show the progress of the file being played You may move the bar to seek at any location of the track 20 i Stable To reduce the jolt in the recorded video also see Chapter 7 1 21 Add Setting Include...
Page 42: ...Cartons cases batteries cabinets tapes or accessories used with product 4 AVerMedia does not warrant that this product will meet your requirements it is your responsibility to determine the suitabilit...