background image


50


ENGLISH

T

T

o

o


D

D

o

o

w

w

n

n

l

l

o

o

a

a

d

d


C

C

a

a

l

l

l

l


H

H

i

i

s

s

t

t

o

o

r

r

y

y


i

i

n

n


W

W

e

e

b

b

T

T

o

o

o

o

l

l

:

:


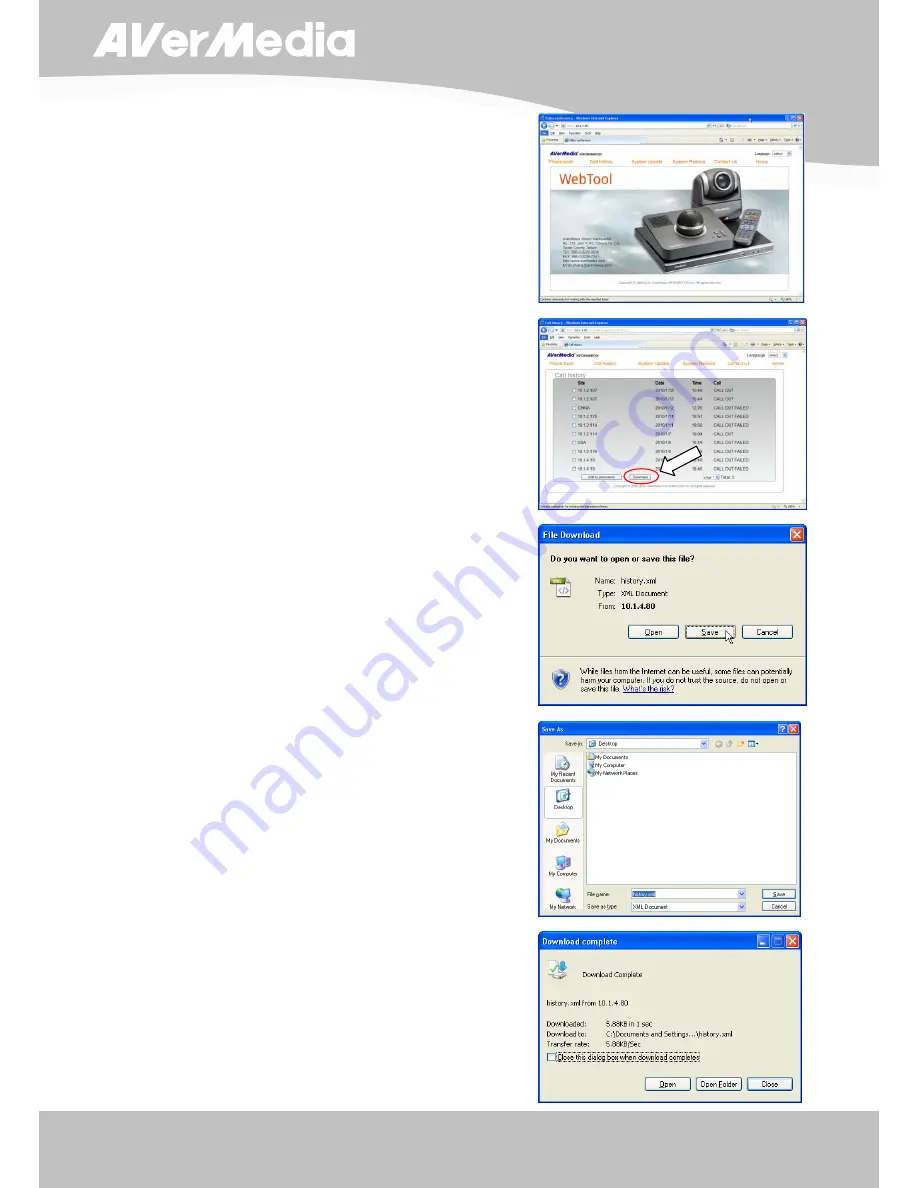
1.  Click Call History in WebTool page.  


2.  Click Download to download the Call History 

data. 


3.  You will be prompt to open, save or cancel the 

operation. Click Save. 


4.  Locate on where you want to save the file. 

Click Save. 


5.  You will be prompt to open the file or close the 

message box when the download is compete. 


Summary of Contents for AverComm H100

Page 1: ...ENGLISH User Manual ...

Page 2: ...he LAN 11 Connecting a Computer 11 Connecting the Power 11 Connecting a DVD player or Camcorder 12 Setting Up AVerComm H300 H100 12 Camera 12 Infrared Sensor 13 Running the AVerComm H300 H100 13 Navigating the Menus and Settings 13 Using the On screen keyboard and numeric pad 13 Home Menu Screen 14 Cam Ctrl 14 To Adjust the AVerComm H300 H100 Camera 14 Dial 15 To Make a Call Using Dial 15 Phoneboo...

Page 3: ...the Video Audio Codec 40 To Set the Camera White Balance Setting 41 To Set the Camera Exposure Setting 41 Reset System 42 To Reset the System 42 Setting the Camera Preset Point 43 To Set the Camera Preset Point 43 Testing the Network 44 To Test the Network 44 To Test the Video and Audio 45 Managing the AVeComm System Using the WebTool 45 To Access AVerComm H300 H100 using the Internet Browser 46 T...

Page 4: ...he Meeting Recording on AVerComm H300 H100 58 To Playback the Meeting Recording Using AVerComm VCplayer 59 Troubleshooting 60 Audio 60 Video Display 60 Network 61 General 62 Limited Warranty 62 Federal Communications Commission Statement Class A 63 Class A ITE 64 CE Class A EMC 64 DISCLAIMER 64 TRADEMARKS 64 COPYRIGHT 64 Remote Control Battery Safety Information 64 ...

Page 5: ...r a bigger screen or with a dual screen setup which allows you to have your presentation and video conference shown simultaneously By using a USB flash drive you can record the meeting and review it anytime on AVerComm H300 H100 or on PC with the bundled AVerComm VC player and share it with your meeting attendees P Pa ac ck ka ag ge e C Co on nt te en nt ts s Make sure the following items are incl...

Page 6: ... to connect AVerComm H300 H100 to an IP based network 2 VIDEO OUT Output the video signal from the main system on an TV thru RCA video connection 3 S VIDEO OUT Output the video signal from the main system on an TV thru S Video connection 4 AUDIO OUT Outputs the audio signal from the main system to a TV or speaker system thru RCA left and right audio connections 5 HUB I O Send and receive signal be...

Page 7: ...delNo V2D 1 1 2 3 4 Table Hub back panel fig 1 2 Name Function 1 VGA IN Input the signal from a computer or other sources Connect this port to the VGA output port of a computer Press PRESENT on the remote and select VGA IN to share and display the computer image with the video conferencing camera image 2 VGA OUT Output the video signal from the main system on a flat panel monitor or LCD DLP projec...

Page 8: ... on off the mic 2 MIC port Use the 6P4C cable and connect the other end to the Table Hub MIC IN port Camera 1 2 fig 1 4 Name Function 1 IR Sensor Aim the remote control here to operate the unit 2 CAMERA Send the signal from the camera to the main system ...

Page 9: ... group contact entry 3 Enter Make a selection in OSD menus or on screen keyboard Accept incoming call Display the site name and icon during the meeting 4 Use these buttons to navigate through the selections in OSD menus or on screen keyboard Pan and tilt the camera to adjust the visual angle of the camera Move around within the zoomed in camera image or the captured image 5 Present Share either th...

Page 10: ... a time 11 Numeric Pad Use to enter numeric number 12 Input Switch the input source between AVerComm H300 H100 camera S Video or Video 13 Far Near Select to control either near site or far site camera The cam ctrl icon will appear on the screen to show which camera site you are going to control The cam ctrl icon will disappear in 5 sec The camera from the far site can only be operated when the ena...

Page 11: ...tured image using the Present function See 5 Present 21 Image Ctrl Zoom and pan tilt the displayed captured image in the shared screen 22 Record Start Stop meeting recording The recording can only be saved in a USB storage drive The record icon will appear on the screen to show which site is recording The record icon will become translucent in 5 sec 23 Info Display the call statistics information ...

Page 12: ... connect all the connection before connecting the power C Co on nn ne ec ct ti in ng g a a V VG GA A d di is sp pl la ay y d de ev vi ic ce e o ou ut tp pu ut t Locate the VGA input port of the graphics display device and connect it to VGA OUT 1 main system or VGA OUT 2 Table Hub port of AVerComm H300 H100 Both VGA OUT 1 and 2 can be used at the same time For sharing data from VGA IN or the captur...

Page 13: ...r SCART RGB of the TV LCD monitor and connect it to AVerComm H300 H100 Make sure NTSC PAL switch setting is set to proper TV system C Co on nn ne ec ct ti in ng g t th he e c ca am me er ra a t to o m ma ai in n s sy ys st te em m Locate the CAMERA port of the camera and connect it to the CAMERA port of the main system ...

Page 14: ...stem 26 Pin D Sub cable male male A V e rM e d ia I N FO R M A TIO N In c Atte n tio n DO NO T O PEN THE C ASE W arranty void if the case hasbeen opened AVerCommHS eries Hub Model No V2D1 C Co on nn ne ec ct ti in ng g t th he e M MI IC C Locate the MIC port of the table hub and use the supplied 6P4C cable then connect it to Mic port Press the button on top of AVerComm H300 H100 Mic to turn on off...

Page 15: ...e er r Locate the VGA output port of the computer or laptop and connect it to VGA IN port of AVerComm H300 H100 Table Hub To share the data press PRESENT and select VGA C Co on nn ne ec ct ti in ng g t th he e P Po ow we er r Connect the power adapter to a standard 100V 240V AC power outlet To prevent shock make sure the connection ports in the main system are connected before connecting the power...

Page 16: ...SCAR T SCAR T OUTPUT DVD AUDIO AUDIO Speaker S Video to SCART cable not supplied S Video cable RCA cable RCA to SCART cable not supplied 2 Phone to RCA Cable Camcorder S Se et tt ti in ng g U Up p A AV Ve er rC Co om mm m H H3 30 00 0 H H1 10 00 0 This section provides useful tips on how to setup the AVerComm H300 H100 to meet your needs Camera The AVerComm H300 H100 camera design can be panned Ø ...

Page 17: ...he Menus and Settings 1 In the Home menu press and on the remote to toggle between the 5 selections 2 Press to make a selection or the new setting to take effect Using the On screen keyboard and numeric pad 1 Use the and buttons to move the selection and to make a selection 2 Select and press to void the action and return to the previous or Home menu 3 Select and press to delete all the entered ch...

Page 18: ... selections and press to make a selection You can easily place a call and select the site contact either in Phonebook Call History or Dial The administrator can also set security password to prevent changing the system setting and WebTool access Cam Ctrl The Cam Ctrl allows you to adjust the visual angle of the camera before making a call To Adjust the AVerComm H300 H100 Camera 1 Select Cam Ctrl a...

Page 19: ...election box to the Call Quality drop down list and press to select the value 2 Use the numeric button on the remote to enter the IP address and press to make a call Phonebook The Phonebook allows you store edit delete contact information group contact by category search contact and make a call The group and site name of the contacts in the directory will be displayed in alphabetical order You may...

Page 20: ...the contacts you can easily categorize the contacts into a specific group such as client vendor company branch and etc 3 Select New Group and press 4 Use the and buttons to move the selection in the on screen keyboard and press to make a selection Select and press to save the new group name ...

Page 21: ...he new group name will be saved and displayed in the Group list To Edit Group 1 Select Phonebook and press 2 Select Group and press 3 Select the name you want to modify in the Group list 4 Select Edit Group and press ...

Page 22: ...ction in the on screen keyboard and press to make a selection Select and press to save the revised group name 6 The revised group name will be saved and displayed in the Group list To Delete Group 1 Select Phonebook and press 2 Select Group and press ...

Page 23: ...you want to remove in the Group list 4 Select Delete Group and press 5 Select Yes to remove the selected group name and No to cancel group name deletion 6 The selected group name will no longer appear in the group list when deleted ...

Page 24: ...20 ENGLISH To Add Phonebook Entries 1 Select Phonebook and press 2 Select New Site and press 3 Select the group name 4 Select Site Name box and press ...

Page 25: ...ou are done to save the new site name 6 Select the IP address box and press 7 Use the numeric number button on the remote to enter the IP address and select to save 8 Select the call quality value in the drop down box and press The bandwidth setting in the Auto Call Quality selection will be used when Auto is selected in Call Quality ...

Page 26: ...H 9 Select Save to store the newly added site contact and Cancel to undo adding contact To Edit Phonebook Entries 1 Select Phonebook and press 2 Select the contact you want to modify 3 Select Edit Site and press ...

Page 27: ...and Call Quality 5 After making the changes select Save to apply the new changes or Cancel to undo the changes and return to Phonebook menu 6 The saved changes will be shown in the Group Site list To Delete Phonebook Entries 1 Select Phonebook and press 2 Select the contact you want to delete ...

Page 28: ...ed contact will no longer appear in the group site list when deleted Call History The Call History allows you to check the incoming and outgoing calls and to make a call by selecting in the Call History list You may also find if the call is being answered or failed connection To Check the IN OUT Calls 1 Select Call History and press ...

Page 29: ...Call status Refer to the table below to check the call status Call Status Answered Failed IN OUT To Make a Call in Call History 1 Select Call History and press 2 Use the and buttons to move the selection and scroll up and down in the call history list and press to make a call 3 The call will be connected ...

Page 30: ...he recorded file Administrator The Administrator allows you to set password to prevent unauthorized user to change the system settings and access WebTool Enable Disable Administrator Setting 1 Select Setting and press 2 Select Administrator and press 3 Select Enable Admin and press to enable disable administrator password protected setting disabled enabled ...

Page 31: ... Default password is 1234 5 Use the and buttons to move the selection in the on screen keyboard and press to make a selection Select and press when you are done entering the password 6 You will be asked to enter the password again for confirmation 7 The entered password will be saved ...

Page 32: ...ime To Setup the AVerComm H300 H100 1 In the Home menu click Setting and select System Settings Quick Start If the system is administrator password protected you need to enter the password to change the System Settings 2 In the Quick Start menu you can modify following settings Language System Name LAN Configuration Network Date and Time ...

Page 33: ...hange the system into the selected language To Setup the System Name 1 Select System Name and press 2 Use the and buttons to navigate and to make a selection 3 Select and press to save and take effect the action and return to previous menu The system name will be displayed on the screen for 5 sec after making a call or answered a call ...

Page 34: ...elect this when the public IP address is available Your IP address is shows the current IP address enter info when you need to configure your IP address manually Subnet Mask shows the designated IP address routing prefix enter info when the system does not automatically obtain the subnet mask Default Gateway allows traffic from one point and exit point in network enter info when the system does no...

Page 35: ...x Transmitting Receiving Bandwidth allows you to specify the maximum bandwidth of the outbound and inbound calls AVerComm H300 H100 system supports up to 4Mb Auto Call Quality enables you to select default outbound inbound bandwidth This setting will be used when Auto is selected in the Call Quality setting To Setup the Date and Time 1 Select Date and Time and press 2 Select the Date and Time form...

Page 36: ...system language set the monitor aspect ratio enable disable Auto Power off mode to switch in standby mode when not in use for 2 hours set the system to automatically answer reject the incoming call and setup the system date and time To Enable Disable Far Control of Near Camera 1 Select Setting and press 2 Select System Settings 3 Select General Setting ...

Page 37: ...spect Ratio 1 Select Setting and press 2 Select General Setting General Setting and press 3 Select Monitor Aspect Ratio drop down box and press Choose the appropriate aspect ratio of the display device you using If you want the system to automatically detect the right setting choose Auto Press to make the selection ...

Page 38: ... Saver drop down box and press Then select the time for the system to automatically switch to standby mode or OFF to disable this feature Press to make a selection The screen will turn black when the system is in standby mode Press any button on the remote to wake up the system To Set the Auto Turn Off Timer 1 Select Setting and press ...

Page 39: ...ct the time of idle mode before the system automatically turns off or OFF to disable this feature The system will completely turn off To turn on the system you need to press the Power button on the main unit To Set the Auto Answer Setting 1 Select Setting and press 2 Select System Settings General Setting Call Settings and press ...

Page 40: ...o Not Disturb to automatically reject incoming calls If you are already in a meeting even if the Auto Answer is turned on you need to manually accept the next call Network Network allows you to setup the network bandwidth auto call quality gatekeeper and firewall setting To Set the Gatekeeper 1 Select Setting System Settings Network and press ...

Page 41: ...Gatekeeper H 323 name gatekeeper will use this name to identify your system H 323 Extension E 164 enter numeric data for gatekeeper to use to identify your system Gatekeeper IP Address enter IP address for the gatekeeper server Use Gatekeeper activate deactivate gatekeeper To Set the Firewall Make sure to setup the Gatekeeper before setting up the Firewall 1 Select Setting System Settings Network ...

Page 42: ...nd traffic through TCP port 1720 1719 for H 323 call set up Enable H 460 Firewall Traversal The gatekeeper must support this feature and register to dedicate gatekeeper for the system NAT Configuration AVerComm H300 H100 supports NAT system that use internal IP address to communicate with other devices outside the LAN NAT Public WAN Address The NAT public address must be entered when you enable th...

Page 43: ... hear the tone sound when you are dialing the number using the remote control To Adjust the Mic Gain Level 1 Select Setting System Settings Video Audio and press 2 Select Mic Gain Level and press Select from the mic gain level up to 9 AVerComm H300 H100 allows you to adjust mic gain level for the proper MIC volume and this will help to get better reception on MIC ...

Page 44: ... specify the codec you want to support AVerComm H300 H100 support H 323 standard coding algorithm each codec has unique properties and performs best given a certain set of circumstances For Video H 264 H 263 H 263 H 261 For Voice G 728 G 722 1C G 722 1 G 722 G 711 Please contact system administrator if you have any question on these codecs ...

Page 45: ...ing 1 Select Setting System Settings Video Audio and press 2 Select Camera White Balance drop down box and press 3 Select the type of mode you prefer and press To Set the Camera Exposure Setting 1 Select Setting System Settings Video Audio and press ...

Page 46: ... you prefer and press Reset System Reset System allows you to restore the system back to factory setting clear phonebook entries and call history Make sure to back up the information before resetting the system To Reset the System 1 Select Setting System Settings Reset System and press ...

Page 47: ... deleted S Se et tt ti in ng g t th he e C Ca am me er ra a P Pr re es se et t P Po oi in nt t You can set the camera preset point on or before the call session To Set the Camera Preset Point 1 Run the AVerComm H300 H100 the Home menu will appear Select Cam Ctrl to adjust the visual angle of the camera 2 Adjust the camera to the view you want using the and Zoom buttons of the remote 3 Press hold t...

Page 48: ...lick Setting 2 Select Test Network Test 3 Enter the Far Site IP address Select and press You may also contact our technical support for IP address to test your unit 4 You will be able to see the test result for Acknowledge Connect Transmit Audio Video and Receive Audio Video When the call is connected The result will indicate OK on each section if not please contact your system administrator To di...

Page 49: ...in ng g t th he e A AV Ve eC Co om mm m S Sy ys st te em m U Us si in ng g t th he e W We eb bT To oo ol l The WebTool allows you to access AVerComm H300 H100 system from the remote site by using the internet browser You can access the Phonebook to add edit and delete entries Call history to view and add the call data in phonebook entry System Update to update your AVerComm H300 H100 and System Re...

Page 50: ...gn in 2 In the WebTool page you can access the Phonebook Call history System Update and System Restore T To o A Ad dd d E Ed di it t a an nd d D De el le et te e P Ph ho on ne eb bo oo ok k i in n W We eb bT To oo ol l 1 In WebTool page click Phone book 2 In Phone book page you can work on the phonebook entry by clicking the New Site Edit Site Delete Site and Group You can also download the phoneb...

Page 51: ...i in n W We eb bT To oo ol l 1 Click Download to download the phonebook entries 2 You will be prompt to open save or cancel the operation Click Save 3 Locate on where you want to save the file Click Save 4 You will be prompt to open the file or close the message box when the download is compete ...

Page 52: ...h ho on ne eb bo oo ok k E En nt tr ri ie es s 1 Locate and open the file using MS Excel and select As an XML list Click OK 2 Click ok to create a schema based on the XML source data 3 You may now edit the file 4 Make sure to save the file as XML Data to be able to upload the file back to the system ...

Page 53: ...e eb bT To oo ol l 1 Click Browse and locate the phonebook entries xml file you wish to upload 2 Select the xml file and click Open 3 Click Upload 4 Click OK to replace the existing phonebook in the system with the new one 5 You will be notified when you have successfully uploaded the file Click OK ...

Page 54: ... l 1 Click Call History in WebTool page 2 Click Download to download the Call History data 3 You will be prompt to open save or cancel the operation Click Save 4 Locate on where you want to save the file Click Save 5 You will be prompt to open the file or close the message box when the download is compete ...

Page 55: ...to add in the phonebook entry 2 Click Add to phonebook 3 Enter the Name and select the Call Quality and Group if necessary Then click save The new entry will be listed in the phonebook T To o U Up pd da at te e t th he e S Sy ys st te em m This is for AVerMedia FAE or distributor s FAE use only You may need to contact them to update your system If you are not the FAE please be advised not to opera...

Page 56: ...LISH T To o B Ba ac ck k u up p t th he e S Sy ys st te em m S Se et tt ti in ng g 1 Click System Restore in WebTool page 2 Click Download 3 You will be prompt to open or save the file Click Save 4 Click Save ...

Page 57: ...essage box Click Close T To o R Re es st to or re e t th he e S Sy ys st te em m S Se et tt ti in ng g 1 Click Browse 2 Locate the system setting file and click Open 3 Click Upload 4 You will be prompt that the system setting upload is successful Click OK ...

Page 58: ... 30 00 0 H H1 10 00 0 Once when you are done setting up the system you may start to make a call H300 supports Multipoint Control Unit MCU which allows you to have up to 4 party video conference call M Ma ak ki in ng g a a c ca al ll l You can make a call in 3 ways Selecting the site contact in the Phonebook list Dial the IP address or get in the Call History list To Call Using the Phonebook 1 Sele...

Page 59: ...in the list and press 3 The call will be connected To Call Using Dial 1 Select Dial and press 2 Use the numeric button on the remote to dial and press to make a call The speed setting in Auto Call Quality will be used when Auto is selected ...

Page 60: ...56 ENGLISH 3 The call will be connected To Call Using Call History 1 Select Call History and press 2 Select the site you want to call in the call history and press 3 The call will be connected ...

Page 61: ...oded If you are not sure of which name you want to disconnect refer to the color of the frame R Re ec co or rd di in ng g y yo ou ur r M Me ee et ti in ng g AVerComm H300 requires a USB flash drive to record the meeting The recorded video will be saved in vc format Insert the USB flash drive to the USB port of the main system Wait till the USB flash drive is ready before starting the recording Pre...

Page 62: ...e in the H300 H100 USB port 1 In the HOME menu click Setting and select Recording File 2 Select Recording Video Playback and select from the recorded meeting list you want to watch 3 In the Recording Video Playback screen use the left and right button on the remote to select the video player buttons to play pause and stop the video ...

Page 63: ...uirements Intel Pentium 4 or AMD Athlon XP or higher processor 2 4GHz Pentium 4 or Intel core 2 duo or better recommended Windows XP SP2 or later 512MB RAM or better 50MB of available hard disk space 1 Click start All Programs AVerComm VCplayer VCplayer or double click on the desktop 2 Click to locate and open the vc file 3 Select the file and click Open ...

Page 64: ... Ensure the proper volume level on the system 2 The audio quality is poor Ensure the AVerComm H300 H100 speaker and mic are not damaged Adjust the Mic Gain Level Make sure the MIC and Speaker are physically away from each other to prevent echo Make sure the hub and microphone cables are properly connected Avoid placing the cellphone next to speaker or microphone V Vi id de eo o D Di is sp pl la ay...

Page 65: ...ng the system IP address is still undetectetable or invaild value If the IP Subnet Mask Default Gateway shown incorrect value you can modify the value in Static IP Mode The default Obtain IP address selection in AVerComm H300 H100 is in Static IP Please change the selection into DHCP in LAN Configuration The system will automatically detect the IP from DHCP server 2 Why cant I access Web tool Chec...

Page 66: ...Media Information Inc AVerMedia warrants that the applicable product Product substantially conforms to AVerMedia s documentation for the product and that its manufacture and components are free of defects in material and workmanship under normal use You as used in this agreement means you individually or the business entity on whose behalf you use or install the product as applicable This limited ...

Page 67: ... USE BUSINESS INTERRUPTION OR PROCUREMENT OF SUBSTITUTE GOODS OR SERVICES ARISING OUT OF OR IN CONNECTION WITH THIS LIMITED WARRANTY OR THE USE OR PERFORMANCE OF ANY PRODUCT WHETHER BASED ON CONTRACT OR TORT INCLUDING NEGLIGENCE OR ANY OTHER LEGAL THEORY EVEN IF AVERMEDIA HAS ADVISED OF THE POSSIBILITY OF SUCH DAMAGES AVERMEDIA S TOTAL AGGREGATE LIABILITY FOR DAMAGES OF ANY NATURE REGARDLESS OF FO...

Page 68: ...es T TR RA AD DE EM MA AR RK KS S AVerMedia is a trademark or registered trademark of AVerMedia Technologies Inc and has been authorized AVerMedia Information Inc to use AVer is a trademark or registered trademarks of AVerMedia Information Inc Other trademarks used herein for description purpose only belong to each of their companies C CO OP PY YR RI IG GH HT T 2010 by AVerMedia Information Inc Al...

Reviews: