5
Connections
HDM
I
Desktop or Laptop
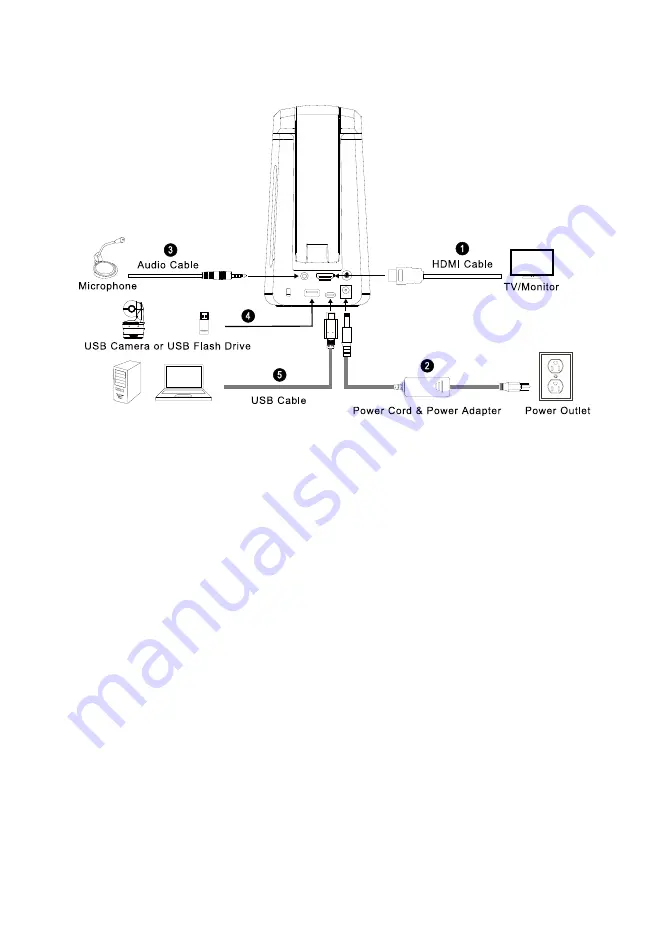
1. For HDMI cable connection:
- Connect the unit to a TV/Monitor to display camera streams or configure camera OSD settings
using the supplied Remote Control or the Function Buttons on the unit.
2. For power connection:
- Use the supplied Power Adapter & Power Cord to connect the unit to the power outlet, the LED
Indicator will light solid red.
3. For audio input connection:
- Line input level: 1Vrms (max.)
- Mic input level: 50mVrms (max.); supplied voltage: 2.5 +/- 0.5 (V)
- The built-in microphone will be disabled when an external microphone is connected.
- Because video conferencing software such as Google Hangouts (Windows), Skype (Mac), or
Teams (Windows and Mac) can automatically adjust volume, the user might experience
randomly unstable volume while using the unit.
[Note]
The audio can be output from the built-in speaker.
4. For USB device connection. You can connect to an USB camera or an external storage
- USB camera: Connect an USB camera to perform the PIP function.
- External storage: Support up to 32GB (FAT32) USB storage device for capturing images and
recordings.
5. For USB cable connection:
- Connect the unit to the Desktop/Laptop PC using the supplied USB 2.0 Type-C to Type-A cable
to work with video conference software such as Teams or Skype.
Summary of Contents for AVerVision A30
Page 1: ...AVerVision A30 Universal Camera User Manual ...
Page 27: ...AVer A30 多功能攝影機 使用手冊 ...
Page 52: ...https jp aver com AVerVision A30 ユニバーサルカメラ ユーザーマニュアル ...
Page 77: ...AVerVision A30 Universelle Kamera Bedienungsanleitung ...
Page 104: ...AVerVision A30 Caméra universelle Mode d emploi ...
Page 105: ...Cámara universal AVerVision A30 Manual del usuario ...
Page 157: ...AVerVision A30 Telecamera Universale Manuale dell utente ...


