background image


1


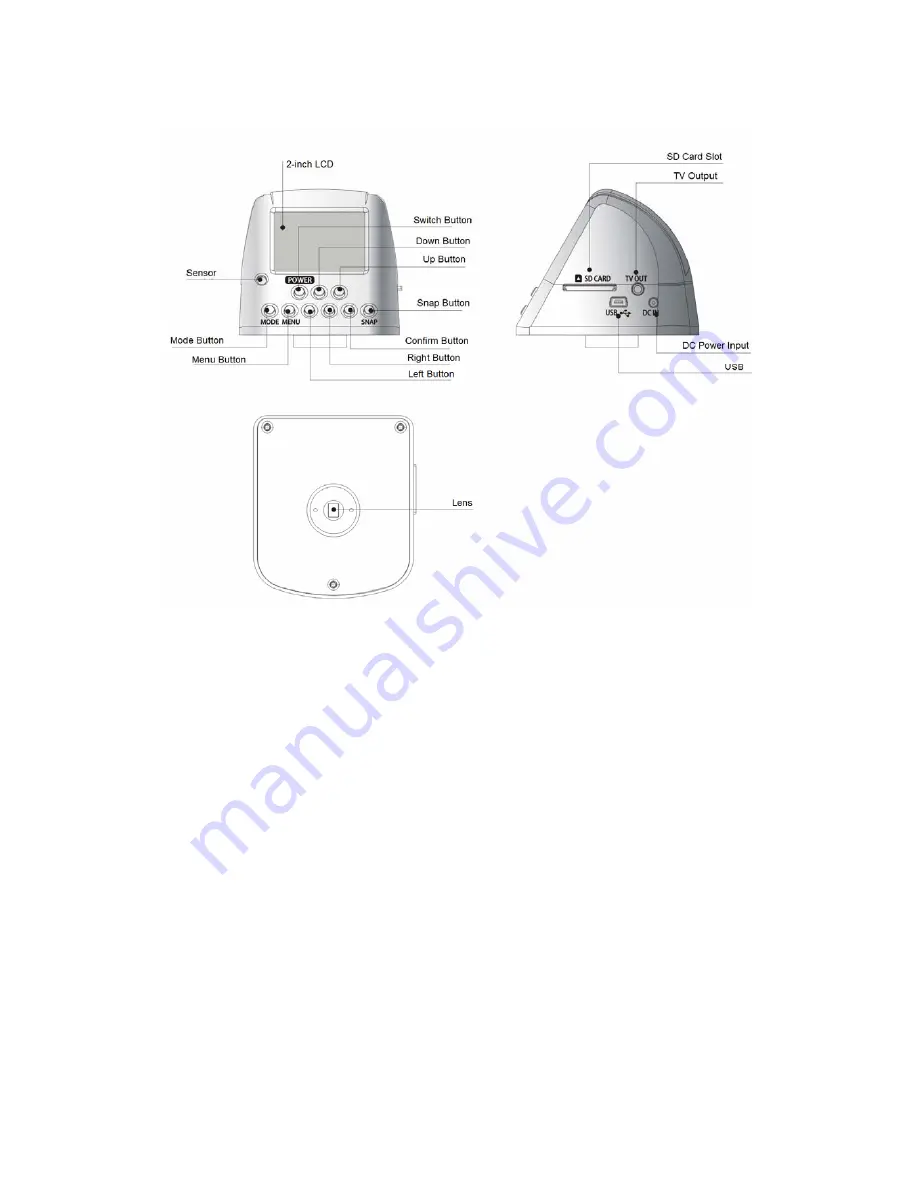
Using the Camera


‹

  Attach the D3C camera to the C-mount adaptor of the extension tube 

of the microscope or video lens. 

‹

  Place the specimen to be examined under the lens 


‹

  Plug in the power cable into the DC IN on D3C camera 

‹

  Switch on the D3C camera by pressing the

POWER

button for 

second, and the LCD will display the starting interface. 

‹

  Insert the SD memory card into the camera (the images taken must 

be stored on the SD card)


Summary of Contents for 26100-230

Page 1: ...1 miniVue Camera 26100 230 Operation Manual Aven Inc www aveninc com...

Page 2: ...o lens Place the specimen to be examined under the lens Plug in the power cable into the DC IN on D3C camera Switch on the D3C camera by pressing the POWER button for second and the LCD will display t...

Page 3: ...d on the SD card To avoid vibrations during recording it is highly recommended to use the remote control or USB control to take the snapshot Camera Modes miniVue camera has three different operation m...

Page 4: ...also be switched off Install and remove the SD memory card Install the SD card z Insert the SD card into the slot along the arrow and click into position z The camera will make sound and displays an S...

Page 5: ...ded data Play mode You can play back the recorded images or video or delete the recorded data The TV OUT cable included can be connected to TV and play back the recorded images or video on TV You can...

Page 6: ...shot option Press DOWN button four times it will display Quality Press RIGHT button to go to the sub menu Use UP DOWN buttons to change the quality and press OK to confirm Press MENU button again to g...

Page 7: ...MERA mode z Brightness Setting the LCD brightness Press MENU button and then RIGHT button once to activate the setting option Press DOWN button three times it will display Brightness Press RIGHT butto...

Page 8: ...buttons to choose to format or not and press OK to confirm Press MENU button again to go back to CAMERA mode z Reset Reset the camera to the factory setting Press MENU button and then RIGHT button on...

Page 9: ...to go to the sub menu Use UP DOWN buttons to set the type of auxiliary cable and press OK to confirm Press MENU button again to go back to CAMERA mode z Video mode choose the output format of the vid...

Page 10: ...button once it will display Delete Press RIGHT button to go to the sub menu Use UP DOWN buttons to choose to delete one or more or all videos and press OK to confirm 9 Delete one video the screen dis...

Page 11: ...angles to choose 90 180 and 270 Use UP DOWN buttons to choose the orientation and press OK to confirm and it will display the confirmation options asking whether to keep the rotated image or not choos...

Page 12: ...o a computer the driver of the camera must be installed and the camera can be operated using the software MicroCap The software can be found on the included CD Notice The system only supports Windows9...

Page 13: ...era and video input port of the TV At this moment the preview image shown on the LCD will be displayed on the TV screen the LCD will be turned off Use PLAY mode you can play back the recorded images a...

Page 14: ...B cable The LCD will display two options use UP DOWN to choose Printer Link and press OK to confirm The camera will display several options and images user can choose different printing mode to print...

Page 15: ...package The system only supports Windows98 2000 XP operating system but not Vista and Mac OS The interface of the software is shown below If the camera is not connected with the computer the software...

Page 16: ...tangle to select the auto mode and the software will adjust the exposure and brightness et al When Auto mode is not selected the values of the exposure and brightness et al can be adjusted by using th...

Page 17: ...to use White LED White balance is the balance among the RGB gains there are three types of adjustment z Auto z Fixed 9 White LED 9 Fluorescent Lamp 9 Tungsten Lamp When one of these three conditions...

Page 18: ...Picture Signal Picture is the default tab when MicroCap V2 0 is started A default folder is provided to store the recorded data To record a single picture left click button and the image is recorded...

Page 19: ...a folder to store the images input the time interval and the number of pictures and click button to start recording You can stop the recording by clicking button Video Recording To record a video go...

Page 20: ...ing the boxes corresponding to Red Green and Blue in Channel Cross line MicroCap V2 0 provides black and white cross lines respectively showing the centre of the previewed field of view Quality You ca...

Page 21: ...t function to measure the size of the samples in real time Click button on the top right corner of the screen to open the measure function dialogue As shown in the figure below there are three main fu...

Page 22: ...ve When a different objective is used a new calibration must be done for measurement Line When the calibration is done you can measure the distance between two points on the preview screen by clicking...

Page 23: ...Maximum resolution 10 Mega Pixel LCD screen size 2 inch LTPS Memory card SD MMC card USB interface Yes TV output NTSC PAL Controller Remote and USB shutter Power supply DC 12V 1 5A Picture format JPE...

Reviews: