background image

User Manual

www.AvantcoEquipment.com

Unpacking:

Unpack the product and check for any damage incurred during transit. This should be reported to the responsible 

carrier, railway or postal authority, and a request for a damage report should be made.

These instructions must be followed for us to guarantee our full support of your claim for 

protecting against loss from concealed damage. The form for filing such a claim will be 

provided by the carrier.

General Installation And Operation 

Instructions:

The Avantco meat slicers are a range of medium duty electrically driven appliances. The units have been designed to 

meet the highest safety and hygiene standards. The robust aluminum construction and powerful drive motor ensure 

long and reliable operation and use. These units will not slice frozen or raw meats. Doing so will void the warranty. 

The SL512 is the only model suitable for slicing cheese, at no more than 30 min per day.

1.  Place the unit in the desired location with the on/off switch facing the operator. DO NOT plug the unit in at this point. 

The supporting table should be stable and at the correct working height. The work surface should be in a dry loca-

tion and preferably away from heavy traffic areas. 

2.  Clean the unit with a DAMP cloth using a neutral P.H. dish detergent. Wipe and dry the machine. (See Cleaning 

instructions on page 3 of this manual.)

3. Set the thickness of slice required using the control knob adjacent to the on/off switch. 

4.  The meat support platform should be in the start position that is close to the operator. Lift up the food pusher; place 

the meat to be sliced on the support platform against the raw edge. Return the food pusher to its original position 

now on top of the meat to be sliced.

5. Switch on the motor and using the handle on the food pusher, push the carriage back and forth to begin cutting the food.

6. After you are finished cutting, turn off machine and collect the product slices in the exit area.

7.  Please Note: The blade-sharpening device is NOT factory fitted on MODELS SL310, SL312 SL512 AND SL713MAN. 

To fit, follow the procedure below.


a) 

  Fit the sharpening device in the socket provided, ensuring the grinding stones are positioned 

at the rear of the machine.


b) 

Tighten the safety locking screw.

To replace the belt, please remove the knife and motor, then remove belt through the hole under the knife. Then, install 

the new belt and reassemble.

!

Cut through the greasiest dishes, glassware, cutlery, pots, and pans with Sunbright pot 

and pan dishwashing liquid. This heavy-duty pot and pan dishwashing liquid was specially 

designed for the institutional environment with its super concentrated, high active, high 

sudsing formula. Available in 32 oz. bottles (12/case) or 5 gallon bulk supply.

Summary of Contents for SL309

Page 1: ...User Manual www AvantcoEquipment com 1 Meat Slicer Instruction Manual Models SL309 SL310 SL312 SL512 SL713MAN Please read and keep these instructions Indoor use only 06 2019 User Manual ...

Page 2: ...tral P H dish detergent Wipe and dry the machine See Cleaning instructions on page 3 of this manual 3 Set the thickness of slice required using the control knob adjacent to the on off switch 4 The meat support platform should be in the start position that is close to the operator Lift up the food pusher place the meat to be sliced on the support platform against the raw edge Return the food pusher...

Page 3: ...ct with food such as slicers conveyor sys tems bottling and canning machinery bakery equipment and dairy equipment Blade Sharpening 1 This operation should be undertaken if the cutting blade becomes dull It should be noted that the blade is made from hardened material and under normal use should only need sharpening once a year 2 Unplug the unit 3 Ensure that the slice thickness knob is in the 0 p...

Page 4: ... the machine on its side clean the slide bar and lubricate with a food safe lubricant like Lubriquik Cleaning and Sanitizing 2 Turn the thickness control knob all the way to the right 3 Remove the product table locking knob and then remove the product table 5 Clean all removed parts slicer knife and base with hot water and detergent 6 Rinse with hot water and sanitize 7 Reassemble slicer Get your ...

Page 5: ...5P Model Blade Dia Blade Rotation Speed Cut Thickness Cut Capacity Net Weight Operating Noise Level SL309 9 532 rpm 0 0 4 6 3 x 7 5 29lbs 60 67 dB A SL310 10 465 rpm 0 0 4 6 7 x 7 5 32lbs SL512 12 300 rpm 0 0 6 9 3 x 6 64lbs SL312 12 428 rpm 0 0 6 9 4x 6 54lbs SL713MAN 13 530 rpm 0 0 6 15 5x 10 5 114lbs LEGEND Description Part Number PB1 Push Button Stop 1 PB SLR PB2 Push Button Start 1 PB SLR T1 ...

Page 6: ...User Manual 6 www AvantcoEquipment com Exploded Parts Diagrams SL309 SL310 ...

Page 7: ...ng Bracket 177PSL32 33 Hex Head Screw 34 Ball Bearing 35 Carriage Knob 177SL3CRGKNB 36 Relay 177SL3RLY 37 Capacitor 177SL3CAP 38 Capacitor Retainer 39 Switch Cover 177PSL39 40 177PSL40 41 Base Cover 177PSL41 42 Director 43 Sharpener Cover 177PSL43 44 Sharpener Cover Bracket 45 Sharpener Base Bracket 177PSL45 46 Sharpener Button 47 Grinding Wheel 48 Sharpening Stone 177PSL48 49 Sharpener Pin 50 Sha...

Page 8: ...User Manual 8 www AvantcoEquipment com Exploded Parts Diagrams SL312 ...

Page 9: ... Bracket Spring 139 Towing Bracket Axle 177SL3PTGR 140 Quadrate Axis 141 Towing Bracket 177PSL141 142 Carriage Knob 177SLCKNOB 143 Sharpener Cover 144 Sharpener Button 145 Grinding Wheel 177PSL145 146 Sharpener Pin 147 Sharpener Spring 148 Sharpening Stone 177PSL148 149 Sharpener Tightening Knob 150 Sharpener Base Bracket 177PSL150 151 Wheel 152 Rubbing Stone Pin 153 Sharpener Cover Bracket 154 Bl...

Page 10: ...User Manual 10 www AvantcoEquipment com Exploded Parts Diagrams SL512 ...

Page 11: ...Blade 177SL512BLD 26A 27 Blade Cover 28 Carriage Bracket 29 Carriage Push Handle 177PSL12HNDL 30 Carriage Knob Threaded Stud 177SLC512KN 177SLCTH512 31 Feed Tray Support Base 32 Feed Tray Support 33 Slider 34 Guard Knob 35 Ball Bearing 36 Pulley 37 Belt 177SL512BELT 38 Belt Wheel Fixing Base 39 Belt Wheel Pin 40 Sharpener Knob 41 Sharpener Cover 42 Grinding Wheel 43 Sharpener Cover Bracket 44 Shar...

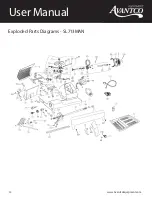
Page 12: ...User Manual 12 www AvantcoEquipment com Exploded Parts Diagrams SL713MAN ...

Page 13: ...te axle 62 Drag frame screw 63 Upper towing bracket spuare axle 84 Blade guarding ring 177P1384 85 Fine sand wheel 86 Wheel spring 87 Course grinding wheel 177PSLA87 88 4 75wheel 89 Crude sand wheel 90 Knife rack fixed screw 91 Adjust seat assembly 92 Active clapboard screw 177PSLA92 94 Tray bracket screw 95 Ball handle 96 Bolt for Carrier support 97 Blade guard ring support 177PSLA97 99 Sharpener...

Page 14: ...er Equipment where the serial number plate has been removed or altered Defects and damage due to improper maintenance wear and tear misuse abuse vandalism or Act of God Avantco warrants its equipment to be free from defects in material and workmanship for a period of 1 year This is the sole and exclusive warranty made by Avantco covering your Avantco brand equipment A claim under this warranty mus...

Reviews: