background image

SMA-X8I, REV-SA03 User

’s Manual 

28 SMA-


X8I, REV-SA03 

User’s Manual


REV-SA03 


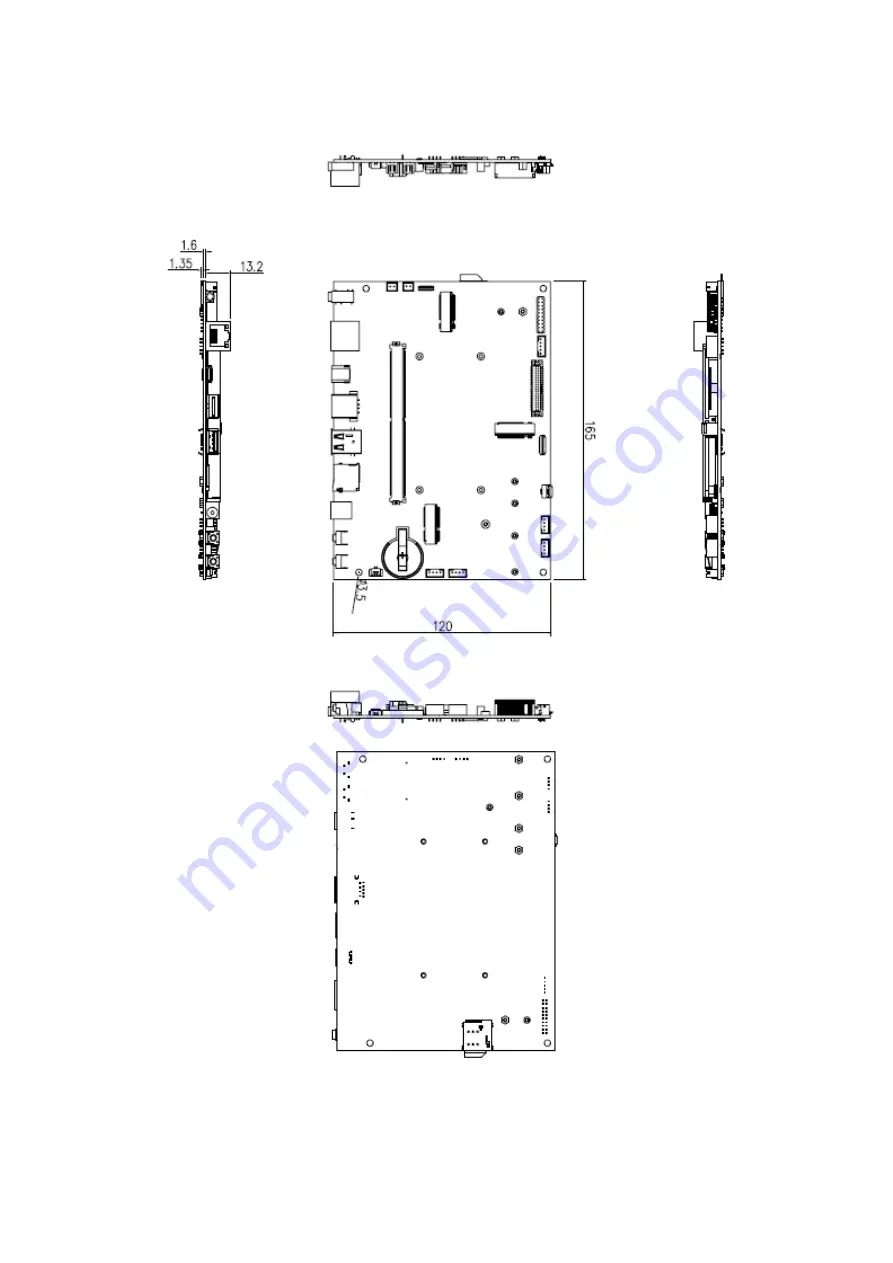
Unit: mm 

Summary of Contents for REV-SA03

Page 1: ...Part No E2047SX8I01R SMA X8I REV SA03 NXP IMX8M Mini SMARC V2 1 RISC Module User s Manual 2nd Ed 24 February 2022 ...

Page 2: ...RECT THE INTERFERENCE AT HIS OWN EXPENSE A Message to the Customer Avalue Customer Services Each and every Avalue s product is built to the most exacting specifications to ensure reliable performance in the harsh and demanding conditions typical of industrial environments Whether your new Avalue device is destined for the laboratory or the factory floor you can be assured that your product will pr...

Page 3: ...roduct Overview 16 2 5 REV SA03 Connector List 17 2 6 REV SA03 Setting Connectors 18 2 6 1 Speaker L connector CN1 18 2 6 2 Speaker R connector CN2 18 2 6 3 MIPI CSI Screen connector J6 19 2 6 4 LCD Backlight connector J10 19 2 6 5 General purpose I O connector J15 20 2 6 6 Touch Panel connector J7 20 2 6 7 LVDS connector J9 21 2 6 8 A53 Core Debug connector UART J13 22 2 6 9 M4 Core Debug connect...

Page 4: ...card Modern electronic devices are very sensitive to static electric charges As a safety precaution use a grounding wrist strap at all times Place all electronic components in a static dissipative surface or static shielded bag when they are not in the chassis Always note that improper disassembling action could cause damage to the motherboard We suggest not removing the heatsink without correct i...

Page 5: ...User s Manual SMA X8I REV SA03 User s Manual 5 1 3 Document Amendment History Revision Date By Comment 1st May 2021 Avalue Initial Release 2nd February 2022 Avalue Update 2 3 SMA X8I Setting Jumpers ...

Page 6: ...d to be necessary to aid in the understanding of this board We strongly recommend that you study this manual carefully before attempting to set up SMA X8I series or change the standard configurations Whilst all the necessary information is available in this manual we would recommend that unless you are confident you contact your supplier for guidance If you have any suggestions or find any errors ...

Page 7: ...mperature 40 85 Degree Default Storage Temp 40 85 Operating Humidity 95 Size L x W Please consult product engineers for the production feasibility if the size is larger than 410x360mm or smaller than 80x70mm 82mm x 50mm As low as 1 5mm Carrier Board top to Module bottom Other stack height options available including 2 7mm 5mm 8mm Overall assembly height Carrier Board top to tallest Module componen...

Page 8: ...dures Test Eb Bump Test OS Information Android 10 Linux Yocto sumo 2 5 Default REV SA03 System SMARC SMARC V2 1 Compatible with Avalue and other SMARC modules CPU Modules 82 x 50mm External I O Connector 1 x Power Key 1 x Reset Key 1 x DC Jack 1 x USB 2 0 Type A 1 x USB 3 0 Type A J3 reserved design for USB3 0 1 x USB Type C 1 x Giga Ethernet 1 x Headphone 1 x Micro SD Socket 1 x SIM Socket Intern...

Page 9: ...roduction feasibility if the size is larger than 410x360mm or smaller than 80x70mm 165mm x 120mm Weight 140g Random Vibration Operation 1 PSD 0 00454G Hz 1 5 Grms 2 operation mode 3 Test Frequency 5 500Hz 4 Test Axis X Y and Z axis 5 30 minutes per each axis 6 IEC 60068 2 64 Test Fh 7 Storage CF or SSD Random Vibration Non Operation 1 Test Acceleration 3G 2 Test frequency 5 500 Hz 3 Sweep 1 Oct pe...

Page 10: ...Manual 2 Acceleration Rate 10g for operation mode 3 Duration Time 11ms 4 No of Shock Z axis 1000 times 5 Test Axis Z axis 6 Operation mode 7 Reference IEC 60068 2 29 Testing procedures Test Eb Bump Test Note Specifications are subject to change without notice ...

Page 11: ...User s Manual SMA X8I REV SA03 User s Manual 11 1 6 Architecture Overview Block Diagram The following block diagram shows the architecture and main components of SMA X8I ...

Page 12: ...SMA X8I REV SA03 User s Manual 12 SMA X8I REV SA03 User s Manual The following block diagram shows the architecture and main components of REV SA03 ...

Page 13: ...User s Manual SMA X8I REV SA03 User s Manual 13 2 Hardware Configuration ...

Page 14: ...03 User s Manual 2 1 SMA X8I Product Overview 2 2 SMA X8I Jumper List The following tables list the function of each of the board s connectors Jumpers Label Function Note S1 Boot Mode selector 1 DIP switch 8pin S2 Boot Mode selector 2 DIP switch 4pin ...

Page 15: ...User s Manual SMA X8I REV SA03 User s Manual 15 2 3 SMA X8I Setting Jumpers 2 3 1 Boot Mode selector 1 2 S1 S2 Programming mode S1 10XXXXXX S2 XXXX X don t care eMMC boot SPI boot SD boot S1 S2 ...

Page 16: ...SMA X8I REV SA03 User s Manual 16 SMA X8I REV SA03 User s Manual 2 4 REV SA03 Product Overview ...

Page 17: ...ching Connector Hirose DF13 40DS 1 25C CON1 M 2 Key E for WIFI BT CON2 M 2 Key B for LTE CON3 PCIe M 2 KEY M for Storage J8 MIPI LCD connector 31 x 1 wafer pitch 0 30mm J7 Touch Panel connector 6 x 1 wafer pitch 0 50mm J12 CAN Bus connector 4 x 1 wafer pitch 2 00mm J17 UART3 connector 4 x 1 wafer pitch 2 00mm J13 A53 Core Debug connector UART 4 x 1 wafer pitch 2 00mm J14 M4 Core Debug connector UA...

Page 18: ...X8I REV SA03 User s Manual 18 SMA X8I REV SA03 User s Manual 2 6 REV SA03 Setting Connectors 2 6 1 Speaker L connector CN1 Signal PIN SPK_L 1 SPK_L 2 2 6 2 Speaker R connector CN2 Signal PIN SPK_R 1 SPK_R 2 ...

Page 19: ...N 3 28 GND GND 4 27 MIPI_CSI_D1P MIPI_CSI_D2P 5 26 MIPI_CSI_D1N MIPI_CSI_D2N 6 25 GND GND 7 24 VCC18_DVP MIPI_CSI_D3P 8 23 GND MIPI_CSI_D3N 9 22 VCC1 5_DVP GND 10 21 CSI_SDA CSI_MCLK0 11 20 CSI_SCL CSI_RST 12 19 GND GND 13 18 VCC28_DVP CSI_PWDN 14 17 AVDD28_DVP GND 15 16 GND 2 6 4 LCD Backlight connector J10 Signal PIN LCD_5V 5 LCD0_BL_PWM 4 LCD0_BL_EN 3 GND 2 LCD_12V 1 ...

Page 20: ...nnector J15 Signal PIN PIN Signal VIO_3V3 20 19 GND DIO_I2C_SDA 18 17 DIO_I2C_SCL DO_7 16 15 DI_7 DO_6 14 13 DI_6 DO_5 12 11 DI_5 DO_4 10 9 DI_4 DO_3 8 7 DI_3 DO_2 6 5 DI_2 DO_1 4 3 DI_1 DO_0 2 1 DI_0 2 6 6 Touch Panel connector J7 Signal PIN TP_RST 6 TP_SDA 5 TP_SCL 4 TP_INT 3 GND 2 VCC_3V3 1 ...

Page 21: ...BCP_D7 33 34 D_LACP_D16 GND 31 32 GND LB3N_D6 29 30 LB2N_D9 LB3P_D5 27 28 LB2P_DCK GND 25 26 GND LB1N_D11 23 24 LB0N_D13 LB1P_D10 21 22 LB0P_D12 GND 19 20 GND D_LA3N_D15 17 18 D_LA2N_D19 D_LA3P_D14 15 16 D_LA2P_D18 GND 13 14 GND D_LA1N_D21 11 12 D_LA0N_D23 D_LA1P_D20 9 10 D_LA0P_D22 GND 7 8 GND LVDS_DDC_CLK 5 6 LVDS_DDC_DAT 3 3V 3 4 5V 3 3V 1 2 5V ...

Page 22: ...2 SMA X8I REV SA03 User s Manual 2 6 8 A53 Core Debug connector UART J13 Signal PIN UART2_RS232_RX 1 GND 2 UART2_RS232_TX 3 VCC_3V3 4 2 6 9 M4 Core Debug connector UART J14 Signal PIN UART4_RS232_RX 1 GND 2 UART4_RS232_TX 3 VCC_3V3 4 ...

Page 23: ...ser s Manual SMA X8I REV SA03 User s Manual 23 2 6 10 UART3 connector J17 Signal PIN VCC_3V3 4 UART3_RS232_TX 3 GND 2 UART3_RS232_RX 1 2 6 11 CAN Bus connector J12 Signal PIN GND 4 CAN_L 3 GND 2 CAN_H 1 ...

Page 24: ...8 Signal PIN LEDA 31 LEDA 30 NC 29 LEDK 28 LEDK 27 LEDK 26 NC 25 GND 24 LA3N_D15 23 LA0N_D23 22 LA3P_D14 21 LA0P_D22 20 GND 19 GND 18 LACN_D17 17 LA1N_D21 16 LACP_D16 15 LA1P_D20 14 GND 13 GND 12 LA2N_D19 11 NC 10 LA2P_D18 9 NC 8 NC 7 C_GPIO8 6 LCD_1V8 5 LCD_1V8 4 LCD_3V3 3 LCD_3V3 2 LCD_3V3 1 ...

Page 25: ...User s Manual SMA X8I REV SA03 User s Manual 25 2 6 13 RTC connector JRTC1 Signal PIN VDD_RTC 1 GND 2 ...

Page 26: ...SMA X8I REV SA03 User s Manual 26 SMA X8I REV SA03 User s Manual 3 Mechanical Drawing ...

Page 27: ...User s Manual SMA X8I REV SA03 User s Manual 27 SMA X8I Unit mm ...

Page 28: ...SMA X8I REV SA03 User s Manual 28 SMA X8I REV SA03 User s Manual REV SA03 Unit mm ...

Page 29: ...User s Manual SMA X8I REV SA03 User s Manual 29 4 Linux User Guide Using with carrier board REV SA03 ...

Page 30: ...SMA X8I REV SA03 User s Manual 30 SMA X8I REV SA03 User s Manual 4 1 Flash Yocto 2 5 to SMA X8I 1 Connect your SMA X8I with REV SA03 to computer via type C USB cable ...

Page 31: ...User s Manual SMA X8I REV SA03 User s Manual 31 2 Download Yocto 2 5 image Please connect Avalue FAE to get download link 3 Set the jumper to OTG mode ...

Page 32: ...SMA X8I REV SA03 User s Manual 32 SMA X8I REV SA03 User s Manual S1 Set to 10101010 S2 Set to 0100 ...

Page 33: ...e device Execute flash bat start to flash image 5 In case that the following situation happens it needs to install the drvier to SMA I8X in Windows 7 skip step 5 if this pronlem does not occur in your device Download this package Unzip the directory downloaded Run install bat as Administrator ...

Page 34: ...A X8I REV SA03 User s Manual 34 SMA X8I REV SA03 User s Manual 6 After flash image finish disable power supplier 7 Set the jumper to boot mode S1 01101010 S2 0100 8 Power on and start to boot to Yocto 2 5 ...

Reviews: