background image

7

4.0

CONNECTING THE HARDWARE

The f irst  step is  to  connect a  video so urce to  the input  of  the 

imageMAX PLUS

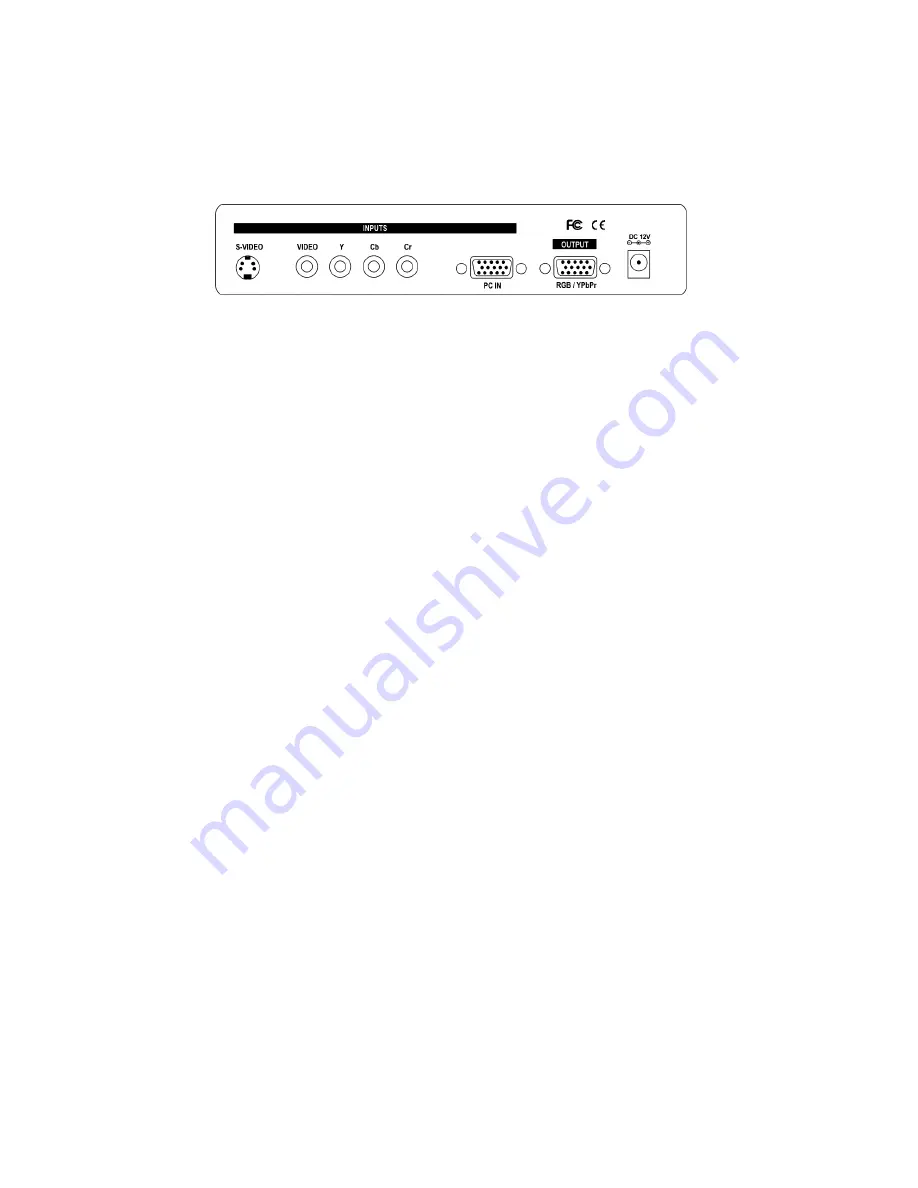
and to connect its output to a display device.  Below is a drawing of the unit.  

Connecting the Video Inputs

The Video Scaler  can accept a  Composite Video, S -Video or YCbCr  Component 
Video  input  signal  for  scaling,  as  well  as  a  computer  signal  input  that  can  be 
passed through.

Composite Video

- use an RCA/RCA cable to connect the Composite Video 

output of the source equipment to the connector labeled “VIDEO” on the back of 
the unit.

S-Video

- use an S-Video cable to connect the S-Video output of the source 

video equipment to the connector labeled “S-VIDEO” on the back of the unit. S-
Video provides improved performance over Composite Video and is 
recommended whenever possible.

Component Video

- use a 3RCA/3RCA cable to connect the YCbCr Component 

output of the source video equipment to the 3 connectors labeled “Y, Cb, Cr” on 
the back of the unit. Component Video provides the better performance than 
Composite Video or S-Video and is recommended whenever possible.

PC Video

- connect the source computer’s VGA output signal to the HD15 

connector labeled “PC IN” on the back of the unit.  

Note – This PC Input Signal is 

not scaled, but is available for pass-through when the PC Source is selected.  
This input may also be used for a YPbPr input.

Connecting the Video Output

Connect th e 

imageMAX PLUS’

output to  the destination  display device,  such as 

an  LCD  computer  monitor,  video  projector,  HDTV  Set  or  other  device,  via  the 
HD15 connector on the back labeled “OUTPUT”.  

Note:

The  output  signal  format  can  be  selected  as  either  PC  (RGB) or  HDTV 

(YPbPr) and  will be  covered later  in this  manual.   When PC  is selected,  use the 
HD-15 to HD-15 cable supplied  to connect to  the display device.   When HDTV  is 
selected, use the HD-15 to 3-RCA cable supplied to connect to the display. 

Summary of Contents for ImageMAX PLUS AVT-3800

Page 1: ...Instruction Manual AVT 3800 ImageMAX PLUS Video Scaler ...

Page 2: ...2 ...

Page 3: ...1 0 Introduction 4 2 0 Specifications 6 3 0 Package Contents 6 4 0 Connecting the Hardware 7 5 0 Operating The Unit 8 6 0 Troubleshooting 11 7 0 Limited Warranty 12 8 0 Regulatory Compliance 12 9 0 Contact Information 13 ...

Page 4: ...f errors AV Toolbox cannot be held liable for the use of this hardware or any direct or indirect consequential damages arising from its use It is the responsibility of the user of the hardware to check that it is suitable for his her requirements and that it is installed correctly All rights reserved No parts of this manual may be reproduced or transmitted by any form or means electronic or mechan...

Page 5: ...or 4 3 Aspect Ratio Automatic detection for 3 2 pulldown for 24fps film source material Frame rate conversion of 50Hz to 60Hz for PAL input signals Vertical Temporal VT Filter removes jagged artifacts On Screen Display for easy setup and adjustment Built in DCTI DLTI circuit for Color Luminance transient improvement PC Input connector for easy integration into an existing system Last memory featur...

Page 6: ...9 KHz 37 880 KHz 48 360 KHz 63 981 KHz RGBHV RGBHV RGBHV RGBHV Progressive Progressive Progressive Progressive HDTV Output Resolutions Vert Rate Horiz Rate Format Scan Type 480p 576p 720p 1080i 852x480 852x576 1280x720 1920x1080 59 94 Hz 50 00 Hz 59 94 Hz 59 94 Hz 31 469 KHz 31 250 KHz 44 995 KHz 33 716 KHz YPbPr YPbPr YPbPr YPbPr Progressive Progressive Progressive Interlaced 3 0 CHECKING PACKAGE...

Page 7: ...nnect the YCbCr Component output of the source video equipment to the 3 connectors labeled Y Cb Cr on the back of the unit Component Video provides the better performance than Composite Video or S Video and is recommended whenever possible PC Video connect the source computer s VGA output signal to the HD15 connector labeled PC IN on the back of the unit Note This PC Input Signal is not scaled but...

Page 8: ... Mode While in this mode press the x or z Buttons to choose the desired input source from Video S Video or Component Video Resolution Mode If the output is selected as RGB press x or z Buttons to choose the output resolution from VGA SVGA XGA or SXGA for PC output If the output is selected as YPbPr press x or z Buttons to choose from 480p 576p 720p or 1080i for HDTV output Output Mode Press x or z...

Page 9: ...stment is 0 48 The Factory Default is 24 Sharpness The range of this adjustment is 0 48 The Factory Default is 10 x and Buttons Press these buttons for control or to set values as described above IR Sensor Window This window allows IR commands access to the unit Power LED and Button The Power LED illuminates when the unit has power on The Power Button turns the power On and Off when the Power Adap...

Page 10: ...A Sets Output Resolution as 640x480 SVGA Sets Output Resolution as 800x600 XGA Sets Output Resolution as 1024x768 SXGA Sets Output Resolution as 1280x1024 480p Sets Output Resolution as 852x480p 576p Sets Output Resolution as 852x576p 720p Sets Output Resolution as 1280x720p 1080i Sets Output Resolution as 1920x1080i Aspect Selects Normal or Wide Aspect Ratio IR Set Hold for 15 sec to unlock Front...

Page 11: ...ng usually occurs when a Composite Video input is used and is generally unavoidable unless you can switch to using S Video Using good quality video cable will help towards reducing this affect Smearing that may not be noticeable on a small video monitor may become objectionable on a large screen video projector No color on the output monitor only a black and white image Check the condition of the ...

Page 12: ...ber from AV Toolbox and return the product to a location designated by AV Toolbox freight prepaid After repairs are complete the product will be returned freight prepaid LIMITATIONS All products sold are as is and the above Limited Warranty is in lieu of all other warranties for this product expressed or implied and is strictly limited to one year from the date of purchase AV Toolbox assumes no li...

Page 13: ...avtoolbox com AV Toolbox Latin America 6991 NW 82nd Avenue 8 Miami FL 33166 USA Tel 305 396 6275 Fax 305 418 9306 sales latinoamerica tvone com www tvonela com AV Toolbox Mercosur Av Diaz Velez 3965 PB 1200 Capital Federal Buenos Aires Argentina Tel 54 11 5917 2525 Fax 54 11 4032 0281 sales mercosur tvone com www tvonela com AV Toolbox Asia 16F 4 No 75 Sec 1 Hsin Tai Wu Rd Hsichih Taipei Hsien 221...

Reviews: