5
Rev. (30-JAN-98) • RLM v4.7
© 1995-98 Automated Logic Corporation
CMnet Communication Wiring
1.
Turn the R683's power switch OFF.
2.
Check the network communication wiring for shorts
and grounds.
3.
Terminate the CMnet communication wires to the
terminals indicated in Figure 3.
NOTE: Be sure to keep the same polarity as
established throughout the CMnet.
4.
Turn the R683's power switch ON.
5.
Verify proper network communications. This can be
done using NETSCAN software. Continue wiring
inputs and outputs only after network
communication has been established.
Zone Sensor Wiring
CAUTION: Because the standard zone sensor inputs
are not surge protected, they should only be used for
thermistors or the enhanced zone sensor. Any other use
could result in damage to the hardware.
Standard Zone Sensor
(Using the Enhanced Zone Sensor Port)
1.
Turn the module's power switch OFF.
2.
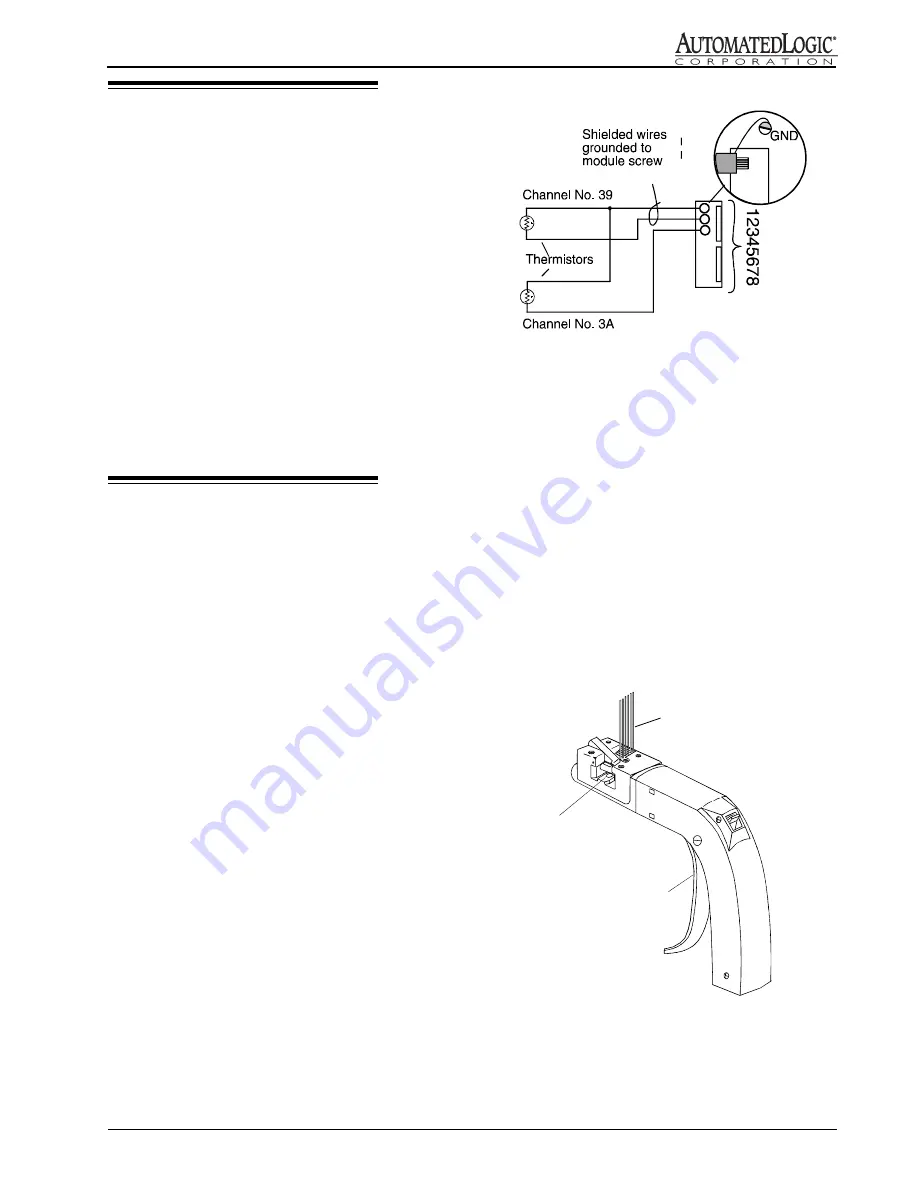
For input 1 (UI 1), connect the zone sensor wires to
pins 1 and 2 on the 8-pin receptacle on the R683
module see Figure 5.
3.
Turn the module's power switch back ON.
4.
Input the channel number, offset, and gain on the
RLM FB parameter page (UI 1 uses channel number
39 and UI 2 uses channel number 3A).
5.
If using input 2 (UI 2) on the Enhanced Zone Sensor
Port, repeat steps 1-4, connecting the sensor between
pins 1 and 3 on the 8-pin connector on the R683
module see Figure 5.
NOTE: When making a sensor cable, disregard the
numbers imprinted on the plastic connector.
Enhanced Zone Sensor
1.
Turn the module's power switch OFF.
2.
Plug the Amp 8-pin connector to the 8-pin
receptacle. If you are constructing your own cable,
use the crimper shown in Figure 6. Refer to Figure 7
for the cable wiring configuration. Use 22 AWG
wire.
3.
Replace the power jumper.
4.
Enter the channel number, offset, and gain on the
RLM FB parameter page as listed in the "Channel
Number" section.
Figure 6: AMP Crimper (ALC part no. CRIMP)
Figure 5: Standard Zone Sensor connection
WIRE
FEED
SLIDE
CAM
HANDLE
A
M
P


