background image


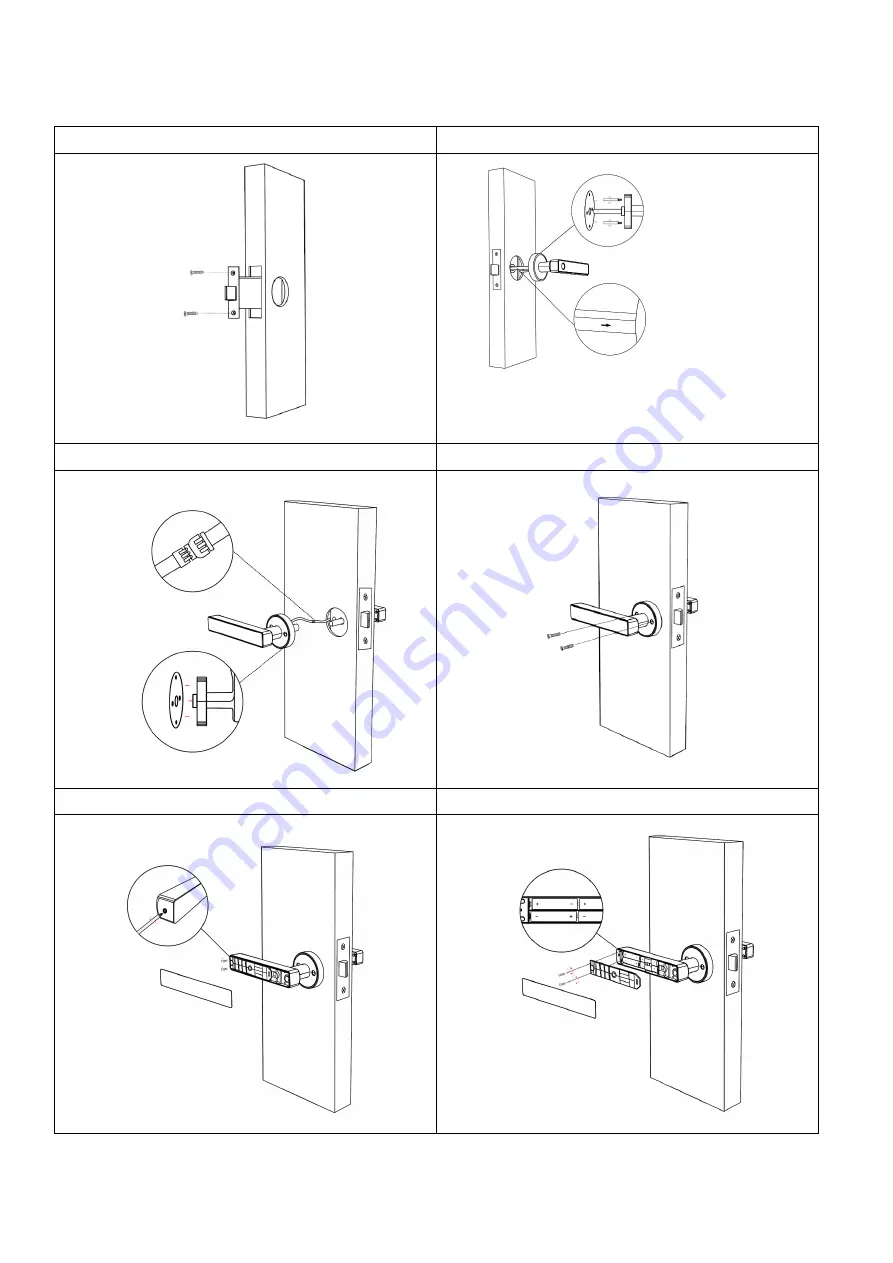
2.Installation 


Step1    Install Mortise 

Step2    Install Front Panel 


Step3    Connect Front and Back Panel 

Step4    Install Back Panel 


Step5    Remove the Battery Cover


Step6    Install Batteries


1. 
Place  the  Waterproof 
Rubber 

Plate 

and 

opposite  pull  screw 
casing 

2. 
Keep arrow direction(shows in 
image) always facing to 
 the lock tongue 

Summary of Contents for N20

Page 1: ...al keys please keep outdoor just in case keys lock in doors 2 Please change the batteries when notified by low wattage alarm 3 Reading this manual carefully before installation and keep it for future reference Smart Lock User Manual ...

Page 2: ...2 1 Lock Structure Mortise OR ...

Page 3: ... Panel Step3 Connect Front and Back Panel Step4 Install Back Panel Step5 Remove the Battery Cover Step6 Install Batteries 1 Place the Waterproof Rubber Plate and opposite pull screw casing 2 Keep arrow direction shows in image always facing to the lock tongue ...

Page 4: ...ckness to Fit 30 60mm Battery Life Span 3 000 Times of Locking Unlocking Operation Working Temperature 25 60 Working Humidity 20 90 Data Capacity Fingerprint 200 pcs Fingerprint Sensor Semiconductor Sensor Fingerprint False Reject Rate 0 01 Fingerprint False Accept Rate 0 00003 System Initialization Open the cover of the back panel handle long press the reset button for 5s and the initialization i...

Page 5: ...e right QR code as above 3 You can also search for AUSLOCK in the APP store for download 4 Register a new account phone number or email or login with an existing account 5 Long press the reset button until the blue light is on click Add Lock 6 The lock nearby will appear on the phone screen click 7 Re name the lock 8 The lock added successfully 1 1 1 2 1 3 ...

Page 6: ...6 1 5 1 4 1 6 1 7 N20 ...

Page 7: ...he unlock the receiver must be download the APP and register an account Enter recipient s account of AUSLOCK set the name and effective time of the eKey as shown in figure 2 2 Send The recipient s account has Bluetooth unlock permission 4 2 4 Fingerprint management Click as shown in finger 2 1 Click Add Fingerprint set the name and effective time of the fingerprint Start Place your finger on the s...

Page 8: ...8 2 1 2 2 2 3 2 4 Enter recipient account of AUSLOCK ...

Page 9: ...9 4 3 Add Gateway Option ...

Page 10: ...se Quantity 1 1 1 1 Picture Name Strike Strike Box Screw 01 For Aluminum Screw 02 For Wooden door Quantity 1 1 2 2 Picture Name Opposite pull screw Waterproof Rubber Plate Mechanical keys Screw 03 Quantity 2 2 2 2 2 Picture Name Hex Screwdriver Gateway Quantity 1 1 Option ...

Page 11: ... services au auslock net Customer Full Name Customer Contact No Place of Purchase store Purchase Date Product Name Product Model Note 1 Please keep this card so that you can use it when you need warranty service 2 We provide you with a one year warranty from the date of purchase 3 This warranty service is valid for customers in any country in the world ...

Reviews: