background image


User Guide 

SAFETY INSTRUCTIONS 


Please review the following safety precautions. If this is the first time using this model, then read this manual 
before installing or using the product. If the product is not functioning properly, please contact your local 
dealer or Aurora for further instructions. 


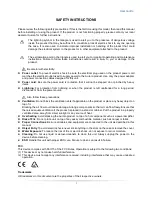
The  lightning  symbol  in  the  triangle  is  used  to  alert  you  to  the  presence  of  dangerous  voltage 
inside the product that may be sufficient to constitute a risk of electric shock to anyone opening 
the  case.  It  is  also  used  to  indicate  improper  installation  or  handling  of  the  product  that  could 
damage the electrical system in the product or in other equipment attached to the product. 


The exclamation point in the triangle is used to alert you to important operating and maintenance 
instructions.  Failure  to  follow  these  instructions  could  result  in  injury  to  you  or  damage  to  the 
product. 


Be careful with electricity:


Power outlet

: To prevent electric shock, be sure the electrical plug used on the  product power cord 

matches the electrical outlet used to supply power to the Aurora product. Use only the power adapter 
and power connection cables designed for this unit. 


Power cord

: Be sure the power cord is routed so that it will not be stepped on or pinched by heavy 

items. 


Lightning

:  For  protection  from  lightning  or  when  the  product  is  left  unattended  for  a  long  period, 

disconnect it from the power source. 


Also follow these precautions: 


Ventilation

: Do not block the ventilation slots if applicable on the product or place any heavy object on 

top of it. 
Blocking the air flow could cause damage. Arrange components so that air can flow freely. Ensure that 
there is adequate ventilation if the product is placed in a stand or cabinet. Put the product in a properly 
ventilated area, away from direct sunlight or any source of heat. 


Overheating

: Avoid stacking the Aurora product on top of a hot component such as a power amplifier. 


Risk of Fire

: Do not place unit on top of any easily combustible material, such as carpet or fabric. 


Proper Connections

: Be sure all cables and equipment are connected to the unit as described in this 

manual. 


Object Entry

: To avoid electric shock, never stick anything in the slots on the case or remove the cover. 


Water Exposure

: To reduce the risk of fire or electric shock, do not expose to rain or moisture. 


Cleaning

:  Do  not  use  liquid  or  aerosol  cleaners  to  clean  this  unit.  Always  unplug  the  power  to  the 

device before cleaning.   


ESD

: Handle this unit with proper ESD care. Failure to do so can result in failure.   


FCC 

This device complies with Part 15 of the FCC Rules. Operation is subject to the following two conditions: 
(1)  This device may not cause harmful interference. 
(2)  This device must accept  any  interference received, including interference that may cause  undesired 

operation. 


Trademarks 

All trademarks in this document are the properties of their respective owners.


Summary of Contents for V-Tune Pro4K

Page 1: ...i Manual Number 141103 Firmware v1 00 above USERS GUIDE V Tune Pro4K Preliminary User Guide Worldwide 4K ATSC QAM NTSC PAL IP Tuner...

Page 2: ...tended for a long period disconnect it from the power source Also follow these precautions Ventilation Do not block the ventilation slots if applicable on the product or place any heavy object on top...

Page 3: ...Auto Scan 8 Manual Scan 9 IP Program Setting 9 Edit 9 Caption Closed Caption Options 11 Setup 12 Output Resolution 12 OSD Opacity 12 I Plate 12 Power Saving 12 Time Zone 12 Sound 12 Network Settings...

Page 4: ...APPENDIX 1 DTV Channel Table Information 17 APPENDIX 2 RF System Guidelines 18 APPENDIX 3 Troubleshooting 20 APPENDIX 4 RS 232 LAN Control Protocol 21 APPENDIX 5 Technical Specifications 24 APPENDIX...

Page 5: ...ng items are included within your package Contact your dealer if any items are missing or damaged Tuner x 1 Remote Control with 2 AAA batteries x 1 Power adaptor x 1 Rack Mount Bracket x 2 Screw x 4 N...

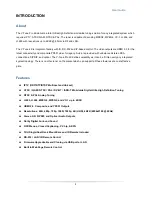
Page 6: ...fines versatility as it can be fit into nearly any integrated system topology There is no other tuner on the market which can support all these features at a cost effective price Features IPTV UDP RTP...

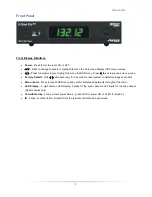
Page 7: ...tory Default Hold simultaneously for 5 seconds to reset system to default settings and reboot Menu Enter Press to launch OSD menu and confirm selected adjustments throughout the menu LED Display 5 dig...

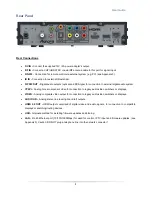
Page 8: ...alog hi res component video for connection to legacy audio video switchers or displays VIDEO Analog composite video output for connection to legacy audio video switchers or displays AUDIO L R Analog s...

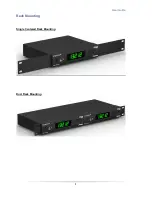
Page 9: ...5 User Guide Rack Mounting Single Centered Rack Mounting Dual Rack Mounting...

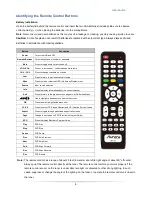
Page 10: ...gle of the lighting on the tuner or operate the remote control unit closer to the tuner Button Description Power Turns tuner ON and OFF Numeric Buttons For entering channel number or password Mute Pre...

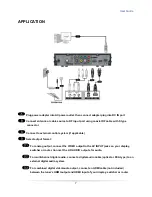
Page 11: ...licable Select output format For analog output connect the VIDEO output to the AV INPUT jacks on your display switcher or router Connect the L R AUDIO outputs for audio For multichannel digital audio...

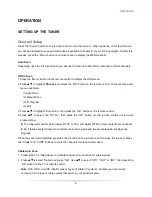
Page 12: ...ght Auto Scan then press the OK button on the remote control 4 Press to select the Off Air then press the OK button on the remote control to start auto programming The tuner will scan for both analog...

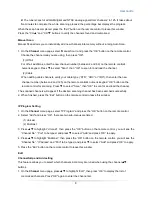
Page 13: ...n on the remote control for scanning Press to select Scan then OK to scan for and load the channel The scanned channels will appear if the desired scanning channel has been searched successfully 2 Whe...

Page 14: ...ight each channel in the list Pressing OK on a checked channel will remove it from the list skip while pressing OK on an unchecked channel will add it to memory 3 Press the Exit button on the remote c...

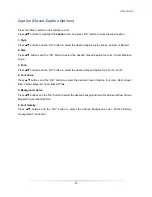
Page 15: ...d Closed Caption font size Small Medium Large 3 Font Press buttons and the OK button to select the desired Closed Caption font Font1 Font7 4 Font Color Press buttons and the OK button to select the de...

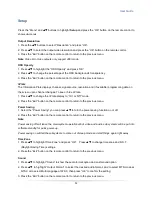
Page 16: ...ff mode 2 Press the Exit button on the remote control to return to the previous menu Power Saving 1 Select the Power Saving you can press to turn the power saving function on or off 2 Press the Exit b...

Page 17: ...mation 1 Press to highlight the System icon and press the OK button on the remote control The display will show the tuner s system related information 2 Press the EXIT button on the remote control to...

Page 18: ...even TV Y All children The themes and elements in this program are specifically designed for a very young audience including children from ages two six USTV FCC Content Category V Violence S Sexual co...

Page 19: ...ting system 4 Press the EXIT button to leave Note When a rating locked channel has selected the message Channel is blocked will appear on the TV screen Advanced Rating 1 Press buttons to highlight Par...

Page 20: ...Data2 Shield Pin 9 TMDS Data0 Pin 16 SDA Pin 3 TMDS Data2 Pin 10 TMDS Clock Pin 17 DDC CEC Ground Pin 4 TMDS Data1 Pin 11 TMDS Clock Shield Pin 18 5 V Power Pin 5 TMDS Data1 Shield Pin 12 TMDS Clock P...

Page 21: ...KCET UHF channel 59 Los Angeles s website is http www kcet org However the most accurate method for locating the local station s website is through their parent network For example to find WCBS New Yo...

Page 22: ...e 6 MHz channel bandwidth including CTB CSO other discrete interference C N analog channels Not less than 27 dB for 64 QAM 33 dB for 256 QAM 43 dB for AM VSB analog 5 CTB Not worse than 53 dBc referen...

Page 23: ...er than 4 5 microseconds shall be considered under item 4 of this table as a contributor to C N I 14 Burst Noise Not longer than 25 s at 10 Hz repetition rate 15 Carrier level at the terminal input 64...

Page 24: ...video a Check whether the tuner output and the TVs input are properly set b Check whether the video connectors are properly connected c Scan this channel again by using Auto Scan and see if the video...

Page 25: ...md KEY_CH 2b password 0000 Will increase the volume on the V Tune Pro HD RPC Command method Send_Command cmd VOL024 password 0000 Will set the volume on the V Tune Pro HD to 24 RPC Command method GetS...

Page 26: ...wer Off PWR CR Query Power status responds with PWRON CR or PWROFF CR VOLxxx CR Volume Level Set xxx 000 to 025 Responds with VOL024 CR for volume level 24 VOL CR Query Volume Level Responds with VOL0...

Page 27: ...filling the entire screen by cropping the left and right portions of the picture ASPECT_FULL CR For a full picture filling the entire screen with no bars RES_480i CR Sets output resolution to 480i RE...

Page 28: ...o level 4 2 1080p 60 fps VC 1 Advanced Profile level 3 VC 1 Simple and Main profile MPEG 2 Main Profile Low Level Main Level and High Level MPEG 4 Part 2 Simple Profile and Advanced Simple Profile MPE...

Page 29: ...1 backwards compatible IR Sensor Extender over 3 5 mm TRS Jack x 1 RS 232 over 3 5mm TRS Jack x 1 Power Interface 12V DC Input Connector x 1 LEDs Power LED x 1 Two Tones Green Red IR LED x 1 Seven se...

Page 30: ...ecibels relative to carrier amplitude dBm Decibels relative to one milliwatt dBmV Decibels relative to one millivolt across a given impedance 75 ohms in North American cable systems DTV Digital Televi...

Page 31: ...System Information Protocol A method of describing Naming and Navigation data for a multi program transport stream as defined in ATSC A 65A QAM Quadrature Amplitude Modulation A signaling modulation...

Page 32: ...en repaired and or altered by other than manufacturer or authorized service center or D The product s original serial number has been modified or removed or E External equipment other than supplied by...

Page 33: ...oduct warranty extends to the original purchaser only and will be null and void upon any assignment or Aurora Multimedia Corp 205 Commercial Court Morganville NJ 07751 Phone 732 591 5800 Fax 732 591 6...

Reviews: