Haier BH2004D, Service Manual
The Haier BH2004D is a versatile product designed to enhance your home entertainment experience. With its sleek design and user-friendly interface, this television offers crystal-clear picture quality. To ensure you get the most out of your purchase, a free Service Manual is available for download at manualshive.com, providing valuable insights for troubleshooting and maintenance.
Share
Download


Reviews:
No comments
Related manuals for BH2004D
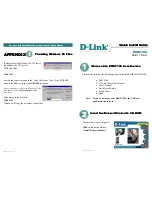
DSB-T100
Brand: D-Link Pages: 2

TY-WK5P1SW
Brand: Panasonic Pages: 11

SelfServ 90
Brand: NCR Pages: 12

DIS-1/S
Brand: dallmeier Pages: 97

UA40B7000WM
Brand: Samsung Pages: 179

UA32C5000QF
Brand: Samsung Pages: 86

39LEDW-K
Brand: Salora Pages: 101

LCM30HD
Brand: Teac Pages: 23

FS5762A1
Brand: Magnavox Pages: 27

FlexVision CTV-5060
Brand: Audiovox Pages: 3

5159
Brand: Palsonic Pages: 19

TFTV555LEDR
Brand: Palsonic Pages: 22

DDQ-20L6SCN
Brand: Daewoo Pages: 45

KALED55UHDZE
Brand: Kogan Pages: 34

TFTV-380
Brand: Palsonic Pages: 26

ATI-TV WONDER VE
Brand: ATI Technologies Pages: 48

QH50B
Brand: Samsung Pages: 99

QH43B
Brand: Samsung Pages: 99


