


22
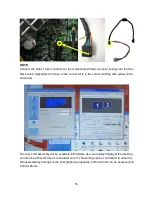
4.), then finally restore the OS image with you disk imaging software.
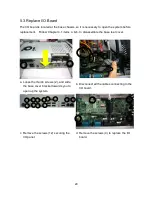
5. System Disassembly
5.1. Replace HDD
a. Loosen the screws (2) that secure the
base rear cover.
b. Slide the base rear cover toward the
back of the terminal.
c. Find the HDD above I/O panel.
d. Pinch and pull the HDD holding bracket
towards you to disconnect the HDD for
the system.
e. For installation, slide the HDD into the
slot till it clicks.
Summary of Contents for Odysse II
Page 1: ...User Manual February 2011 Revision 1 0 ...
Page 8: ...8 e Biometric Reader fingerprint f Customer Display VFD g 2nd Display ...
Page 9: ...9 2 System View 2 1 Front Side view 2 2 Rear view ...
Page 10: ...10 2 3 I O view ...
Page 32: ...32 6 Jumper Settings 6 1 Main Board Layout ...
Page 36: ...36 6 3 Connectors Location ...
Page 44: ...44 Appendix B Dimensional Drawings All dimensions in mm ...
Page 45: ...45 ...


