background image


23 


Turn the rotary knob clockwise or counter-clockwise to increase or decrease the 

value, and push the rotary knob to confirm the value. 


To cancel a band highlight and quit equalizer setup interface, please select “< 

Back” option, don’t turn the knob and then push the rotary knob again. 


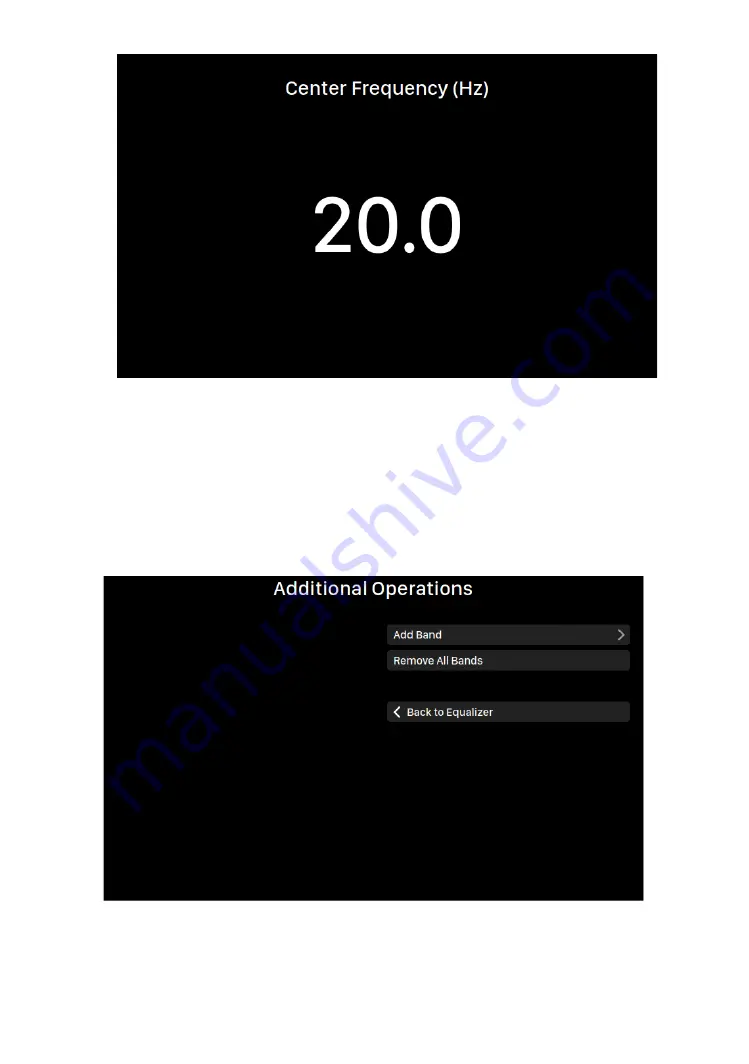
“Additional Operations”

: Access the options to add a band or remove all bands 

at one time: 


o


“Add Band”

: Add a new band to the equalizer. You can add up to 8 bands 

in total.  

Summary of Contents for Sirius G2.1

Page 1: ......

Page 2: ......

Page 3: ... may appear in this manual AURALiC inspire the music Lightning DS Lightning Streaming Tesla Processor Proteus Co Processor Purer Power Smart IR Unity Chassis Unity Chassis II ORFEO and their graphic logos are trademarks or registered trademarks of AURALiC in the United States and or other countries AURALiC s trademarks may not be used in connection with any product or service that is not AURALiC s...

Page 4: ...ate of the art AURALiC Proteus G2 Co Processing Platform which harnesses a Xilinx XC7A200T FPGA chip at its heart bolstered by 512 MB of DDR3 memory This FPGA chip contains more than 200 000 logic cells and 740 DSP slices all combining to provide unparalleled levels of data processing capability SIRIUS G2 1 s computational power and efficiency are achieved in part because of the design decision to...

Page 5: ...3 ...

Page 6: ...r SIRIUS G2 1 16 Power Up and Sleep 16 Home Screen 16 Volume Control 17 Main Menu 18 Resampler Menu 18 Equalizer Menu 21 Speaker Menu 25 Input Menu 26 Output Menu 27 System Menu 28 Smart IR Remote Control 29 Useful Tips 31 Two different USB Outputs 31 DSD has a lower output level than PCM 31 Every DAC has an optimal sampling frequency 31 Different filters for different music 32 There is no passthr...

Page 7: ...Do not use the product near water i e near a bathtub kitchen sink laundry tub in a wet basement near a swimming pool etc l Do not install the product near heat sources such as radiators heat registers stoves or other apparatus that produce heat See Placement and Cabling on page 7 l Do not let objects or liquids fall into the product Do not expose the product to dripping or splashing Do not place a...

Page 8: ...nting these directives 2014 35 EU Low Voltage Directive LVD 2014 30 EU Electromagnetic Compatibility Directive EMC 2012 19 EU Waste of Electrical and Electronic Equipment Directive The following harmonized standards were applied Health and safety of the user EN 60065 2002 A1 2006 A11 2008 A2 2010 A12 2011 Electromagnetic compatibility EN301489 1 V1 9 2 2011 09 EN301489 17 V2 2 1 2012 09 EN55013 20...

Page 9: ... must be done by AURALiC or by an authorized AURALiC repair agency Work done by unauthorized persons will void any and all warranty coverage AURALiC products are uniquely identified with a serial number S N printed on the label attached under the unit This number is required to validate your warranty Please provide AURALiC with the product s serial number if service is required Before the product ...

Page 10: ... SIRIUS G2 1 dissipates up to 40 Watts of power during normal operation It should be installed in a space with at least one inch of clearance above behind and on both sides of its enclosure to provide adequate ventilation Avoid placing it directly above other equipment that produces heat Check Your AC Mains Voltage SIRIUS G2 1 is shipped with its mains voltage preset for operation in the destinati...

Page 11: ... the power cord socket on the back of the unit Please double check the AC mains voltage on the back of the unit before connecting to the power Please make sure to power off all units in your system before any cabling job failure to follow this instruction may result in permanent damage to the device and void any warranty ALWAYS POWER OFF SIRIUS G2 1 BEFORE CABLING AES IN COAX IN and TOS IN For tho...

Page 12: ...ocessor and DAC Lightning Link uses an HDMI type of physical connector but it is neither an HDMI port nor an I2S output Please do not attempt to connect it to any HDMI or I2S device Please see Lightning Link chapter at page 10 for detailed cabling instruction AES OUT COAX OUT and TOS OUT The AES EBU Coaxial and Toslink ports are driven by the same Femto Clock source but are individually buffered T...

Page 13: ...ed for firmware update use To update device firmware when available please connect your SIRIUS G2 1 to the Internet via an Ethernet cable wait for one minute for SIRIUS G2 1 to establish network connection then use the Firmware Update option inside the SYSTEM menu to download the latest firmware Lightning Link Lightning Link is a low jitter bi directional 18Gbps coupling that takes advantage of hi...

Page 14: ...rce Connect all external digital sources to SIRIUS G2 1 s input Analog Source Connect analog source to VEGA G2 1 s analog input VEGA G2 1 s streaming and digital inputs will be disabled automatically when it detects ARIES G2 1 and SIRIUS G2 1 VEGA G2 1 will send its volume status and display settings to SIRIUS G2 1 and ARIES G2 1 when you select Lightning Link as the input and output on those devi...

Page 15: ...er to Smart IR Remote Control on page 28 for detailed instructions You can switch between ARIES streaming source SIRIUS digital sources and VEGA analog input via Lightning DS When accessing ARIES G2 1 s web control interface you can setup SIRIUS G2 1 and VEGA G2 1 using Processor Setup and DAC Setup Connect to ARIES G2 1 G2 Lightning Link Connect ARIES G2 1 and SIRIUS G2 1 using a Lightning Link c...

Page 16: ...d via ARIES G2 1 s Smart IR menu Please refer to Smart IR Remote Control on page 28 for detailed instructions You can switch between the ARIES streaming source and SIRIUS digital sources via Lightning DS When accessing ARIES G2 1 s web control interface you can setup SIRIUS G2 1 using Processor Setup Connect to VEGA G2 1 G2 Lightning Link Connect SIRIUS G2 1 and VEGA G2 1 using a Lightning Link ca...

Page 17: ...y on off volume up down mute unmute and selection of analog source to be assigned via VEGA G2 1 s Smart IR menu Selection of digital sources to be assigned via SIRIUS G2 1 s Smart IR menu Please refer to Smart IR Remote Control on page 28 for detailed instructions Front Panel The front panel of SIRIUS G2 1 Power Button SIRIUS G2 1 will power up automatically after the main power on the back of the...

Page 18: ...l Please refer to Smart IR Remote Control on page 28 for detailed instructions Using your SIRIUS G2 1 Power Up and Sleep SIRIUS G2 1 will power up automatically after the main power on the back of the unit is switched on Push the power button on the front panel briefly to put the unit into sleep mode after it has started To bring the unit back to work from sleep mode please push the power button b...

Page 19: ...e home screen there are two small icons indicating Equalizer and Speakers processing functions status A highlighted icon means the corresponding function has been activated On the right hand side of home screen a small dot with color and letter indicates the current resampler filter setting P Precise D Dynamic B Balance S Smooth You can use Smart IR to assign remote control buttons to quickly swit...

Page 20: ...essing function setup Equalizer Access to the parametric equalizer processing function setup Speaker Access to the speaker compensation processing function setup Reserved A menu option that is currently unavailable Input Select SIRIUS G2 1 s input channel Output Select SIRIUS G2 1 s output channel System Access to the system menu for hardware settings Exit Exit main menu and go back to home screen...

Page 21: ...g five digital filters optimized for the corresponding sampling rates Developed using a combination of objective data models and subjective testing these modes optimize sonic quality for varying music types and formats Precise A traditional filter design using a single filter algorithm for all sampling rates Precise mode provides the most exacting sonic representation of the source material Dynami...

Page 22: ...pling rates Individual Select different output frequencies for each input sampling rate Output Frequency If you have selected Master option as Output Mode you will use this option to select the resampler s output sampling rate If you have selected Individual option as Output Mode you will set output frequency for each of all supported input sampling rates Back to Menu Go back to main menu ...

Page 23: ...ne details on frequency response curve Enable Equalizer Enable disable the parametric equalizer Auto Gain Adjustment Allows the Lightning Streaming device to calculate and adjust the overall equalizer gain to ensure the digital signal level does not exceed 0dBFS at any time We recommend you keep this option on Overall Gain dB When the Auto Gain Adjustment setting is disabled you may adjust the ove...

Page 24: ...s parameters Push the knob without selecting any band to quit this interface When a band is highlighted you can push the rotary knob to activate band mode which allows you to highlight and edit specific parameters of the highlighted band To edit a specific band parameter turn the rotary knob and highlight the parameter then push the rotary knob to enter the editing interface ...

Page 25: ...irm the value To cancel a band highlight and quit equalizer setup interface please select Back option don t turn the knob and then push the rotary knob again Additional Operations Access the options to add a band or remove all bands at one time o Add Band Add a new band to the equalizer You can add up to 8 bands in total ...

Page 26: ...nge the type of an existing band After band type has been selected you will need to enter all parameters of the added band Turn the rotary knob clockwise or counter clockwise to highlight an option and push the rotary knob to enter value Turn the rotary knob clockwise or counter clockwise to increase or decrease the value and push the rotary knob to confirm the value ...

Page 27: ...ows the user to add distance based left and right channel delay as well as change the gain of individual channel to compensate for non ideal speaker placement Turn the rotary knob clockwise or counter clockwise to highlight an option and push the rotary knob to select it ...

Page 28: ...t speaker is closer to the listening position than the right speaker Allows only negative values Right Speaker Distance cm The distance between the right speaker and your listening position in centimeters Right Speaker Gain dB Attenuation of the right channel Use this option if the right speaker is closer to the listening position than the left speaker Allows only negative values Save Save the pre...

Page 29: ...ise or counter clockwise to highlight an input channel and push the rotary knob to select it The L Link Lightning Link input channel will only be available to select when SIRIUS G2 1 is connecting to a music source such as ARIES G2 or ARIES G2 1 using a Lightning Link cable Output Menu ...

Page 30: ... the rotary knob to select it Enable Volume Control Allows volume control of your device If SIRIUS is connecting to ARIES G2 or G2 1 via Lightning Link you will be able to change its volume remotely via Lightning DS software Volume Mode Set up how SIRIUS volume control is working Master Control All input channels share the same volume number Separate Channel Each input channel has its own volume n...

Page 31: ...ction Hardware Information Display device hardware information such as S N and firmware version Language Select a different interface language for your device Firmware Update Check and update device firmware Please make sure your device is connected to Internet Erase All User Settings Erase all settings on your device Your device will reboot automatically when the operation is complete Back to Men...

Page 32: ... a list of controls that can be mapped to any button on your own remote control Please follow the menu guide to complete your remote control setup The following operations are especially useful for SIRIUS G2 1 operation Volume Up Down Mute Unmute Set Precise Dynamic Balance Smooth filter Bypass Resampler Equalizer Speaker Setup ...

Page 33: ...stem DSD has a lower output level than PCM Please keep in mind that any DSD output frequency from SIRIUS G2 1 will have a lower signal level by about 3dB when compared to any PCM output level This is common for the DSD format and is done to prevent overloading during signal processing Because of the signal level difference it is hard to perform an A B comparison between PCM and DSD You will need t...

Page 34: ...y developed by AURALiC which allows you to map your existing IR remote control buttons to operate particular functions of your AURALiC product SmartIR works with most IR remote controls and can come from a TV an AV receiver or many other home appliances You can access SmartIR via SIRIUS G2 1 s SYSTEM menu There is no passthrough mode All signals coming from any input will first be converted into a...

Page 35: ...orized personnel to attempt to repair Do not attempt to service the product yourself any unauthorized repair of the device will void the warranty Before SIRIUS G2 1 can be returned for service an RMA Return Material Authorization number must be issued by AURALiC Contact your dealer or AURALiC for further information Contact If you have any questions please feel free to contact our technical suppor...

Page 36: ...0dB Downsampling to 44 1K 48K Hardware Platform AURALiC Tesla G1 General Control Processor AURALIC Proteus G2 Computing Co Processor Internal Clock Triple Femto Clocks for Digital Outputs USB Host and Proteus G2 Noise Elimination Dual Galvanic Isolation for digital and USB audio outputs Unity Chassis II with copper EMI shieling enclosure Power Supply Triple Channel Purer Power internal linear powe...

Page 37: ...35 AURALiC Product Registration Form Owner Information Your Name Address City Zip Code Country Email Telephone Product Information Product Name Serial Number Dealer Name Purchase Date Purchase Price ...

Page 38: ......

Page 39: ......

Page 40: ...Meet our G2 1 series ...

Reviews: