-16-
English
The Radio Channel Manager
operates in the same way as the TV
Channel Manager. Please refer to
section 7.1.1 for further instructions.
Press
TV/RADIO
to switch between
the TV Channel Manager and the
Radio Channel Manager.
Press
EXIT
to go back to the previous
submenu.
7.1.3 Delete All
Press
MENU
, select
Channel
and
press
OK
. Select
Delete All
and press
OK
.
This option will reset the TV and
Radio channel lists.
Press
OK
, then input the password to
delete all channels.
The default password is 0000.
Select
Yes
to confirm or
No
to cancel.
7.1.4 Channel Play Type
Press
MENU
, select
Channel
and
press
OK
. Then, select
Channel Play
Type
, press
OK
and use ◄ and ► to
change the type of channel displayed
between
All, Free and Scrambled
.
Press
EXIT
to return to the
Channel
submenu.
7.2 Channel Search
Press
MENU
, select
Channel
Search
and press
OK
.
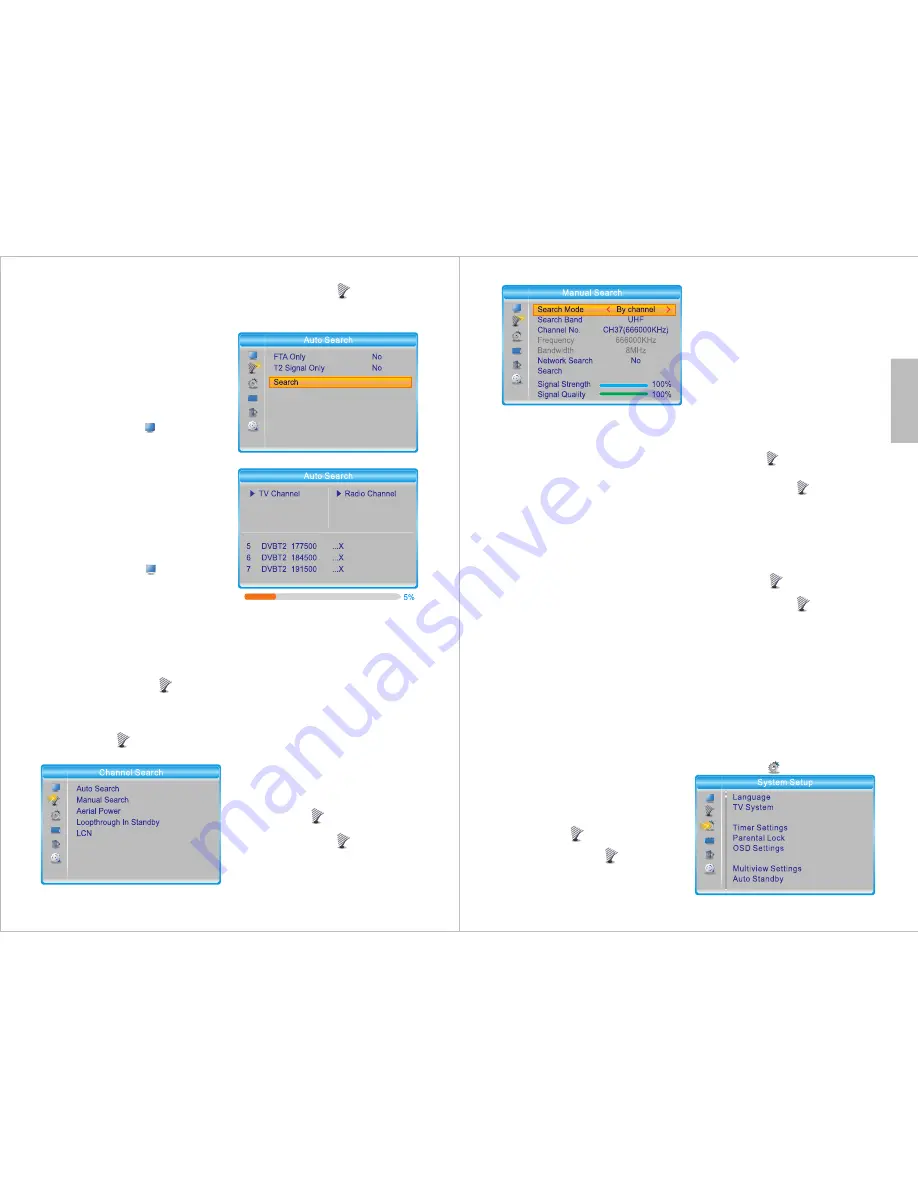
7.2.1 Auto Search
Path
: MENU > Channel Search >
Auto Search
Press
MENU
, select
Channel
Search
and press
OK
. Then, select
Auto Search
and press
OK
.
Use ◄ or ► to alter the selected
setting.
FTA Only
: Enable this option to
search for free to air channels only.
T2 Signal Only
: Enable this option to
search for HD channels only.
Select
Search
and select
Yes
to start
searching or select
No
to cancel.
Note
: When performing a new scan,
the channel list will not be updated
but will be replaced by the channels
that are found.
7.2.2 Manual Search
Path
: MENU > Channel Search >
Manual Search
Press
MENU
, select
Channel
Search
and press
OK
. Then, select
Manual Search
and press
OK
.
-17-
Use ◄ or ► to alter the selected
setting.
Search Mode
: Choose either
By
Channel
or
By Frequency
.
Selecting
By Channel
allows you to
select a channel number and search
for it using the default frequency of
that channel.
Navigate to
Channel No.
and use ◄
and ► to change the channel.
Selecting
By Frequency
allows you to
enter a specific frequency to search.
Navigate to
Frequency
and use the
number keys to enter the desired
frequency.
Network Search
: Enable the
Network Search
option to allow the
DVB425 to search all channels with
ONID (Original Network ID) on the
selected frequency.
Note
: Prior to scanning, a preview of
the signal strength and quality for the
selected channel or frequency will be
displayed on the screen.
Select
Search
and press
OK
to start
scanning.
7.2.3 Aerial Power
The DVB425 can output 5V power
from the coaxial aerial socket. This
allows you to power compatible
indoor amplified aerials.
Path
: Menu > Channel Search >
Aerial Power
Press
MENU
, select
Channel
Search
and press
OK
. Then, select
Aerial Power
and press
OK
.
Note
: DO NOT activate this function if
using a rooftop aerial or if your indoor
aerial is powered by a power adaptor
as it will negatively affect the signal
quality.
7.2.4 Standby Loopthrough
While in standby mode, the DVB425
can provide an antenna point for a
second receiver or TV. Follow the
instructions below to ensure that the
Loopthrough function is enabled, then
connect the second device to the
Antenna Out (Please see section 4.2).
Path
: Menu > Channel Search >
Loopthrough in Standby
Press
MENU
, select
Channel
Search
and press
OK
. Then, select
Loop Through in Standby
and press
OK
. Finally, select
On
to enable the
loopthrough function or
Off
to disable
it.
7.2.5 LCN
Path
: MENU > Channel Search >
LCN
Press
MENU
, select
Channel
Search
and press
OK
. Then, select
LCN
and press
OK
.
LCN
(Logical Channel Number)
provides channel sorting as intended
by the broadcaster 1 = BBC1, 2 =
BBC2 etc.
Enable/disable this function using
◄ / ► to sort channels by LCN.
Tip
: We strongly recommend leaving
this function enabled.
7.3
System Setup
Path
: MENU > System Setup
Favourite
Date/Time Settings


