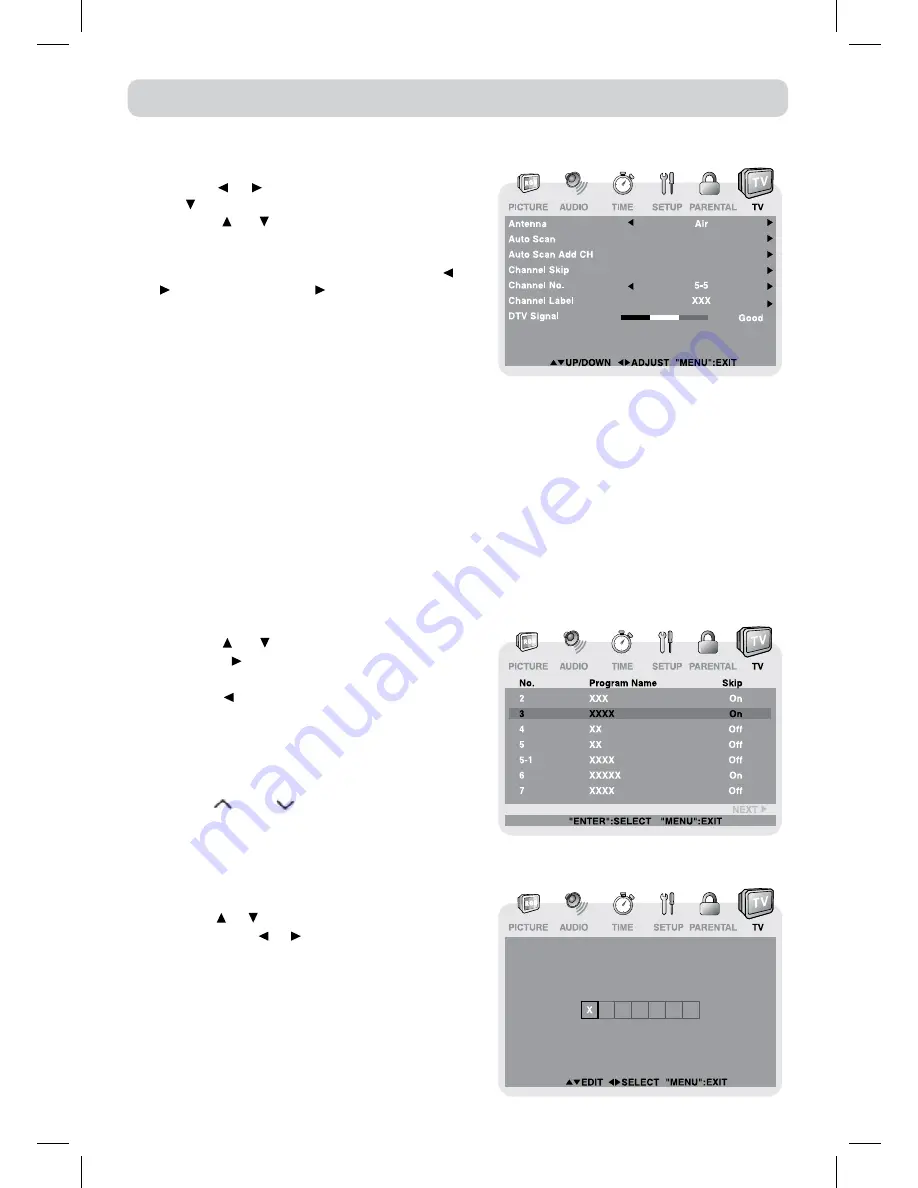
background image

E - 22

TV SETUP

Antenna 


:  Air (over-the-air broadcasts, Ch 2-69) or CATV (cable/satellite broadcasts, 

CH 1-135) mode are available.

Auto Scan 


:  Search for usable stations and store them in memory.

Auto Scan Add CH

  : Search for more usable stations and add them in memory. The stations 

stored before are still kept.

Channel Skip


:  Skip weak channels and the channels you don’t like.

Channel No.


: Select a different TV channel.

Channel Label


: Display and edit the channel label.

DTV Signal


: Display the signal strength (for digital TV channels only). 

TV MENU (For TV Mode Only)

1.  Press the 

MENU

 button.

2.  Use the   or   button to select TV, then press 

the   button to enter the TV settings. 

3.  Use  the    or    button  to  select  the  options 

(

Antenna

Auto  Scan

Auto  Scan Add  CH

Channel  Skip

Channel  No.

Channel  Label 

or 

DTV  Signal

). Adjust  them  using  the    or 

 button, or press the   button to go into the 

detailed settings.

4.  Press the 

MENU

 button to return to the previous 

menu.

5.  Repeat steps 3 and 4 to adjust other options.

6.  To  exit  the  MAIN  MENU  and  return  to  the 

normal screen, press the 

EXIT

 or 

MENU

 button repeatedly.

Channel Skip

1.  Use  the


  or    button  to  select  a  channel. 

(Press the


 button to select the last channel 

of the page; press again to go to the next page. 

Press the


 button to select the first channel of 

the  page;  press  again  to  return  the  previous 

page.)

2.  Press the 

ENTER

 button to shift between On / 

Off. (Select On to skip the selected channel. 

The channel will not appear when you press 

the 

CH 

 / CH 

 button.)

Channel Label

You can edit a label for each channel.

1.  Use the


 or   button to select the number or 

letter. Use the


 or   button to move and edit 

the next character. Press the 

ENTER

 button to 

confirm.

2.  After editing, the Channel and Channel Label 

will be shown on the screen when you press 

the 

DISPLAy

 button.

English P1-32.indd   22

6/11/2008   12:22:28 PM

Summary of Contents for FPE-1908DV

Page 1: ...1 FPE1908DV 19 HD FLAT PANEL LCD TV DVD COMBO OWNER S MANUAL 1 128 8329 FOR ASSISTANCE CALL CUSTOMER SERVICE AT 1 800 645 4994 OR VISIT US AT WWW AUDIOVOX COM English P1 32 indd 1 6 11 2008 12 22 10 P...

Page 2: ...ore of the following measures Reorient or relocate the receiving antenna Increase the separation between the equipment and receiver ConnecttheequipmentintoanACpoweroutlet on a circuit different from t...

Page 3: ...replacement of the obsolete outlet 10 ProtecttheACpowercordfrombeing walkedonorpinchedparticularlyat the plug convenience receptacles and the point where they exit from the apparatus IMPORTANT SAFETY...

Page 4: ...E Menu 19 Setup Menu 19 20 Parental Menu 20 21 TV Menu 22 CD DVD OPERATION 23 24 Playing a Disc 23 Playing a Picture File Disc 23 Pausing Playback Still Mode 23 Stopping Playback 23 Skipping to a Diff...

Page 5: ...the button to select Yes Press the ENTER button to proceed with the initial setup 2 Use the button to select Antenna then press the button to select Air or CATV 3 Use the button to select Auto Scan t...

Page 6: ...ple camera angles Region code indicator Notes on Copyright It is forbidden by law to copy broadcast show broadcast on cable play in public or rent copyrighted material without permission Apparatus Cla...

Page 7: ...explode GETTING STARTED CAUTION Danger of explosion if battery is incorrectly replaced Note If the remote control is not going to be used for a long time remove the batteries to avoid damage caused by...

Page 8: ...apters or tracks on a disc 10 SUBTITLE Button Press to select one of the subtitle languages programmed on a DVD 11 ANGLE Button Press to switch the camera angle of the video presentation when scenes w...

Page 9: ...ton Press to perform slow forward playback of a DVD 25 DVD MENU Button Press to enter the main menu of the DVD 26 SETUP Button Press to enter and exit the SETUP menu of the DVD 27 A B Button Press to...

Page 10: ...hannel Button Press to select previous chapters or tracks on a disc Button Press to select the next title chapter or track on a disc 8 VOL Controls Press to adjust the volume level 9 STANDBY Indicator...

Page 11: ...IN Jack AV IN 18 AUDIO IN Jacks Left Right AV IN 19 MONITOR VGA Jack PC IN 20 AUDIO Jack PC IN 21 COMPONENT VIDEO IN Jacks Y PB PR YUV IN 22 AUDIO IN Jacks Left Right YUV IN 23 S VIDEO Jack AV IN 24 H...

Page 12: ...and S VIDEO cable not included as shown Make sure you connect the cable from the other equipment AUDIO OUT and S VIDEO OUT to this unit AUDIO IN and S VIDEO IN Note Please refer to the user manual for...

Page 13: ...and VIDEO IN Note Please refer to the user manual for the other equipment for more information Connecting a VCR PVR Camcorder Connect the AUDIO VIDEO cable not included as shown Make sure you connect...

Page 14: ...MPONENT VIDEO IN and AUDIO IN YUV IN May require a subscription for receiving HD channels Check with your cable satellite service provider for details To AUDIO IN jacks YUV IN To AUDIO OUT jacks To CO...

Page 15: ...re all components are connected correctly When you are not going to use the unitforalongperiodoftime disconnect the AC power cord Connect the AUDIO cable not included as shown Make sure you connect th...

Page 16: ...rotected at all times when removing the base stand Be sure that nothing hard or sharp or anything that could scratch or damage the LCD display come in contact with it Do NOT place pressure on the fron...

Page 17: ...recorded with Dolby Digital Not all Dolby Digital sources are recorded with 6 channels Some sources marked Dolby Digital may be recorded in Dolby Surround a 2 channel system Look for this logo on you...

Page 18: ...of the picture toward purple toward green Color Adjust the color of the picture AUDIO MENU 1 Press the MENU button 2 Use the or button to select Audio then press the button to enter the Audio settings...

Page 19: ...ime Clock Display the current time setup MENU 1 Press the MENU button 2 Use the or button to select SETUP then press the button to enter the SETUP settings 3 Use the or button to select the options OS...

Page 20: ...ect the digital closed caption or turn it off Digital Caption Style Select As Broadcaster to use the default digital caption style of the broadcaster Select Custom to activate the caption style items...

Page 21: ...oned TV MA Mature Audience Only N A Not rated G GENERAL AUDIENCES Suitable for all ages PG PARENTAL GUIDANCE SUGGESTED Some material may not be suitable for children PG 13 PARENTS STRONGLY CAUTIONED S...

Page 22: ...he or button or press the button to go into the detailed settings 4 Press the MENU button to return to the previous menu 5 Repeat steps 3 and 4 to adjust other options 6 To exit the MAIN MENU and retu...

Page 23: ...and gently push it onto the spindle with the label side facing the front until you hear a click 3 Push the door gently to close it The picture files on the disc will be displayed one by one automatica...

Page 24: ...shown in the example 2 Press the SUBTITLE button repeatedly to select the desired subtitle language Note If only one language is recorded the language does not change About two seconds later playback...

Page 25: ...mbers you can locate a specific title by directly selecting a title number 1 In STOP mode press the GOTO button 2 Press the or button to highlight a specific field and press the corresponding number b...

Page 26: ...layed repeatedly Repeating aN ENTIRE DISC 2 While the disc is playing press the REPEAT button until the indicator displays on the screen The entire disc is played repeatedly To resume normal playback...

Page 27: ...n press the ENTER button to confirm 4 Press the button to go back to the previous menu Repeat steps 2 and 3 to adjust other options 5 To exit the SETUP MENU and return to the normal screen press the S...

Page 28: ...s to the factory default TV type Pan Scan When wide screen video is played this mode clips the right and left sides of the image so that it can be viewed on a conventional screen Some wide screen DVDs...

Page 29: ...light or excessive heat Clean the disc before playback Wipe the disc from the center outward with a cleaning cloth NEVER use solvents such as benzine or alcohol to clean the disc MAINTENANCE SYMPTOM C...

Page 30: ...olume Make sure the antenna or audio video source device is working properly Make sure all cables are firmly connected Check for local interference Colored patches of picture Make sure there are no un...

Page 31: ...E 31 Unit INCH English P1 32 indd 31 6 11 2008 12 22 32 PM...

Page 32: ...E 32 Printed in china 811 319991W150 English P1 32 indd 32 6 11 2008 12 22 32 PM...

Reviews: