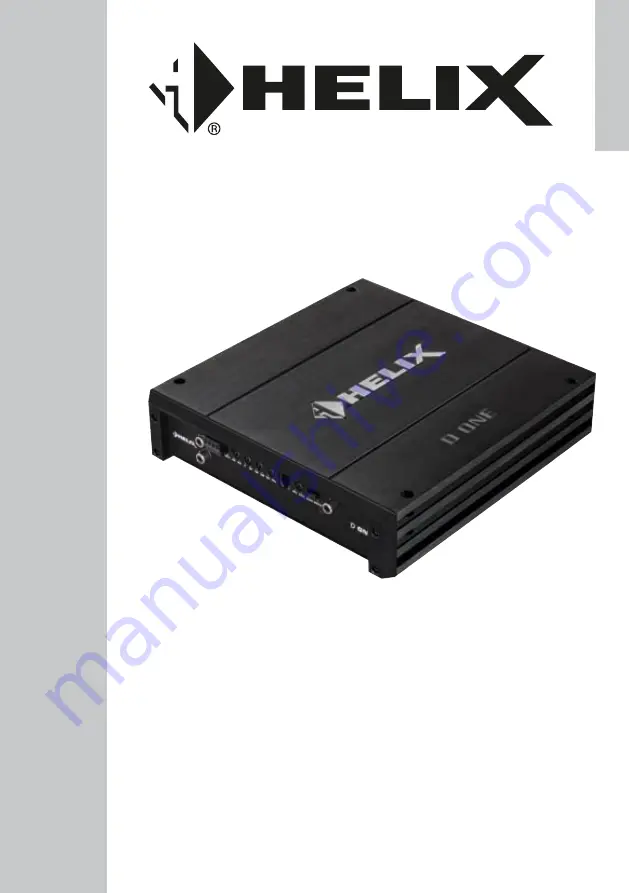
D ONE
1-Kanal Class D Verstärker
1-channel Class D amplifier
deutsch / english
Page 1: ...D ONE 1 Kanal Class D Verstärker 1 channel Class D amplifier deutsch english ...
Page 2: ...heit muss der Verstärker professionell befestigt werden Dieses geschieht über Schrauben die in eine Montagefläche ein geschraubt werden die wiederum genügend Halt bieten muss Bevor Sie die Schrauben im Montagefeld befesti gen vergewissern Sie sich dass keine elektrischen Kabel und Komponenten hydraulische Bremslei tungen der Benzintank etc dahinter verborgen sind Diese könnten sonst beschädigt wer...
Page 3: ...pegel Lautsprechereingang zum An schluss von Werksradios oder Radios ohne Vorverstärkerausgänge 3 Level Input Regler zum Einstellen der Eingangsempfind lichkeit des Line und Highlevel Inputs 4 Phase Shift Regler zum Einstellen der Phase von 0 bis 180 5 Bass Boost Regler zum Einstellen der Bassanhebung von 0 bis 12 dB 6 Subsonic Regler zum Einstellen des Subsonicfilters von 10 Hz bis 50 Hz 7 Remote...
Page 4: ...nge ist nicht möglich und kann zu Schäden an Ihrem Auto radio führen 3 Level Input Mit Hilfe dieses Reglers kann die Eingangsempfind lichkeit an die Ausgangsspannung des angeschlos senen Radios angepasst werden Dieser Regler ist kein Lautstärkeregler sondern dient nur der Anpassung Der Regelbereich des Cinch Eingangs Line Input liegt zwischen 0 5 6 Volt und 1 14 V für den Hochpegeleingang Highleve...
Page 5: ...odus werden dabei deaktiviert Achtung Bitte immer darauf achten das ein Ver stärker auf Master und der andere auf Slave ge schaltet ist In diesem Modus liegt die Minimalim pedanz bei 2 Ohm Hinweis Wird der Verstärker einzeln betrieben muss die Schalterstellung Master gewählt werden Konfigurationsbeispiele finden Sie auf Seite 7 ff 10 Mono Cinch In Output Dieser Anschluss dient als Signalein oder a...
Page 6: ...lung der Eingangsempfindlichkeit Achtung Es ist zwingend notwendig die Eingangsempfindlichkeit der D ONE an die Signalquelle anzupassen um Schäden am Verstärker zu vermeiden Um die Eingangsempfindlichkeit zu verändern verwenden Sie den Drehregler siehe Seite 4 Punkt 3 Level Input Die Einstellung dieses Reglers beeinflusst sowohl die Vorverstärker eingänge Line Input als auch die Hochpegel Lautspre...
Page 7: ... Seite 5 Punk 9 Master Slave Modus 2 Stellen sie den Master Slave Modus Schal ter des anderen Verstärkers auf Slave 3 Verbinden Sie mit einem Cinchkabel den Mono Cinch In Output der beiden Verstär ker siehe Seite 10 Punkt 10 Mono Cinch In Output 4 Nehmen Sie sämtliche Filtereinstellungen am Master Verstärker vor Alle Filterein stellungen des Verstärkers im Slave Modus werden automatisch deaktivier...
Page 8: ...oppelschwingspule Dual Voice Coil Reihenbetrieb Zwei Subwoofer mit einer Schwingspule Single Voice Coil oder ein Subwoofer mit Doppelschwingspule Dual Voice Coil werden in Reihe geschaltet Hinweis Die Reihenschaltung von zwei Schwingspulen führt zur Verdopplung der Impedanz Maximale Ausgangsleistung dieser Konfiguration Zwei Subwoofer mit 1 x 2 Ohm entsprechen einer Gesamtimpedanz von 4 Ohm 200 40...
Page 9: ... Konfiguration miteinander verbunden werden Hierzu sollte der selbe Kabelquer schnitt gewählt werden welcher auch für den Anschluss des Subwoofers genutzt wird Master Slave Ein Subwoofer mit Doppelschwingspule Dual Voice Coil Maximale Ausgangsleistung dieser Konfiguration 2 x 4 Ohm 400 800 Watt 2 x 2 Ohm 680 1 360 Watt 2 x 1 Ohm 1 060 2 120 Watt Hinweis Bei diesem Konfigurationsbeispiel ist auch i...
Page 10: ... 30 A Maxi Stecksicherung FK3 Abmessungen H x B x T 53 x 250 x 230 mm Zusätzliche Features Aktive regelbare Frequenzweiche Bass Boost Phase Shift Master Slave Modus Schalter Highlevel Eingang mit automatischer Einschaltung und Advanced Diagnostics Error Protection ADEP Basspegel Kabelfernbedienung Technische Daten Die Garantieleistung entspricht der gesetzlichen Regelung Von der Garantieleistung a...
Page 11: ... Before mounting carefully examine the area around and behind the proposed installation location to ensure that there are no electrical cables or components hydraulic brake lines or any part of the fuel tank lo cated behind the mounting surface Failure to do so may result in unpredictable damage to these com ponents and possible costly repairs to the vehicle General instruction for connecting the ...
Page 12: ... a factory radio or an aftermarket radio without lowlevel line outputs 3 Level Input Control for adjusting the input sensitivity of the lowlevel Line and Highlevel Inputs 4 Phase Shift Control for adjusting the phase from 0 to 180 5 Bass Boost Control for adjusting the bass boost from 0 to 12 dB 6 Subsonic Control for adjusting the subsonic filter from 10 to 50 Hz 7 Remote Input for connecting the...
Page 13: ...ge to the lowlevel line outputs of your car radio 3 Level Input This control is used to adapt the input sensitivity to the output voltage of the connected signal source This is not a volume control it s only for adjusting the amplifier gain The control range of the RCA Line Input lowlevel is 0 5 6 Volts and 1 14 Volts for the Highlevel Input If the Highlevel Input is used in combination with a sta...
Page 14: ... Output This connector serves as signal in or output for connecting a further D ONE amplifier in bridge mode see page 14 item 9 Master Slave Mode 11 Speaker Output Speaker outputs to connect a subwoofer The minimum load impedance must not be lower than 1 Ohm 2 Ohms in Master Slave Mode 12 Power Protect LED The power and protect LED indicates the operating mode of the amplifier Green The amplifier ...
Page 15: ...D ONE to the sig nal source in order to avoid damage to the amplifier If you want to change the input sensitivity use the Level Input control see page 13 item 3 Level Input The setting of the control affects both the lowlevel line inputs Line Input and the highlevel speaker inputs Highlevel Input If the High level Input is used in combination with a standard car radio we recommend an in put sensit...
Page 16: ...All filter adjustments of the amplifier which operates in Slave mode will be deactivated Examples of configurations can be found on page 18 7 Connecting the loudspeaker outputs The loudspeaker outputs can be connected directly to the wires of the loudspeakers Note Outputs are wired in parallel internally This means that both plus outputs and both minus outputs deliver the same output sig nal Never...
Page 17: ...shutdown of the amplifier In series Two subwoofers with one voice coil single voice coil or one subwoofer with dual voice coil are connected in series Note The connection of two voice coils in series will re sult in doubling the impedance Maximum output power of this configuration Two subwoofers with 1 x 2 Ohms correspond to a total impedance of 4 Ohms 200 400 Watts One subwoofer with 2 x 2 Ohms a...
Page 18: ...rs have to be connected by using a speaker wire The size should be similar to the speaker wires which are used for the subwoofer connection Master Slave One subwoofer with dual voice coil dual voice coil Maximum output power of this configuration 2 x 4 Ohms 400 800 Watts 2 x 2 Ohms 680 1 360 Watts 2 x 1 Ohm 1 060 2 120 Watts Note In this configuration example an 1 Ohm configura tion in Master Slav...
Page 19: ...Ohm 1 x 530 1 060 Watts Amplifier technology Class D Inputs 2 x RCA Cinch 2 x Highlevel speaker input 1 x Remote In 1 x Remote control input Outputs 1 x Speaker output Frequency response 10 Hz 250 Hz Bass boost 0 12 dB 45 Hz Lowpass 50 Hz 250 Hz adjustable Bandpass 10 Hz 250 Hz adjustable Subsonic 10 Hz 50 Hz adjustable Phase 0 180 adjustable Slope subsonic lowpass 12 dB Oct Distortion THD 0 25 Si...
Page 20: ...Audiotec Fischer GmbH Hünegräben 26 57392 Schmallenberg Germany Tel 49 2972 9788 0 Fax 49 2972 9788 88 E mail helix audiotec fischer com Internet www audiotec fischer com ...